GTA retaining wall project planning is the coordinated process of assessing grade, soil, drainage, utilities, permits, and materials to design a stable wall that fits your Mississauga property. It aligns engineering basics with local workflows so the wall resists frost, controls runoff, and integrates with your landscape for decades of service.
By HR Greenroots Landscaping • Visit our website
Last updated: 2026-06-26
Quick Summary
Plan your retaining wall by clarifying purpose, height, alignment, and drainage up front. Document utilities, confirm soil, pick an appropriate wall type, and align permits and scheduling. In our experience, projects with this prep cut change orders dramatically and speed up installation by several days once ground breaks.
Most walls fail on paper before they fail on site. Clear goals, a measured grade profile, and a drainage sketch prevent rework. Below you’ll find a complete planning workflow, Ontario-cold-climate best practices, and practical examples from HR Greenroots Landscaping’s design–build projects across Mississauga and the GTA.
- What retaining wall planning is and why it matters in the GTA
- Step-by-step workflow from site walk to final compaction
- Wall types compared for height, style, and maintenance
- Drainage, base prep, and geogrid fundamentals
- Permits, utilities, inspections, and sequencing with other work
- Mississauga-specific notes plus a soft, consultative checklist
What is retaining wall project planning?
Retaining wall project planning defines the wall’s job, maps site constraints, and translates them into a buildable design. It captures purpose, wall height, soil behavior, drainage paths, utilities, access, and aesthetics so materials, labor, and scheduling line up for a predictable, code-aware build.
In plain terms, planning is your blueprint for a wall that won’t move, lean, or drain poorly. We document at least five essentials on every Mississauga visit: measured slope (in percent), anticipated wall height, soil type and bearing, runoff direction, and access for excavation and aggregate delivery.
- Purpose and loads: Garden terrace? Parking pad edge? Play area? The use guides block choice and reinforcement intervals.
- Measured height: Even an 18–30 inch wall needs proper base and drainage; taller walls often require geogrid reinforced soil.
- Soil type: Clay holds water; clean granular soils drain. We document at least a 12–18 inch backfill zone of 3/4-inch clear stone.
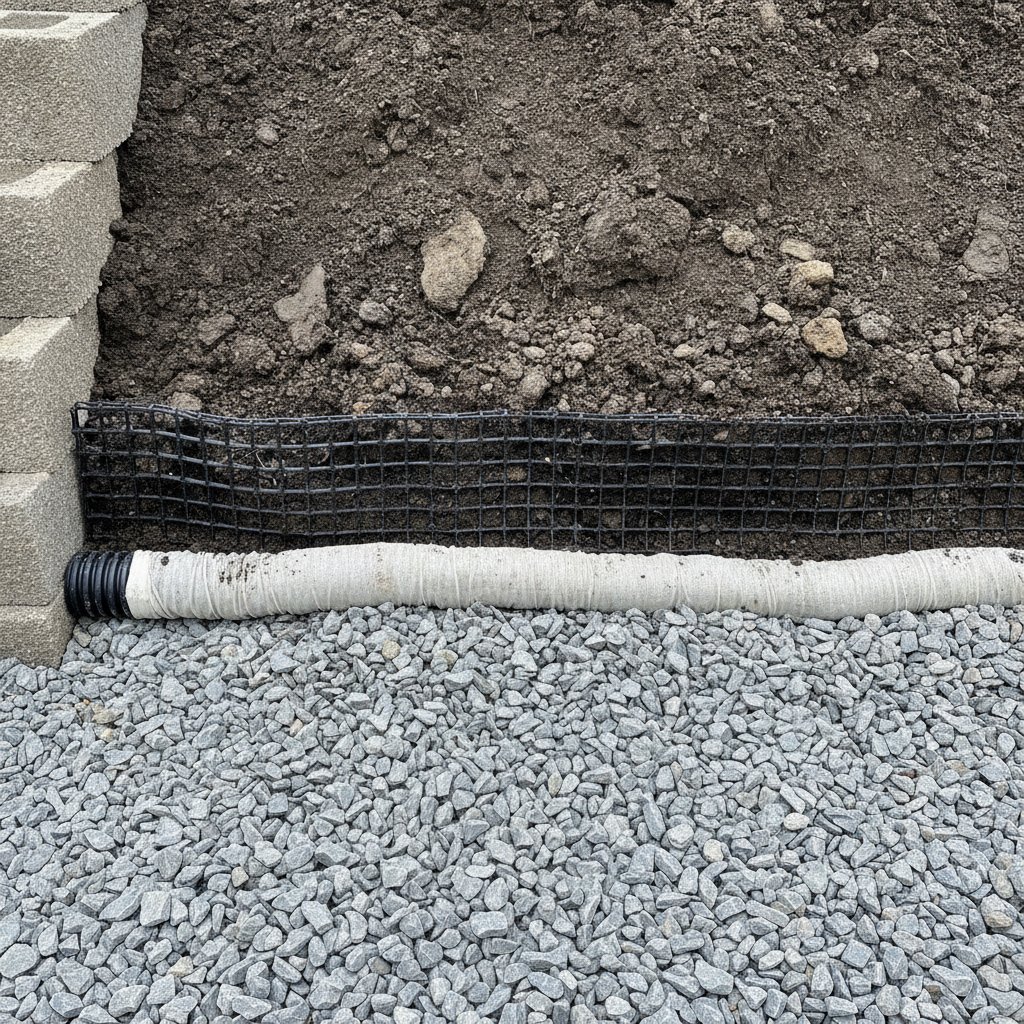
- Drainage concept: A perforated pipe wrapped in a sock, pitched 1% to daylight, removes hydrostatic pressure that topples walls.
- Access and sequencing: Where will excavated soil go? Can a mini skid steer reach? Coordination avoids slow hand-digging.
GTA retaining wall project planning formalizes these decisions before a single block is ordered. That’s how we avoid mid-project pivots and keep your lawn, interlock, or deck plans on schedule.
Why planning matters in the GTA
Cold winters, clay-rich soils, and tight urban lots make GTA walls uniquely demanding. Good plans account for frost heave, positive drainage, and access constraints. The result: straighter walls, fewer callbacks, and landscape zones that stay usable through spring thaws and summer storms.
Here’s the thing: frost lifts saturated soils. If base layers are too thin (under 6 inches) or fines are trapped, heave can tilt a wall in one season. We specify a compacted granular base 6–8 inches thick minimum, up to 12 inches for taller or vehicle-adjacent walls, with at least the bottom course buried 6–10% of wall height.
- Freeze–thaw reality: Expect 60–120 freeze–thaw cycles in a typical Ontario winter. Designs that drain win every time.
- Runoff intensity: One inch of rain on 500 sq. ft. is over 300 gallons; tight lots need clear water paths to daylight.
- Urban access: Narrow side yards often cap equipment width at 36 inches; plan soils/aggregate staged in smaller loads.
- Aesthetics that last: Clean edge control and cap alignment keep the wall reading “new” far longer.
Local considerations for Mississauga
- Seasonal: Aim earthworks between late April and mid-October, when soils are workable and compaction reaches 95%+ density more consistently.
- Landmarks and logistics: Properties near Saigon Park often have higher water tables; establish daylight outlets early if feasible.
- Campus adjacencies: Around Lambton College, plan deliveries to avoid peak traffic hours; equipment staging plans save hours on site.
Thoughtful planning upfront often removes an entire workday from installation while improving tolerance to seasonal movement. That’s real durability.
How planning works: step-by-step
Document a to-scale site sketch, mark proposed wall alignment and heights, confirm soils, and design drainage and reinforcement. Sequence excavation, base, block courses, geogrid intervals, and backfill. Align permits and utility locates before mobilization to keep the build clean and efficient from day one.
Below is the repeatable workflow we use across Mississauga. Use it as your checklist—then lean on our crew where it saves you time.
- Discovery and intent: Confirm wall purpose, target height, and adjacent uses (parking, play, planters).
- Field measurements: Shoot grades and map a centerline. A simple 1% fall away from the wall sheds water.
- Utility locates: Call before you dig. We avoid surprises by flagging services and planning safe offsets.
- Drainage design: Perforated pipe behind the first course, 1% pitch to daylight or a dry well; weep outlets every 25–40 feet.
- Base section: Excavate to stable subgrade; add 6–8 inches of compacted granular base (or more) and set the first course level.
- Reinforcement: For taller segments, place geogrid every 2–3 courses, extending 0.6–0.8× the wall height into the backfill.
- Backfill lifts: Use 3/4-inch clear stone in 6–8 inch lifts; compact each lift to refusal for a tight, free-draining zone.
- Capping and edges: Adhere caps with a flexible construction adhesive; maintain clean lines and consistent overhangs.
- Surface water control: Swales, downspout extensions, and grade breaks keep surface flow from loading the wall.
- Punch list and photos: Verify level, batter, cap bond, outlets, and cleanup; document for maintenance planning.
For deeper dives, see our retaining wall drainage guide and this primer on retaining wall or grading first. Locking down drainage and grade order prevents callbacks and lawn damage later.
Types of retaining walls and materials
Choose a wall type based on height, loads, and style: modular concrete block for versatility, armor stone for natural mass, timber for rustic looks, or poured-in-place concrete for sleek strength. Match the system to drainage and soil so the structure stays straight and low-maintenance.
There’s no one-size wall. We match materials to function and setting, then detail drainage and geogrid to suit. Below is a quick comparison table we use during Mississauga consultations.
Wall type Ideal height range Key strengths Planning considerations Modular concrete block (segmental) 1–6 ft (higher with engineering) Versatile, clean caps, engineered systems Requires level first course, geogrid at set intervals Armor stone 1–5 ft Natural look, heavy mass resists movement Equipment access needed; irregular faces require skilled set Timber (treated) 1–4 ft Warm, rustic, fast to install Lifetime limited by wood exposure; robust drainage essential Poured-in-place concrete 2–8 ft (engineered) Sleek appearance, continuous structure Formwork and reinforcement; control joints and drainage pathsFor style guidance, explore our notes on how to choose retaining wall materials and a deeper look at best materials for Ontario walls. For a broader regional perspective on layout thinking, you can also review this design ideas overview.
Engineering, drainage, and base
Stable walls start with a compacted granular base, free-draining backfill, and a perforated pipe pitched 1% to daylight. Taller walls add geogrid layers every 2–3 courses to extend the resisting mass. Embed the first course 6–10% of wall height to fight frost and toe kickout.
Drainage is the silent hero. We use 3/4-inch clear stone behind the wall for 12–18 inches, separated from native soils with a geotextile to prevent fines migration. Weep outlets at 25–40 foot intervals and at low points reduce hydrostatic pressure that otherwise pushes on the face.
- Base course: 6–8 inches (or more) of compacted granular “A” or equivalent, laser-leveled before placing the first block course.
- Backfill lifts: 6–8 inch lifts compacted to refusal; compaction energy matters more than time spent.
- Geogrid: Typical grid length is 0.6–0.8× wall height; follow the manufacturer’s chart for spacing by block system.
- Surface water: Keep downspouts 6–10 feet away or pipe under walkways; never let roof water load the wall zone.
Want to visualize water paths and outlet spacing? Our team outlines them in your drawing package and references this deeper drainage guidance before we break ground.
Permits, utilities, and inspections
Secure utility locates, confirm property lines and easements, and align with municipal requirements before digging. In many GTA contexts, walls above a certain height or supporting structures trigger engineering review. Advanced prep avoids stop-work delays and keeps your schedule intact.
Property contexts vary, but the planning rhythm doesn’t. We begin with utility locates and a property survey reference. If a wall exceeds typical thresholds or supports driveways, we coordinate an engineer’s design that specifies grid spacing, surcharge limits, and bearing capacities.
- Utility locates: Plan for several business days; mark offsets on the site sketch to keep the crew efficient.
- Property research: Check for easements and drainage swales; never block a neighbor’s overland flow.
- Engineering triggers: Height, proximity to structures, and vehicle loads often require sealed drawings.
- Inspections: When required, schedule visits at base and reinforcement stages; photos help document compliance.
Not sure if your plan crosses a threshold? We’ll flag it during our design consult and coordinate the right professionals so your project moves ahead smoothly.
Integrating your wall with sod, interlock, and decks
Plan the wall alongside sod, interlock, and decks so grades, edges, and access align. Set final elevations early, then stage work: wall first, then base courses for pavers, followed by sod. This sequencing protects finishes and delivers clean, durable transitions.
Walls rarely live alone. On many Mississauga projects we rebuild a slope, then extend a paver patio and refresh sod to lock in clean circulation. The trick is protecting finished surfaces: we stage aggregates and equipment routes so caps and pavers don’t get scuffed by wheelbarrows.
- Lock final grades before caps; it’s easier to add a shim of bedding sand than to reset courses later.
- Run lighting conduit or sleeve paths while the backfill is open; retrofits are messy.
- Coordinate deck footings and wall geogrid so they don’t occupy the same soil zone.
For design thinking that ties all zones together, skim our retaining wall design overview and our notes on material selection. For additional walkway planning angles, here’s a succinct patio and walkway planning read that pairs nicely with wall layouts.
Free Planning Call (15 minutes): Share your wall height, length, and a few photos. We’ll advise on drainage, geogrid triggers, and sequencing with interlock or sod—no obligation.
Book a quick consult and get a right-sized game plan for your yard.
Budget, scope, and scheduling (no prices)
Align budget to scope by clarifying height, length, access, and finishes. The big drivers are excavation volume, base thickness, reinforcement needs, and tie-ins to patios or steps. A clear sequence reduces staging hours and weather risk, which streamlines your calendar without compromising quality.
We don’t publish price lists because every site is different. Instead, we model scope variables with you and recommend approaches that protect longevity and reduce maintenance. Typical schedule windows for single walls fall between a few days and a couple weeks depending on length, height, and access constraints.
- Scope drivers: Wall length and height, soil export, base thickness, reinforcement, and cap/detail complexity.
- Access impact: 36-inch pathways may require compact equipment and more labor for aggregates and block staging.
- Weather windows: Spring through early fall offers best compaction and curing conditions for reliable results.
- Adjacent work: Coordinating pavers, steps, and lighting can consolidate mobilizations and shorten overall timelines.
If you want a conceptual breakdown of scope considerations without numbers, our team can walk you through examples from similar Mississauga properties. For a high-level overview of how scope varies across the region, here’s a concise service overview from another GTA provider you can compare conceptually.
Tools and resources we use
Successful wall builds combine accurate layout tools, compaction equipment, and clean aggregates. We rely on laser levels, plate compactors, mini skid steers, geotextiles, geogrid, and 3/4-inch clear stone—plus a job plan that sequences materials and labor so crews stay efficient and surfaces stay clean.
Tools are only as effective as the plan behind them. We stage pallets by course, aggregate by zone, and geogrid by interval so the crew follows the same rhythm on every site. That assembly-line consistency is why our caps line up and edges read crisp years later.
- Layout: Laser level, string lines, marking paint, and tapes confirm elevation and batter before the first block.
- Excavation: Mini excavator or skid steer sized to access; trench shovels and tampers for final touches.
- Compaction: Plate compactors and jumping jacks to densify subgrade and base in 6–8 inch lifts.
- Drainage materials: Perforated pipe with sock, 3/4-inch clear stone, and weep outlets to daylight.
- Reinforcement: Geogrid matched to the chosen block system’s design charts.
- Protection: Edge guards and plywood tracks to keep pavers, turf, and beds clean during the build.
Want a deeper concept-to-detail handoff? Pair this section with our retaining wall design overview and our Ontario materials guide.
Case studies: Mississauga retaining walls
Real sites prove the plan. These Mississauga examples show how purpose, drainage, and sequencing shape results. Each outcome follows the same playbook: stable base, free-draining backfill, and clean tie-ins to lawns and pavers so the yard looks intentional on day one and easy to maintain later.
Backyard play terrace with interlock tie-in
A family needed a level zone for a swing set and a grill. We designed a 36-foot modular block wall at 30 inches average height, embedded one course, added a perforated drain pitched 1% to daylight, and extended geogrid every third course. We then installed a paver landing and refreshed sod, sequencing wheelbarrow routes to avoid scuffing caps.
- Base: 8 inches compacted; first course buried 3–4 inches to fight frost.
- Backfill: 3/4-inch clear stone, 12–16 inches behind the wall, geotextile to separate fines.
- Finish: Clean caps, edge control around lawn, and a mulch refresh to reduce weeding.
Driveway edge reinforcement and steps
A sloped side yard narrowed a driveway. We built a 42-foot segmental wall with integrated steps, designed for occasional vehicle loading. Grid layers extended about 0.7× wall height. We tied into a new paver walk, keeping downspouts extended 8–10 feet so roof water never pressurized the backfill.
- Access: 36-inch path required compact equipment and staged aggregates.
- Drainage: Weep outlets spaced about every 30 feet; one low-point outlet to daylight.
- Result: Two usable parking spots and safe winter egress without rutting the lawn.
Naturalized armor stone garden tiers
For a homeowner who preferred a softer look, we placed armor stone in two low tiers totaling 4 feet of rise. The mass of each stone, combined with 8–10 inches of compacted base and 12 inches of free-draining backfill, delivered stability with a natural profile that pairs well with perennials.
- Stone selection: Varied depths for stable bearing; faces aligned for consistent reveals.
- Planting: Drought-tolerant layers reduce maintenance and add seasonal color.
- Outcome: Gentle terraces with excellent overland flow, even during heavy rains.
For even more planning context across the region, this short design ideas piece offers a useful complement to our Mississauga-specific approach.
Retaining wall planning FAQ
Most GTA homeowners ask about wall height limits, drainage details, and how walls coordinate with patios or lawns. The answers below cover utility locates, geogrid triggers, and sequencing so your wall integrates cleanly with sod, interlock, and decks.
How high can I build a retaining wall without engineering?
It depends on site context. Short garden walls often proceed with standard details, while taller walls, walls near structures, or walls supporting driveways typically require an engineer’s design. We’ll flag thresholds during planning and coordinate sealed drawings when needed.
Do I need a drain pipe behind my wall?
Yes, a perforated pipe pitched about 1% to daylight relieves hydrostatic pressure. Combine it with 12–18 inches of free-draining 3/4-inch clear stone and weep outlets at intervals. Good drainage is the number one factor in long-term wall stability.
What’s the right order if I’m adding a patio and new sod too?
Build the wall first, then complete any sub-base and paver setting beds, and finish with sod. Agree on final elevations early and keep equipment routes off finished surfaces. This sequencing protects caps and edges, prevents ruts, and speeds final cleanup.
How do I keep surface water from overloading the wall?
Direct downspouts 6–10 feet away or pipe them through controlled routes. Add shallow swales and grade breaks to steer heavy rainfall. The goal is to stop roof and overland flow from saturating the backfill or pooling at low points.
Key Takeaways
Define purpose and height, design drainage, and sequence work. Reinforce taller walls with geogrid, embed the base course, and protect finished surfaces by planning access. Align utilities and engineering up front to keep your Mississauga project efficient, durable, and maintenance-friendly.
- Planning beats patching—measure grades and map drainage first.
- Base, backfill, pipe, and outlets do most of the structural work.
- Choose wall types to match loads, looks, and maintenance goals.
- Integrate with pavers, steps, lighting, and lawn for a cohesive yard.
- Schedule during workable soil windows for better compaction and finish.
Conclusion: Plan once, build for decades
A retaining wall that survives winters and storms is designed on paper first. Clarify purpose, confirm soils, and plan drainage and reinforcement. When the build begins, every hour feels smoother—and the wall looks straight, drains well, and integrates with your landscape for the long haul.
If you’re mapping grades in Mississauga and want a second set of eyes, we’re happy to help. Our design–build team handles walls, interlock, sod, decks, and more—coordinated so the space looks intentional on day one and stays sharp through the seasons.
Next step: Book a discovery session in Mississauga. Share photos and a rough sketch; we’ll return a right-sized plan with drainage, reinforcement notes, and a suggested sequence.
Related Planning Topics
Good planning connects the dots across your yard. As you finalize wall details, think about patio elevations, lawn refresh timing, and bed edges. A cohesive plan reduces maintenance and keeps movement through the space natural and safe.
We often package retaining walls with walkway pavers, driveway extensions, and sod installation. When designed together, transitions stay crisp and water management becomes simpler—making the entire landscape easier to care for.