Retaining wall design is the planned engineering and layout of structures that hold back soil on a slope to prevent erosion and failure. In Mississauga and the broader GTA, well-designed walls manage grades, protect foundations, and unlock usable yard space. HR Greenroots Landscaping designs and builds walls that integrate drainage, base prep, and planting for durable results.
By HR Greenroots Landscaping • Last updated: 2026-04-28
Quick Summary and Table of Contents
This complete retaining wall design guide explains what walls do, why they matter, and exactly how they’re built to last in Southern Ontario conditions. You’ll learn wall types, drainage, base prep, geogrid, frost depth planning, and step-by-step checks—plus local tips for Mississauga properties and when to bring in a pro crew.
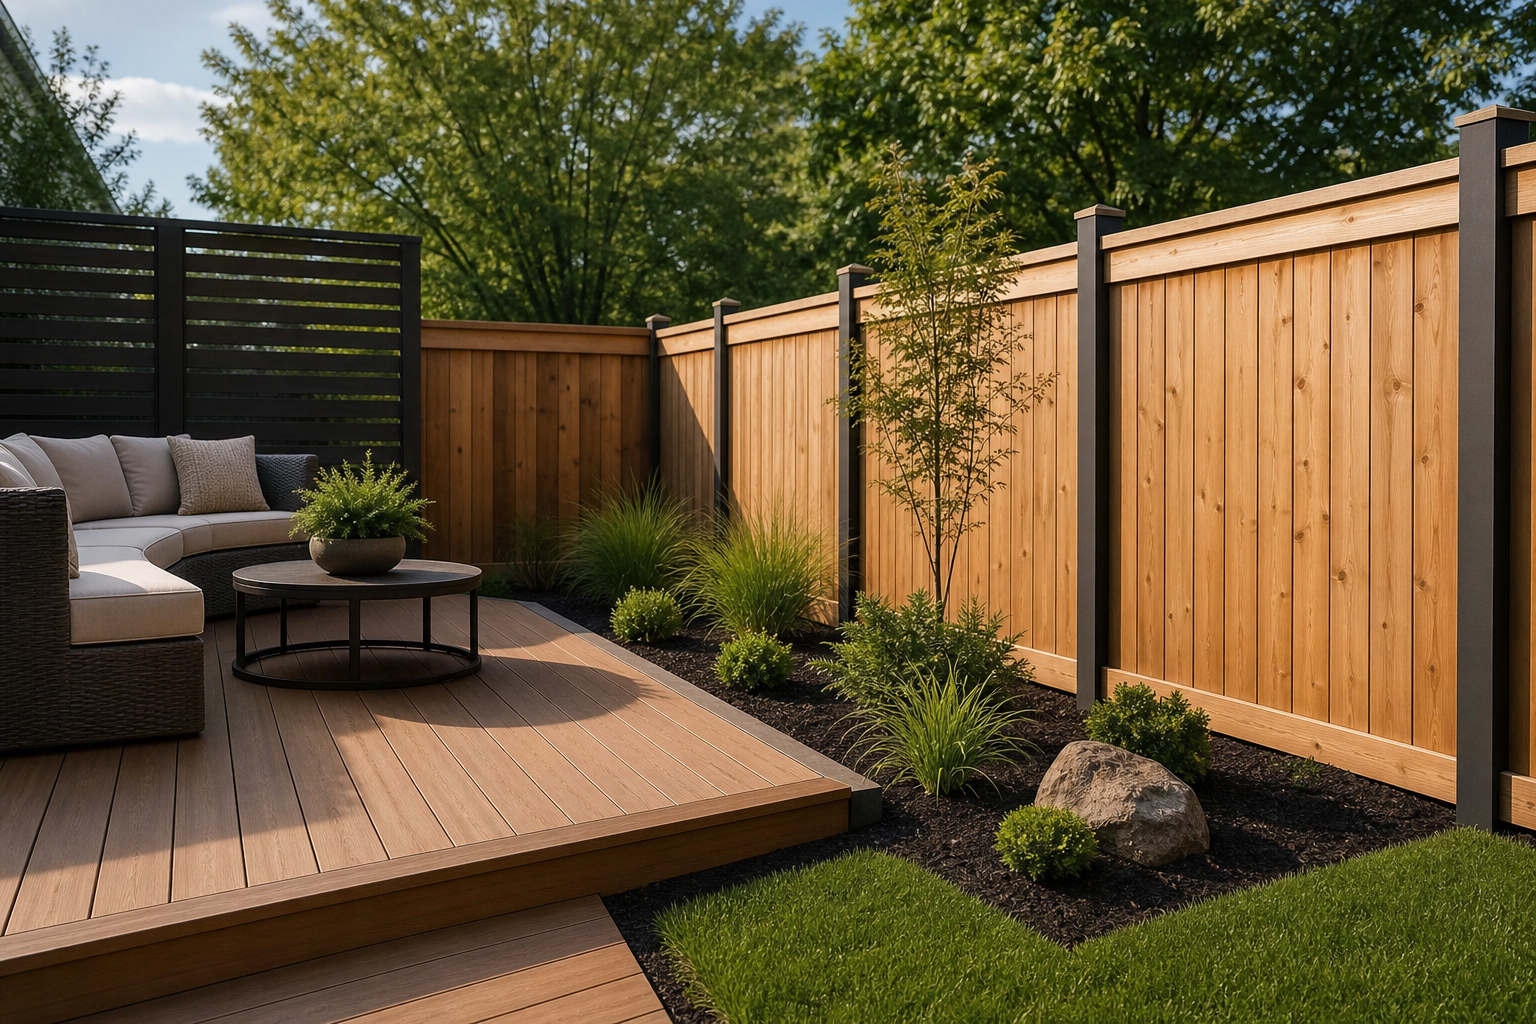
Use this section to skim the essentials and jump to what you need most. We include practical examples from our Mississauga and GTA projects, and tie decisions back to adjacent elements like patios, walkways, fencing, and planting so your whole layout works as one system.
- What is retaining wall design?
- Why retaining wall design matters
- How retaining walls work
- Types of retaining walls
- Best practices for design
- Tools and resources
- Case studies and examples
- FAQ
- Conclusion
- Related Articles
What Is Retaining Wall Design?
Retaining wall design is the process of analyzing soil, slope, loads, and drainage to plan a wall that resists earth pressure safely. Good design covers base depth, backfill gradation, drain routing, reinforcement, and materials so the wall stays straight, drains freely, and performs through freeze–thaw cycles.
At its core, a retaining wall is a gravity and friction system that stabilizes soil. The wall must counter active earth pressure, shed water quickly, and sit on compacted, level support. Details—like a 4–6 inch leveling pad, free-draining backfill, and a sloped perforated drain—prevent movement and moisture build-up.
- Purpose: Hold soil, shape grades, and create flat areas for patios, lawns, and walkways.
- Key forces: Lateral earth pressure, surcharge loads, hydrostatic pressure.
- Core controls: Base quality, drainage path, reinforced soil zone thickness, and facing stability.
- Common materials: Segmental concrete blocks, natural stone (including armor stone), poured concrete, and timber (limited lifespan).
In our experience designing walls across Mississauga and the GTA, the projects that age best pair clean edge control with consistent compaction and a clear water exit. Those elements matter more than any decorative choice on the face of the wall.
Why Retaining Wall Design Matters
Thoughtful retaining wall design prevents slope failure, trip hazards, and water pooling. It also protects nearby structures, reduces maintenance, and adds usable square footage. In Mississauga and the GTA, freeze–thaw and spring runoff make drainage and base prep the difference between a 1-year fix and a 20-year solution.
Design choices directly affect safety and longevity. Walls that lack drainage can bulge within the first few seasons. Structures without reinforcement can rotate under surcharge, like parked vehicles or nearby decks. Even small grade holds benefit from a perforated drain, filter fabric, and compacted lifts about 6–8 inches thick.
- Longevity drivers: 95%+ relative compaction targets, non-frost-susceptible base, and positive drain slope (about 1% fall).
- Winter resilience: A base set below frost penetration with clean stone backfill reduces heave and settling.
- Usability gains: Terraces convert unusable slopes into lawns, patios, or path connections with interlocking pavers.
- Low maintenance: Edging, mulch, and groundcovers in tiers keep weeds down and moisture stable.
When we connect walls to cohesive landscape design, circulation improves and maintenance gets easier. The wall isn’t just a barrier—it becomes the backbone for patios, steps, and bed lines that feel intentional year-round.
How Retaining Walls Work
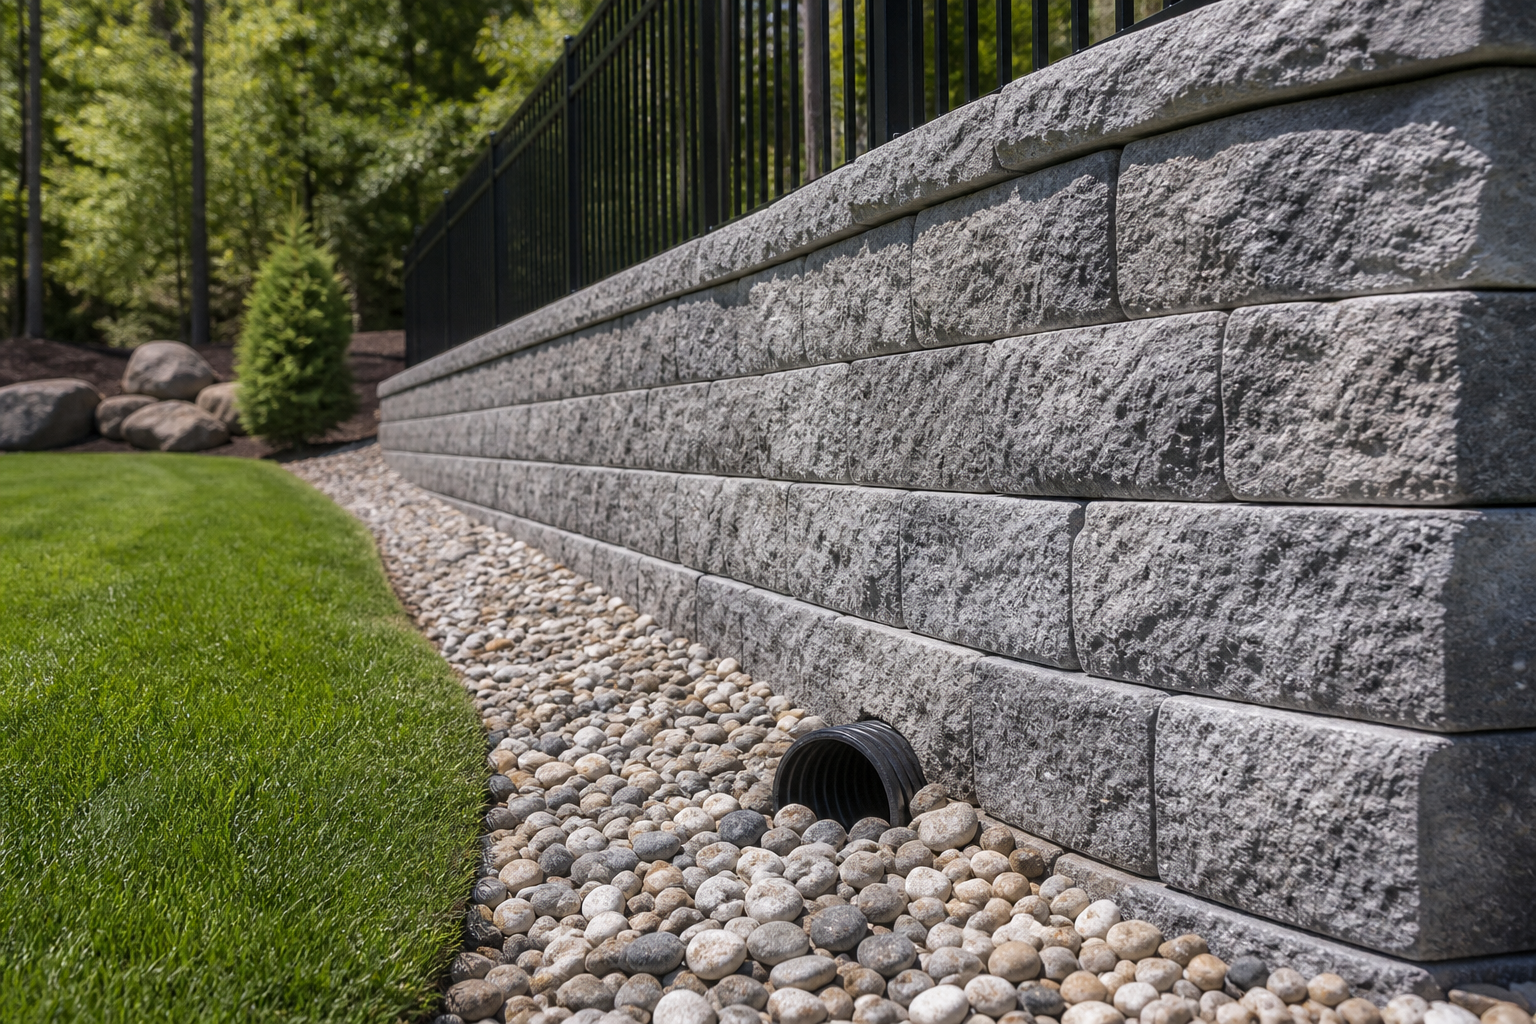
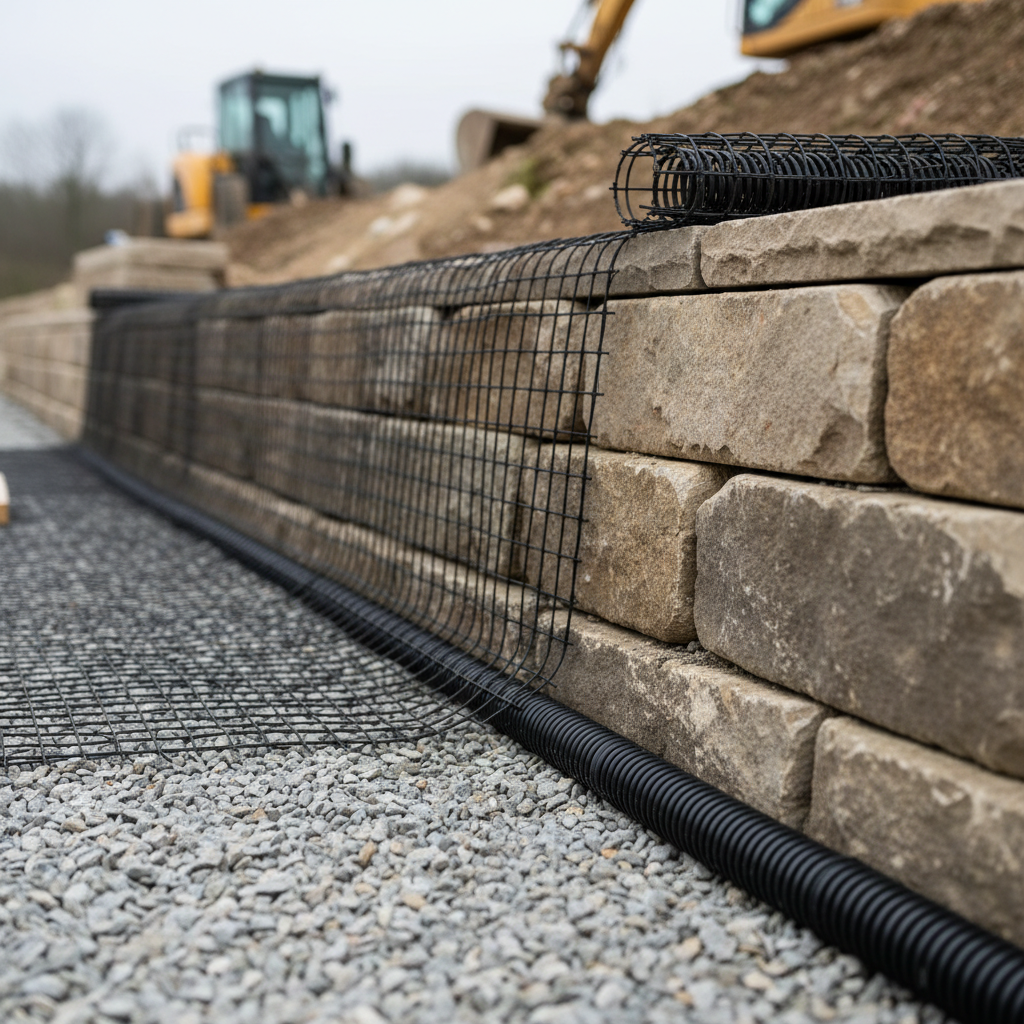
Retaining walls work by converting soil pressure into resistance through weight, friction, and reinforced soil. A compacted base supports the wall; free-draining backfill and a perforated pipe relieve water; and geogrid layers create a composite mass that acts like a deeper, stronger wall.
At installation, the sequence controls performance: excavate and over-dig for base, compact subgrade, place and level a crushed-stone pad, set the first course dead-level, add drain tile with outlet, backfill with clean stone, and place geogrid at specified heights and lengths. Repeating level courses and compaction stabilizes the system.
- Base pad: Often 4–6 inches of dense-graded aggregate, compacted in 2-inch lifts and leveled across the entire trench width.
- Drainage: A perforated pipe set behind the first course, wrapped in a filter sock and pitched to daylight or a catch basin.
- Backfill: Clean, angular stone (often 3/4 inch) for at least 12 inches behind the wall to promote free drainage.
- Reinforcement: Geogrid layers that extend back 0.6–1.0 times the wall height, depending on product guidance and loading.
Here’s the thing: the first course is everything. If it’s perfectly level and aligned, the courses above track straight, caps sit tight, and the wall sheds water as intended. When we’re integrating steps or a paver patio, we sync elevations so tread heights and paver edge restraints line up cleanly.
Types of Retaining Walls
Common retaining wall types include segmental (modular block), gravity (mass), cantilever (concrete with footing), and natural stone. For most residential GTA sites, segmental systems balance strength, looks, and budget, while armor stone suits rustic tiers and steps where large, durable blocks are desired.
Different wall types solve different site needs. Segmental retaining wall (SRW) systems lock together and pair well with geogrid for taller structures. Gravity walls rely on sheer mass—think large stone or oversized block. Cantilever walls use steel-reinforced concrete and a footing. Natural stone blends with plantings for warmer aesthetics.
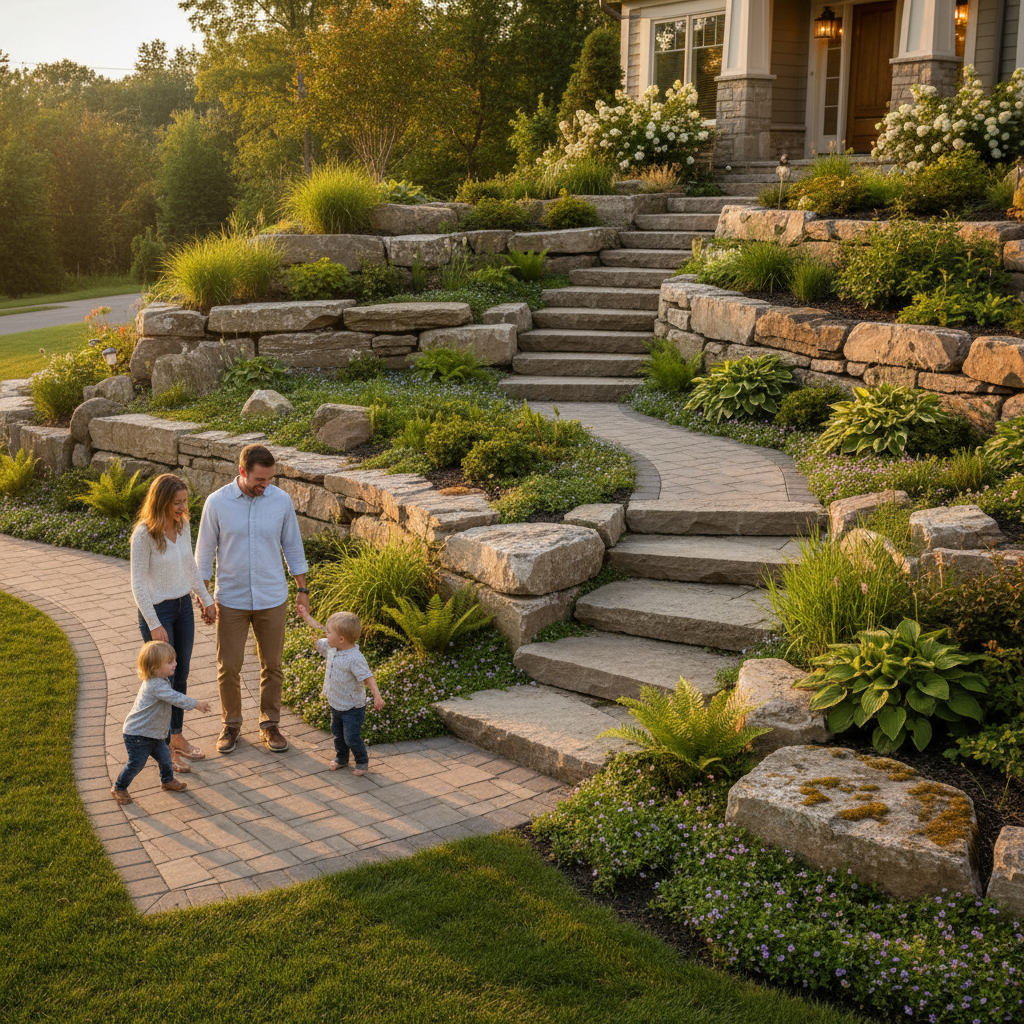
Wall Type Best For Height Range Reinforcement Notes Segmental (SRW) Curves, tiers, integrated steps, patios Up to 3–4 ft unreinforced; higher with geogrid Yes, geogrid as needed Modular, clean lines, strong with proper base/drain Gravity (mass) Short holds, rustic looks Typically 2–4 ft No Relies on weight; still needs drainage and base Cantilever concrete High loads, limited space behind 4 ft and up Steel rebar in footing and stem Engineered; good when property lines limit geogrid Natural/armor stone Organic, terraced landscapes 2–6 ft in tiers Rare; relies on mass and step-backs Pairs well with steps and planting pocketsTake a Mississauga sloped side yard: a two-tier SRW with geogrid at every second course, 12–18 inches of clean stone backfill, and a continuous drain can create a flat walkway that ties into an SRW-facing and cap profile your home’s style supports. Armor stone can become steps between tiers for a natural, durable transition.
Best Practices for Design
The best retaining wall designs start with soil and water. Establish a level, compacted base; specify clean backfill; add a sloped drain to daylight; use geogrid for taller walls; tie in steps and patios; and protect edges with fabric and mulch. Build in lifts, keep courses level, and verify outlets.
We build walls to handle Ontario’s freeze–thaw cycles and heavy spring runoff. That means controlling water and frost all the way from the subgrade to the top cap. Where patios or interlocking pavers meet walls, we plan joint sand stabilization and edge restraints so nothing migrates into the drain zone.
Design checklist we rely on
- Subgrade: Remove organics; proof-roll and re-compact to 95%+ relative compaction.
- Leveling pad: 4–6 inches of dense-graded aggregate, dead-level in both directions.
- First course: Set each block on level pad; rubber mallet to seat and align; check every joint with a torpedo level.
- Drain tile: 4-inch perforated pipe with sock, pitched about 1% to a daylight outlet or basin.
- Backfill and separation: Minimum 12 inches of 3/4-inch clear stone plus non-woven fabric to separate from native soil.
- Geogrid: Specify tensile strength and length (often 0.6–1.0 times wall height) per manufacturer tables; keep layers clean and taut.
- Step-backs and batter: Follow system specs (commonly 3/4 inch per course) for stability and visual rhythm.
- Caps and adhesive: Dry-fit caps; use exterior-rated construction adhesive; maintain consistent overhang.
When your wall supports a driveway, we coordinate with interlocking driveway base depths and edge control so load paths don’t undermine the drain. For privacy, a nearby fence post layout should land outside the reinforced soil zone—planning layouts together avoids future conflicts with geogrid.
Local considerations for Mississauga
- Expect saturated soils during spring thaw; prioritize drain exits to daylight and protect outlets from ice and debris.
- Plan winter durability: below-grade base, clean stone backfill, and fabric separation reduce heave across freeze–thaw cycles.
- Integrate with GTA layouts: tie terraces to paver walks and low-maintenance beds so water flows to lawn, not toward foundations.
Walls become easier to maintain with a mulch layer on top terraces, drip irrigation for plantings, and defined bed edges that prevent soil from migrating toward the caps. Pair the wall with groundcovers to stabilize exposed soil and soften the structure without blocking drainage fabrics.
Tools and Resources
Plan retaining walls with accurate levels, compaction, and product data. Core tools include a plate compactor, trenching tools, levels, lasers, geogrid, filter fabric, perforated pipe, and washed stone. Use manufacturer charts for grid spacing and consult local regulations before building near property lines.
We equip crews with laser levels for grade checks, compaction meters where needed, and manufacturer spec sheets for the exact block system. Specs determine grid length and lift spacing. For integrated landscapes across the GTA, our team aligns walls with patios, walkways, and bed lines to move water intentionally through the site.
- Layout: Stringlines, mason’s levels, and lasers to keep courses straight over long runs.
- Compaction: Plate compactors sized to aggregate depth; dead-blow mallets for seating block.
- Drainage kit: 4-inch perforated pipe with sock, T-fittings, and gravel stop details at outlets.
- Separation and stability: Non-woven geotextile fabric and properly spec’d geogrid for the wall height and loading.
- Finish: Exterior adhesive for caps, polymeric sand and paver-to-drain transitions where patios meet wall lines.
For broader property plans or landscaping GTA projects, a design-first approach aligns all walls, walks, and plantings so maintenance stays low and seasonal water has a safe path off the site.
Case Studies and Examples
Real GTA projects show how design details add up. Tiered SRW terraces with geogrid convert steep lawns into play areas; armor stone steps bridge grade changes; and integrated paver patios shed water to drains. When walls, walks, and planting are planned together, maintenance drops and usability increases.
Mississauga backyard terrace: A 5-foot overall grade change split into two tiers—each about 30–36 inches—using modular block. We specified geogrid at every second course, 18-inch clean-stone backfill, and a drain pitched 1% to daylight. A small paver patio ties the upper terrace to the back door, with bed edges and mulch to stabilize soil.
- Result: Flat lawn and patio zones where a mower and furniture are stable.
- Maintenance: Mulch and groundcovers in tiers reduce weeding and soil wash-out.
- Seasonal note: Spring runoff now follows the pipe instead of cutting ruts down the slope.
GTA front-yard approach: A sloped entry became stone steps framed by short gravity walls. We matched interlocking pavers for the landing and set a discrete outlet at the side. With separation fabric, the lawn edge stays clean and the drain rock never migrates to turf.
- Result: Safer, even treads for daily use and winter shoveling.
- Maintenance: Snowmelt drains toward the pipe, not across the walk.
Side-yard squeeze near property line: Space constraints ruled out long geogrid lengths, so we collaborated with an engineer on a cantilever concrete wall. The reinforced footing and stem delivered capacity without intruding into the neighbor’s yard, and we still kept a clean stone backfill and outlet.
If you’re weighing options for slopes, our design-build approach ensures walls, patios, and fencing don’t compete for the same ground. The outcome: fewer surprises and better long-term performance.
Free site assessment: Planning a wall in Mississauga or the GTA? Book a practical, on-site review so we can outline the right wall type, drainage path, and connections to nearby patios, walks, or beds.
Frequently Asked Questions
Homeowners ask about height limits, when geogrid is needed, how drainage works, and how walls tie into patios and steps. Here are direct answers that apply to many Mississauga and GTA properties, with a focus on longevity, winter resilience, and day-to-day usability.
How tall can a retaining wall be without reinforcement?
Many modular block systems allow 3–4 feet without geogrid, depending on product and soils. Taller walls typically require grid and step-backs. On tight sites or near structures, consult engineering and local regulations before building.
Do I need a drain behind a small wall?
Yes. Even short walls benefit from a 4-inch perforated pipe set at the base, wrapped in a filter sock, and pitched to daylight. Clean stone backfill (about 12 inches min) and a separation fabric help prevent hydrostatic pressure and keep fines out of the drain.
What’s the right base for a retaining wall?
Use dense-graded aggregate compacted in thin lifts over proof-rolled subgrade. A 4–6 inch leveling pad set dead-level is common. Avoid placing blocks on topsoil or soft fills. In the GTA, placing the base below frost penetration reduces heave and movement through winter.
How do walls tie into paver patios and steps?
Plan elevations and edges together. Sync cap heights with paver elevations and use edge restraints, polymeric sand, and fabric to keep fines out of the drain zone. Steps can be modular block, natural stone, or armor stone set with proper tread depth and riser consistency.
Conclusion
Successful retaining wall design balances soil, water, and structure. When base prep, drainage, and reinforcement work together, GTA walls stay straight, safe, and attractive for years. Align walls with patios, walkways, and plantings to reduce maintenance and make every outdoor square foot count.
Design walls as part of the whole site—not as an afterthought. That’s why our team pairs wall planning with adjacent interlocking pavers, bed edges, and planting layers for year-round function. If you’re in Mississauga or the GTA, we can assess slopes, set elevations, and show how to turn grade challenges into usable space.
- Key takeaways: control water, compact well, reinforce when needed, and plan walls with patios and steps.
- Next step: If your yard is sloped or soggy, schedule an on-site review to align wall type, drains, and layout.
Related Articles
Pair this guide with deep dives on drainage, design-build planning, and wall–patio integration. Reading across topics helps you connect slopes, water paths, and surfaces into one low-maintenance landscape plan for Mississauga and the GTA.
- See how we route water safely in our overview of retaining wall drainage and outlet details.
- Explore full-property planning in landscape design and build for coordinated patios, walls, and beds.
- Review wall options and finishes on our retaining wall services page for material inspiration.
For perspective on layout choices and hardscape considerations in nearby municipalities, see these overviews of Durham Region landscaping ideas, tips when planning patios and walkways, and practical concepts for Ajax landscaping best practices.