Retaining wall drainage is the engineered system that moves water away from soil held by a wall to prevent pressure, frost heave, and failures. In Mississauga’s freeze-thaw climate, proper drainage protects adjacent patios, lawns, and foundations. At HR Greenroots Landscaping, we design and install retaining walls with integrated drainage so your yard stays usable and dry.
By HR Greenroots Landscaping — Mississauga & GTA | Last updated: 2026-04-18
Overview and Table of Contents
This complete guide explains what retaining wall drainage is, why it matters in the GTA, how it works, the systems available, and the best practices we use on real projects. You’ll learn step-by-step methods, specs, tools, and maintenance tips designed for Ontario’s freeze-thaw cycles and clay-heavy soils.
Here’s what you’ll find in this guide and how to use it. Skim the summary, then jump to the section you need using the quick links below.
- What is retaining wall drainage?
- Why drainage matters in the GTA
- How it works (step-by-step)
- Drainage types and methods
- Best practices and specs we use
- Tools and resources checklist
- Case studies + local considerations
- Common mistakes to avoid
- Maintenance and seasonal care
- FAQ
- Conclusion + next steps
What Is Retaining Wall Drainage?
Retaining wall drainage is a behind-the-wall system—granular backfill, geotextile, and a perforated pipe on slope—that relieves hydrostatic pressure and carries water to a safe outlet. Done right, it stabilizes soil, reduces frost heave risk, and extends wall life for patios, driveways, and gardens.
Think of retaining wall drainage as pressure relief. When rain or snowmelt saturates soil, water adds weight and pushes on the wall. Managed flow behind the wall—rather than trapped water—keeps forces predictable and the structure stable.
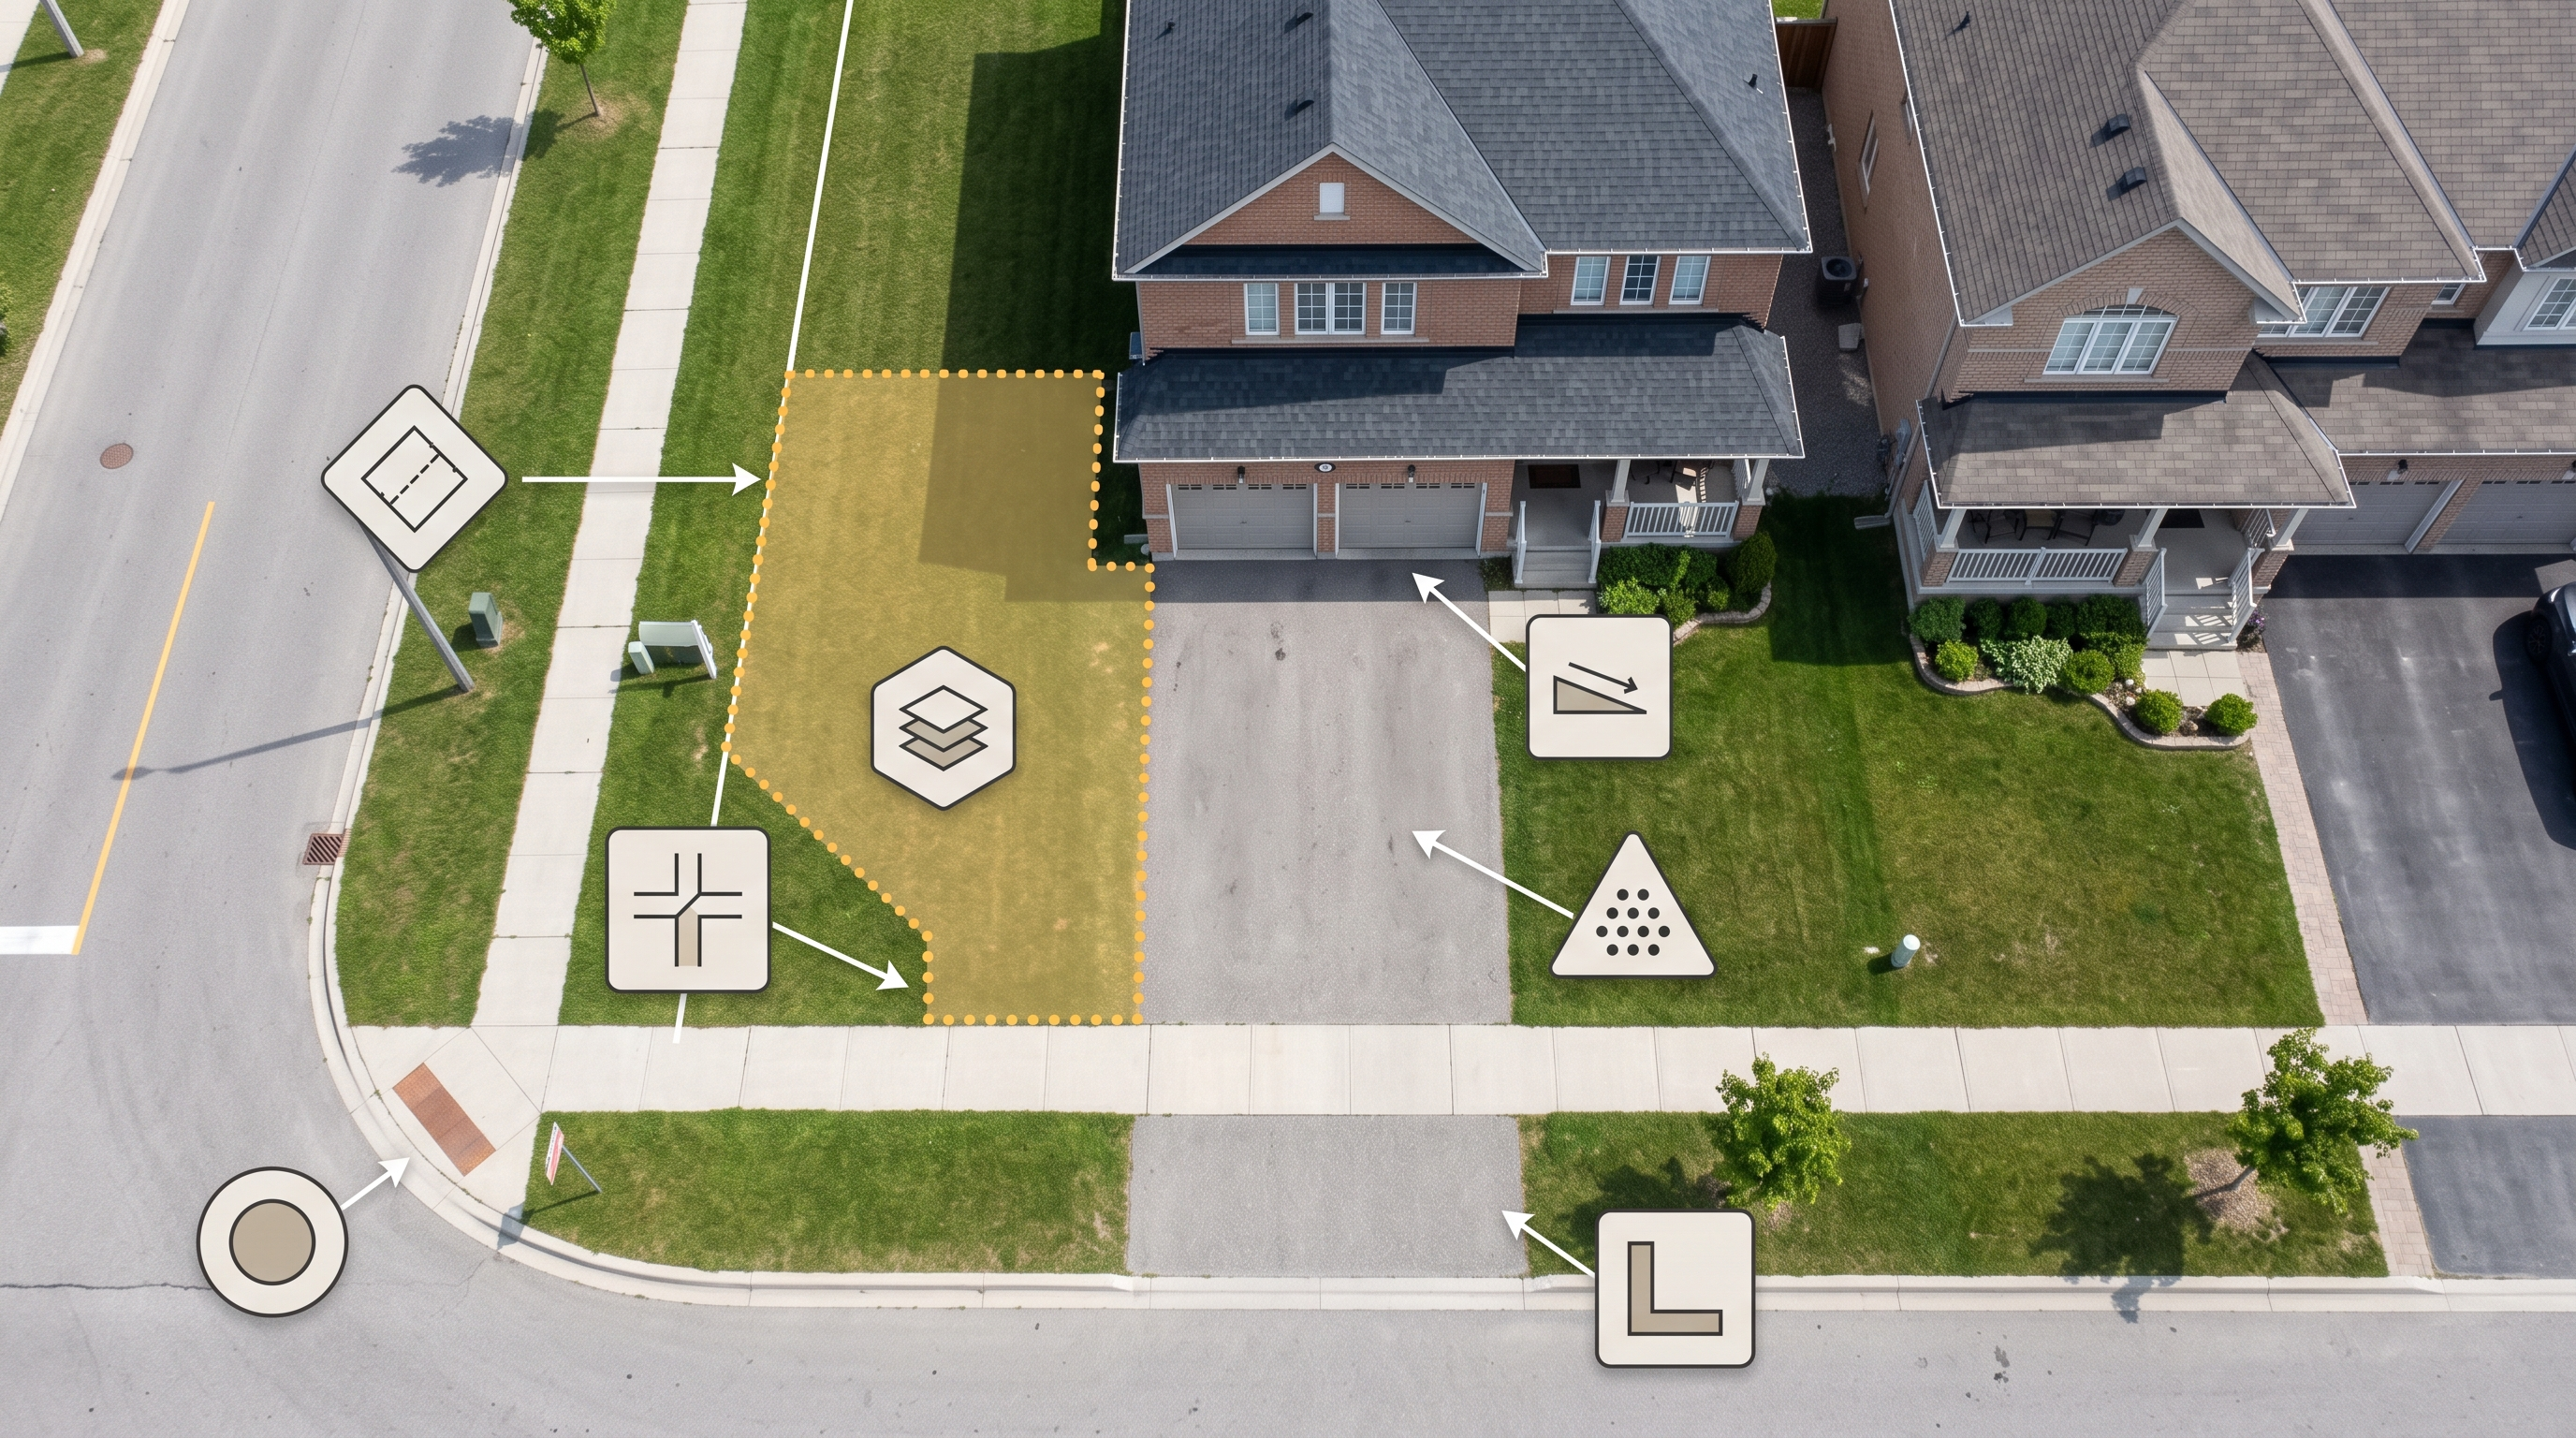
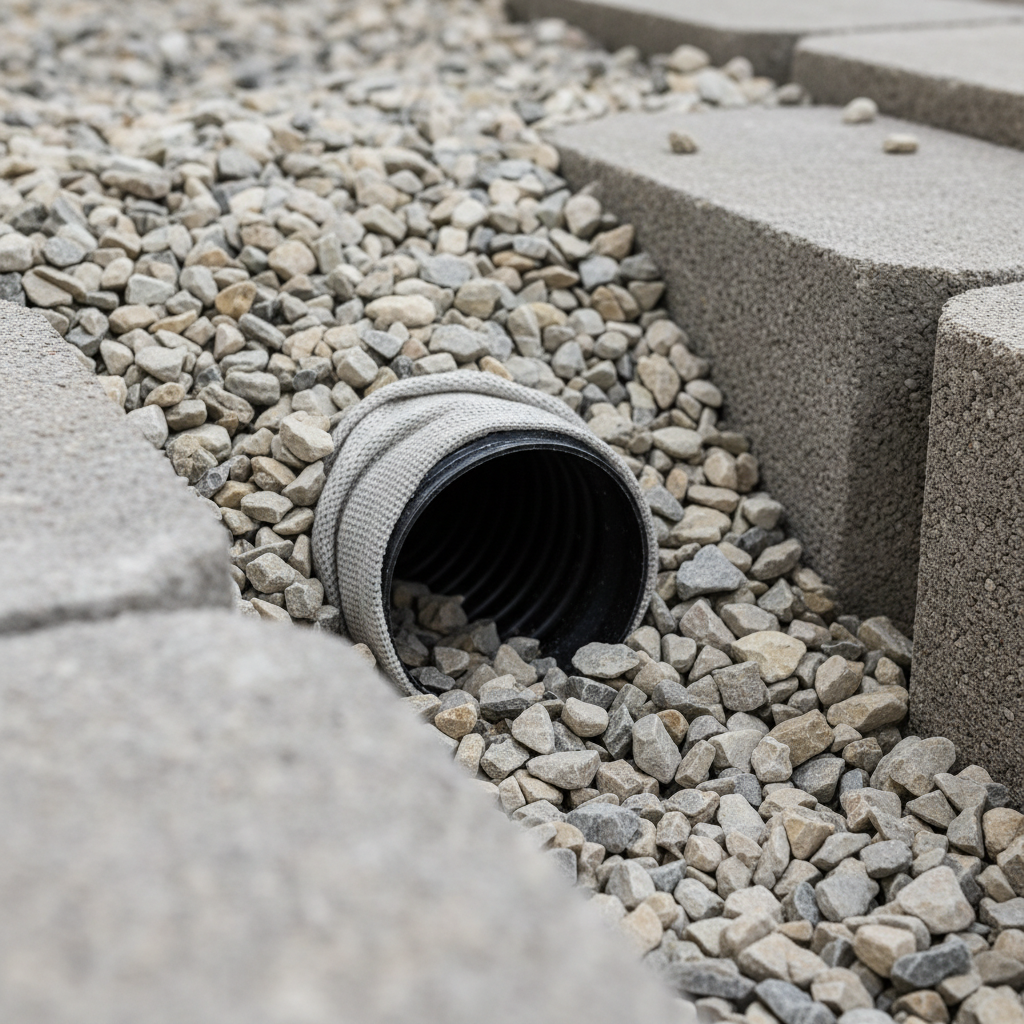
Typical assemblies include four essentials: a free-draining aggregate zone, a wrapped perforated pipe, separation fabric, and a defined outlet. Each part does a distinct job. For example, 3/4 inch angular stone stays open for decades while a 4 inch pipe captures and moves water. A 1% slope (about 1/8 inch per foot) toward an outlet prevents pooling.
In our design-build projects across Mississauga and the broader landscaping GTA, we integrate drainage with adjacent interlocking pavers, sod installation, and planting beds. The result is a cohesive system—solid base prep, clean edge control, and reliable water management—rather than isolated fixes that fight each other.
Why Retaining Wall Drainage Matters
Drainage matters because trapped water multiplies pressure on the wall, accelerates freeze-thaw damage, and saturates adjacent patios or lawns. A dedicated drain zone behind the wall relieves pressure, lowers frost risk, and protects nearby hardscapes and foundations.
Water is relentless. Saturated backfill can weigh 40–60% more than dry soil, and that extra load doesn’t care how pretty your wall looks. When pressure spikes, walls bulge, joints open, and caps shift. Add Ontario’s freeze-thaw cycles—where moisture expands on freezing—and small imperfections can escalate into structural issues.
We see three common downstream effects in the GTA:
- Bulging courses as hydrostatic pressure increases behind the face units.
- Heaving at corners where freeze-expansion lifts base that wasn’t isolated from fines.
- Soaked edges along interlocking patios or walkways when outlets were omitted or clogged.
Proper retaining wall drainage also improves turf health. Lawns bordering walls can stay waterlogged for days if runoff is trapped. With a 12–18 inch clear-stone backfill zone and a sloped outlet, water moves away so sod roots can breathe. The same principle protects mulch and plantings from erosion after heavy summer thunderstorms.
How Retaining Wall Drainage Works (Step-by-Step)
A sloped perforated pipe sits at the wall’s heel inside a 12–18 inch free-draining stone zone wrapped with geotextile. Surface water filters through stone, enters the pipe, and discharges at daylight or a sump. Separation fabric prevents soil fines from clogging voids.
Here’s the proven sequence we use on design-build projects in Mississauga and across the GTA. Each step has a clear purpose and measurable spec so the system stays open long-term.
- Excavate and over-dig: Create room for a base and a 12–18 inch drainage column. Over-dig to undisturbed soil; remove organics and soft spots.
- Establish the base: Place 6–8 inches of well-compacted, free-draining base (clear 3/4 inch stone or HPB), compacted in 2–3 lifts to ~95% relative compaction.
- Set the first course: Level the first block course precisely; the wall inherits the base’s accuracy.
- Install the pipe: Lay a 4 inch perforated drainpipe at the heel on 1% slope toward the outlet. Wrap with non-woven geotextile to resist fines.
- Backfill with clear stone: Fill the zone behind the wall with angular 3/4 inch stone up to 12–18 inches from the face. Keep fines out of this zone.
- Separate with fabric: Fold geotextile over the stone before capping with topsoil or bedding to keep silt from migrating.
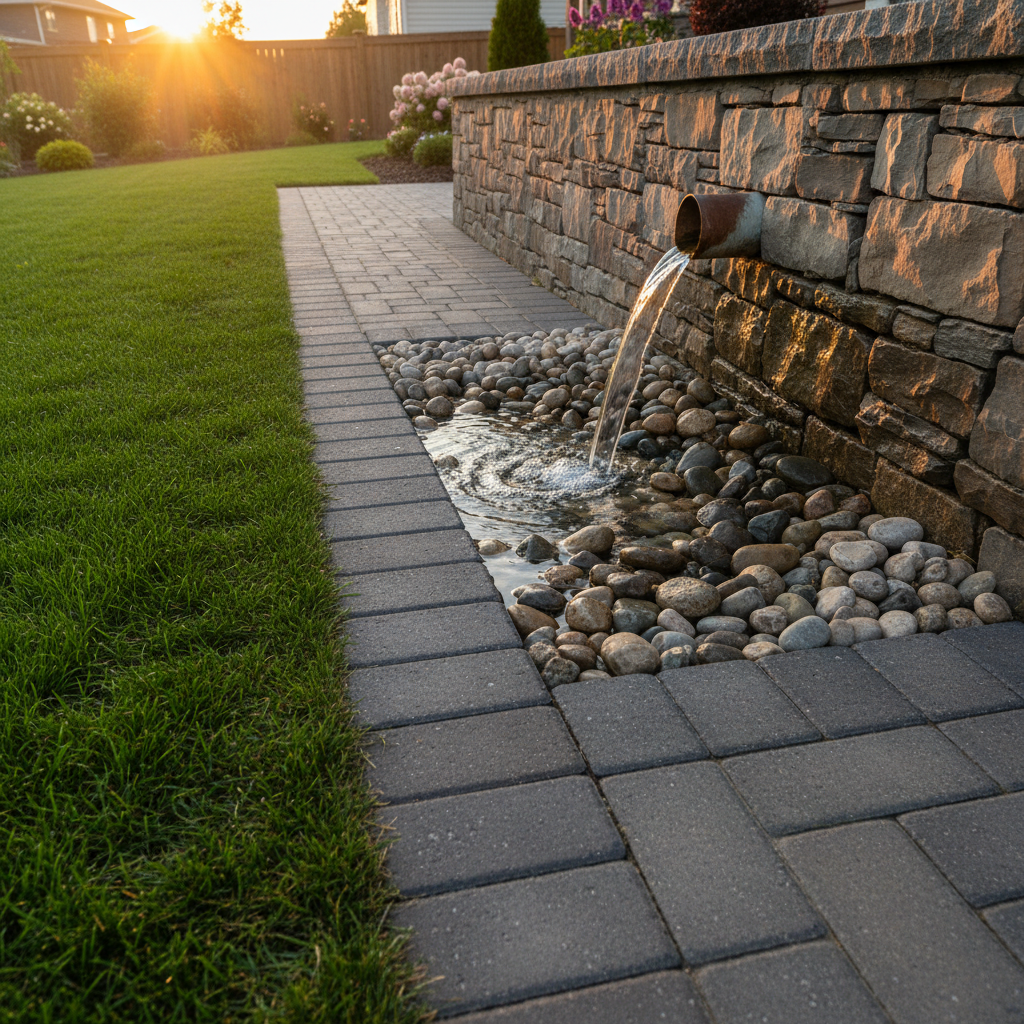
- Outlet to daylight or sump: Daylight the pipe on a rock splash pad or connect to a code-compliant sump/soakaway where daylighting isn’t feasible.
- Cap and edge-control: Finish with caps, secure edges, and grade the surface at 2–5% away from the wall to divert sheet flow.
Small details compound. For example, a mere 20–30 feet of pipe at 1% slope gives 2.4–3.6 inches of fall, which is often enough to daylight a typical backyard wall. Where grades are tight, we design shallow channels in the base to keep slope continuous to the outlet without lowering the entire trench.
Types and Methods of Retaining Wall Drainage
Common drainage methods include a behind-the-wall French drain, weep holes through the face, surface swales above the wall, and trench drains at hardscape edges. The right mix depends on soil type, wall height, adjacent surfacing, and available outlet options.
Most residential walls in the GTA benefit from a combined approach. Here are the core methods we specify and how they fit different conditions.
Behind-the-wall French drain
- Perforated pipe on 1% slope within a 12–18 inch stone column.
- Best for clayey or mixed fills and any wall that retains irrigation-heavy planting beds.
- Pairs well with geogrid-reinforced segmental retaining walls (SRWs) 3–8 feet tall.
Weep holes through the face
- Allow incidental water to exit at intervals; spacing often 3–6 feet.
- Supplementary—not a substitute for a pipe where volumes are significant.
- Useful on gravity walls where internal drains are hard to retrofit.
Surface grading and swales above the wall
- Grade the upper terrace 2–5% away from the face to lower inflow.
- Shallow swales can redirect roof and lawn runoff before it reaches the wall.
- Critical where lawns or beds shed water directly onto hardscape edges.
Trench drains at hardscape transitions
- Linear drain grates intercept sheet flow at the back of patios or driveways.
- Helpful where interlocking pavers meet a raised planter or wall.
- Direct connect to the wall’s pipe system or a separate outlet.
Daylight vs. sump/soakaway
- Daylight: Preferred when 2–4 inches of fall to grade is available; simplest to maintain.
- Sump/soakaway: For flat lots; requires a stone-filled pit sized to soil infiltration.
- Either way, protect outlets with a rock pad to limit erosion.
For homes adding patios, walkways, or driveway extensions near a wall, evaluating drainage at the design stage prevents conflicts. Additional reading on paving context can be found in this homeowner-focused overview of interlocking in Ontario that discusses site prep and performance concepts for cold climates.
Best Practices and Specs We Use (HR Greenroots)
We standardize on clear 3/4 inch stone, a wrapped 4 inch perforated pipe at 1% slope, 12–18 inches of free-draining backfill, geotextile separation, and protected outlets. We coordinate grading, paver edge constraints, and planting to keep the entire system open and serviceable.
Over hundreds of installations across Mississauga and the wider landscaping GTA, we’ve found consistent specs produce consistent results. These are the field-proven practices our crews follow.
- Base accuracy: 6–8 inches of free-draining base compacted in multiple lifts to ~95% yields predictable settlement.
- Pipe slope continuity: Maintain 1% minimum—use laser levels or smart levels to verify; avoid flat spots.
- Stone-only drain zones: Keep soil fines out of the 12–18 inch column; extend fabric to fully separate stone from native soil.
- Outlet protection: Daylight onto a 2–3 foot rock splash pad to diffuse energy and prevent washouts.
- Surface runoff control: Grade upper terraces away from the wall; where needed, add a shallow swale.
- Paver coordination: When patios or walkways meet walls, maintain independent edge restraints and avoid blocking weep paths.
- Winter readiness: In freeze zones, avoid saturated fines near the base; prioritize clear stone backfill and fabric separation.
Numbers matter. A 12 inch drain column roughly halves the path length water travels compared to compacted soil, so flow times drop and pressure dissipates faster. Using angular stone—not round pea gravel—improves interlock and void space, so the drain stays open even after years of minor sedimentation.
On multi-terrace designs, we decouple each level’s pipe network so one overflow can’t overwhelm another. Where grades are complex, we integrate trench drains at hardscape edges to capture sheet flow, then tie them into a main outlet at grade.
Tools and Resources Checklist
You’ll need excavation tools, a plate compactor, a laser level, non-woven geotextile, 3/4 inch angular stone, a 4 inch perforated pipe, outlet protection stone, and PPE. Verify slopes and separation at each stage to keep the system open for decades.
Whether you’re reviewing a contractor’s plan or tackling a small garden wall, this checklist keeps quality on track.
- Layout and verification: Laser level or smart level; string lines; stakes; spray paint.
- Excavation and base: Shovel, mini-excavator (as needed), plate compactor, rakes, hand tamper.
- Drainage materials: Non-woven geotextile (for separation), 3/4 inch angular clear stone, 4 inch perforated pipe with fittings.
- Wall system: Segmental blocks, caps, geogrid (per manufacturer for walls above gravity height).
- Finishing: Rock splash pad stone, topsoil or bedding sand, edge restraints for adjacent pavers.
- Safety: Gloves, eye protection, steel-toe footwear, hearing protection.
For a broader primer on outdoor construction sequences that homeowners can understand, this practical landscape construction guide outlines common steps and why foundation prep drives longevity—principles that also apply to drainage behind retaining walls.
Case Studies and Local Considerations
In our GTA projects, integrated drainage fixes bulging walls, soggy lawns, and heaving pavers. Real results come from a 4 inch pipe on slope, a 12–18 inch stone column, and protected outlets—plus grading coordination with patios and turf.
Here are brief, real-world scenarios from our Mississauga and GTA work. While every site is unique, these show patterns you can recognize in your own yard.
Mississauga backyard wall feeding a soaked lawn
The issue: a two-tier garden wall bled water into a low lawn for days after storms. We added a sloped pipe, increased the stone column to 16 inches, and daylit at a rock pad near grade. The lawn’s surface dried within 24–36 hours, and sod root health recovered.
Etobicoke patio with edge heave
A raised patio shared bearing with a planter wall. Freeze-thaw heave opened joints each spring. We separated the paver edge restraint from the wall, installed a trench drain, and tied both into a dedicated outlet. Joint movement dropped to near zero across the next winter.
Brampton slope with clay-heavy fill
Clay retained water and pushed on a 4-foot wall. We upsized the drainage column to 18 inches, used non-woven fabric, and maintained a 1% pipe slope to daylight. The wall remained plumb through spring thaw, and adjacent mulch stayed in place after heavy rain.
Local considerations for Mississauga
- Plan for spring thaws: prioritize clear stone backfill and protected outlets so meltwater doesn’t saturate lawns or patios.
- Schedule work between late spring and early fall to avoid frozen ground and to verify slopes with accurate instruments.
- Coordinate with adjacent interlocking and sod installation so edges, grades, and drains don’t conflict during build-out.
If you’re exploring driveway or patio changes alongside a wall, this quick explainer on interlock paver driveways covers surface water behavior at edges and why drains or swales matter wherever hardscapes meet soils.
Common Mistakes and How to Avoid Them
The big errors are no outlet, flat or clogged pipe, fines in the drain zone, and poor surface grading. Avoid them by maintaining 1% pipe slope, using angular clear stone, wrapping with geotextile, and daylighting onto a rock pad or approved sump.
We’re often called to fix walls that looked fine on day one but failed within two winters. These are the patterns we see most—and how to head them off.
- No true outlet: Ending a pipe in soil is not an outlet. Daylight it or connect to a designed soakaway.
- Pipe with zero slope: Water stagnates and fines settle. Use lasers to verify 1% minimum fall.
- Pea gravel instead of angular stone: Round particles lock poorly and reduce void space over time.
- Skipping geotextile: Soil fines migrate and clog the stone column; flow plummets.
- Surface pitching toward the wall: Even with a pipe, sheet flow overwhelms systems pitched the wrong way.
- Blocked weep paths at pavers: Shared edges or mortar lips trap water against the wall.
Simple checks reduce risk: confirm outlet visibility, verify slope with a level, tug on fabric overlaps, and photograph the drain zone before final backfill. Documentation helps if future landscaping changes introduce conflicts.
Maintenance, Inspection, and Seasonal Care
Inspect outlets twice a year, after spring thaw and fall leaf drop. Clear debris, confirm flow during rain, and check for bulges or joint shifts. Healthy systems discharge within minutes of rainfall and keep adjacent lawns and pavers firm underfoot.
Think of retaining wall drainage as a low-maintenance system that still deserves quick seasonal attention.
- Outlet checks: Remove leaves, mulch, and sediment from splash pads; verify water flow after steady rain.
- Face inspection: Sight down the wall for bulges; check caps and joints after freeze-thaw periods.
- Paver edges: Ensure edge restraints are seated and not impeding weep paths or swales.
- Lawn condition: Persistent sogginess within 24–48 hours of rain may indicate a clog upstream.
- Record and respond: Photograph any movement and contact a retaining wall contractor if trends persist.
When we install walls, we also plan for long-term upkeep: accessible outlets, visible splash pads, and surfaces graded for quick visual checks. Our seasonal maintenance visits often take less than an hour to review outlets, edges, and any new landscaping that could alter drainage.
Frequently Asked Questions
Homeowners ask about pipe size, outlets, fabric choices, and how drainage ties into patios and lawns. Here are direct answers you can act on today, drawn from our Mississauga and GTA installation experience.
What size drainpipe should I use behind a retaining wall?
A 4 inch perforated pipe is standard for residential walls. Install it at the wall’s heel with a consistent 1% slope toward an outlet. Wrap the pipe in non-woven geotextile and surround it with 12–18 inches of clear, angular 3/4 inch stone to keep the system open.
Where should the drainage outlet discharge?
Daylight the pipe to a visible location on a rock splash pad whenever you have at least a few inches of fall. If daylighting isn’t possible, use a designed soakaway or sump that matches your soil’s infiltration rate. Keep outlets accessible for quick seasonal checks.
Do I still need weep holes if I have a perforated pipe?
Weep holes help relieve incidental water at the face, but they’re not a substitute for a true behind-the-wall drain. We often use both: a sloped 4 inch pipe to handle volume and well-spaced weep holes to reduce face moisture and staining in heavy rain events.
How does drainage tie into interlocking pavers or sod?
Plan edges early. Maintain independent paver edge restraints so they don’t block weep paths. Grade surfaces 2–5% away from the wall to reduce inflow. For lawns, keep topsoil out of the stone column and use fabric separation so sod roots get oxygen instead of sitting in water.
Conclusion and Next Steps
Great walls manage water first. With a sloped 4 inch pipe, 12–18 inches of angular stone, geotextile separation, and visible outlets, you’ll prevent pressure, frost heave, and soggy edges. Design drainage with patios, lawns, and plantings in mind for a system that stays dry and durable.
Key takeaways you can use right now:
- Always include a dedicated drain zone: pipe on 1% slope inside 12–18 inches of angular stone.
- Separate stone from soils with non-woven geotextile to stop fines migration.
- Grade surfaces away from the wall 2–5% and keep outlets visible on rock splash pads.
- Coordinate with interlocking pavers and sod so edges and drains don’t conflict.
Ready to fix a soggy wall or plan a new terrace in Mississauga or the GTA? Let’s coordinate design, build, and seasonal maintenance so your walls, pavers, and plantings work as one.