Interlocking pavers guide refers to a structured, step‑by‑step approach to designing, building, and maintaining modular stone or concrete surfaces. It covers base prep, drainage, pattern selection, and seasonal care. For Mississauga properties, HR Greenroots Landscaping leverages this method to create durable patios, driveways, and walkways that handle freeze–thaw and stay low‑maintenance.
By HR Greenroots Landscaping — Mississauga & GTA design–build hardscape specialists
Last updated: April 25, 2026
Quick Summary
This interlocking pavers guide lays out what pavers are, why they excel in Ontario’s climate, and exactly how to plan and build a long‑lasting surface. You’ll get step‑by‑step installation, a tools checklist, planning best practices, maintenance tips, and real Mississauga/GTA examples you can model.
Use this complete guide when you’re:
- Choosing between patio, driveway, walkway, or pool surround layouts
- Deciding base depth, drainage slope, and paver thickness
- Comparing laying patterns like herringbone vs. running bond
- Shortlisting tools and materials for a clean, durable install
- Planning seasonal maintenance for freeze–thaw and de‑icing
What Are Interlocking Pavers?
Interlocking pavers are modular concrete or stone units set on a compacted aggregate base and a thin sand bed, then locked with joint sand. The system relies on friction and edge restraints—not poured mortar—so surfaces flex slightly, drain well, and withstand freeze–thaw without cracking like monolithic slabs.
At their core, paver systems are engineered layers that work together. The layers manage loads, shed water, and resist movement. When each layer is properly designed and compacted, you get stable, attractive hardscapes that are easy to repair and maintain.
- Visible surface: Concrete or natural stone pavers (common thicknesses: ~60 mm for patios/walkways; ~80 mm for driveways)
- Joint fill: Washed sand or polymeric sand that hardens after activation
- Bedding layer: ~1 in. of screeded concrete sand for final leveling
- Base course: Compacted, graded aggregate (granular A/Crusher Run) sized to soils and loads
- Subgrade: Native soil compacted and shaped for proper drainage
- Edge restraints: Hidden restraints with spikes to prevent lateral spread
- Geotextile (as needed): Separates soils and base to reduce pumping in poor soils
Because the system is modular, individual units can be lifted and reset for repairs or utility access. That’s a major advantage for busy Mississauga and GTA properties that experience seasonal ground movement.
Why Interlocking Pavers Matter in Mississauga & the GTA
Pavers shine in Southern Ontario because they manage freeze–thaw cycles, snow loads, and heavy use better than many monolithic options. With proper base prep and drainage, surfaces stay even, drain quickly, and resist cracking—boosting curb appeal and usability year‑round.
Our region sees repeated freeze–thaw swings each winter. In flexible paver systems, joints act like expansion gaps while the compacted base supports loads. With a 2% slope (about 1/4 in. per foot) away from structures, meltwater sheds reliably and reduces icing risk.
- Climate fit: Modular systems tolerate movement; joints vent moisture and reduce slab‑scale cracks.
- Drainage by design: The aggregate base and bedding sand promote runoff and infiltration.
- Repairability: Lift, adjust, and reset isolated areas without replacing the whole surface.
- Finish options: Textures improve traction; color blends tie into planting and stone accents.
- Curb appeal: Clean edge control and pattern continuity frame lawns and beds for a finished look.
Local considerations for Mississauga
- Target a 2% surface slope and positive grading along walkways and driveways to move meltwater away from entries and garages.
- Schedule heavy excavation and compaction in frost‑free periods; aim to achieve final compaction before sustained freezes.
- Choose de‑icing‑tolerant pavers and polymeric sands; plan joint top‑ups each spring after snow operations.
How Interlocking Pavers Work
Interlocking performance comes from three controls: a dense, graded base that distributes loads, tight joints that create frictional lock, and edge restraints that stop lateral creep. When each is built to spec and compacted, the surface behaves like a unified, flexible slab.
Think of it as a load path. Wheels or foot traffic push down on the paver. Joints share and transfer force sideways, while the base spreads it downward into soil. Proper compaction increases friction between particles, which boosts capacity. Edge restraints preserve joint alignment so loads continue to flow predictably.
- Base density: Multiple compactor passes reach high density for bearing and frost resistance.
- Joint integrity: Washed or polymeric sand fills gaps to limit rotation and block weeds.
- Restraints: Spike‑anchored plastic or aluminum restraints prevent edge roll‑out.
- Surface texture: Chamfers and textures help shed water and add grip for winter safety.
Because systems are not bonded to a rigid slab, small adjustments can be made over time with minimal disruption—a practical advantage for busy driveways and walkways.
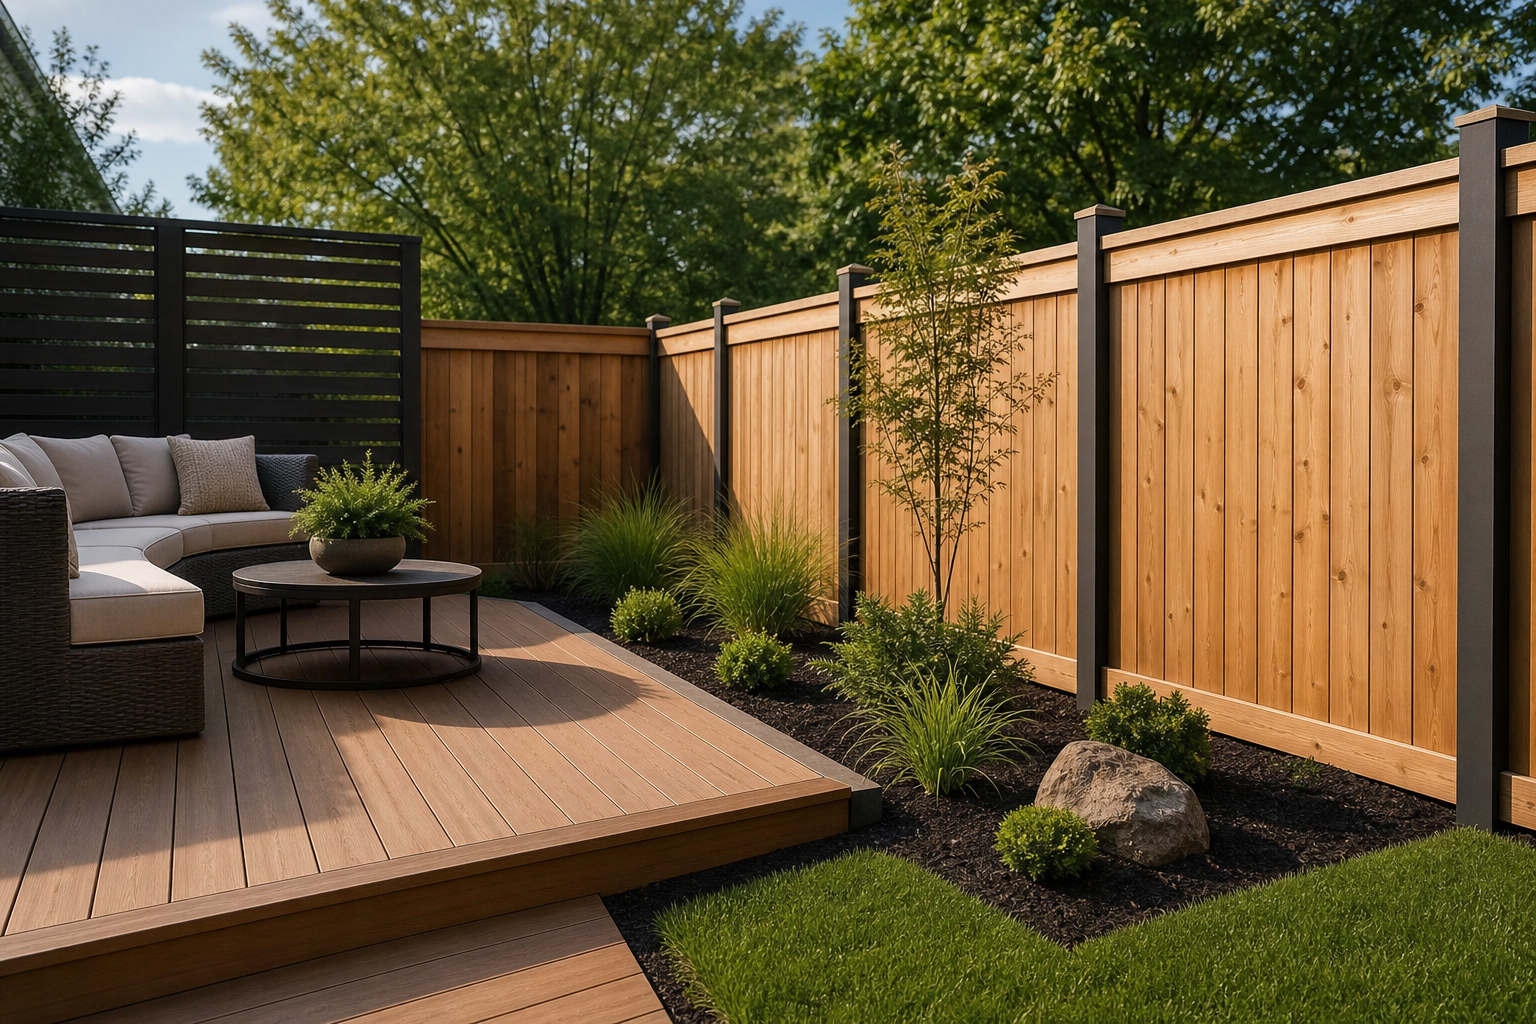
Types, Patterns, and Where Each Excels
Choose paver thickness, shape, and pattern by load and context. Herringbone offers superior interlock for driveways, while running bond and ashlar patterns suit patios and walkways. In pool areas, textured finishes and lighter colors keep surfaces cooler and more slip‑resistant.
Pattern and unit choice affect both strength and style. A 45° or 90° herringbone pattern maximizes locking action—ideal for turning movements on driveways. For patios, modular ashlar patterns blend sizes for a natural look. Along pool surrounds, opt for textures and lighter palettes to reduce heat absorption in summer.
- Common patterns: Herringbone, running bond, basketweave, modular ashlar, and random flagstone
- Unit profiles: Smooth, tumbled, slate‑face, granite‑face; beveled edges reduce chipping
- Thickness cues: ~60 mm for patios/walkways; ~80 mm for vehicle traffic
- Pool surrounds: Textured, sealed only when needed; plan for splash‑zone drainage
- Edging: Soldier or sailor courses provide clean borders and visual order
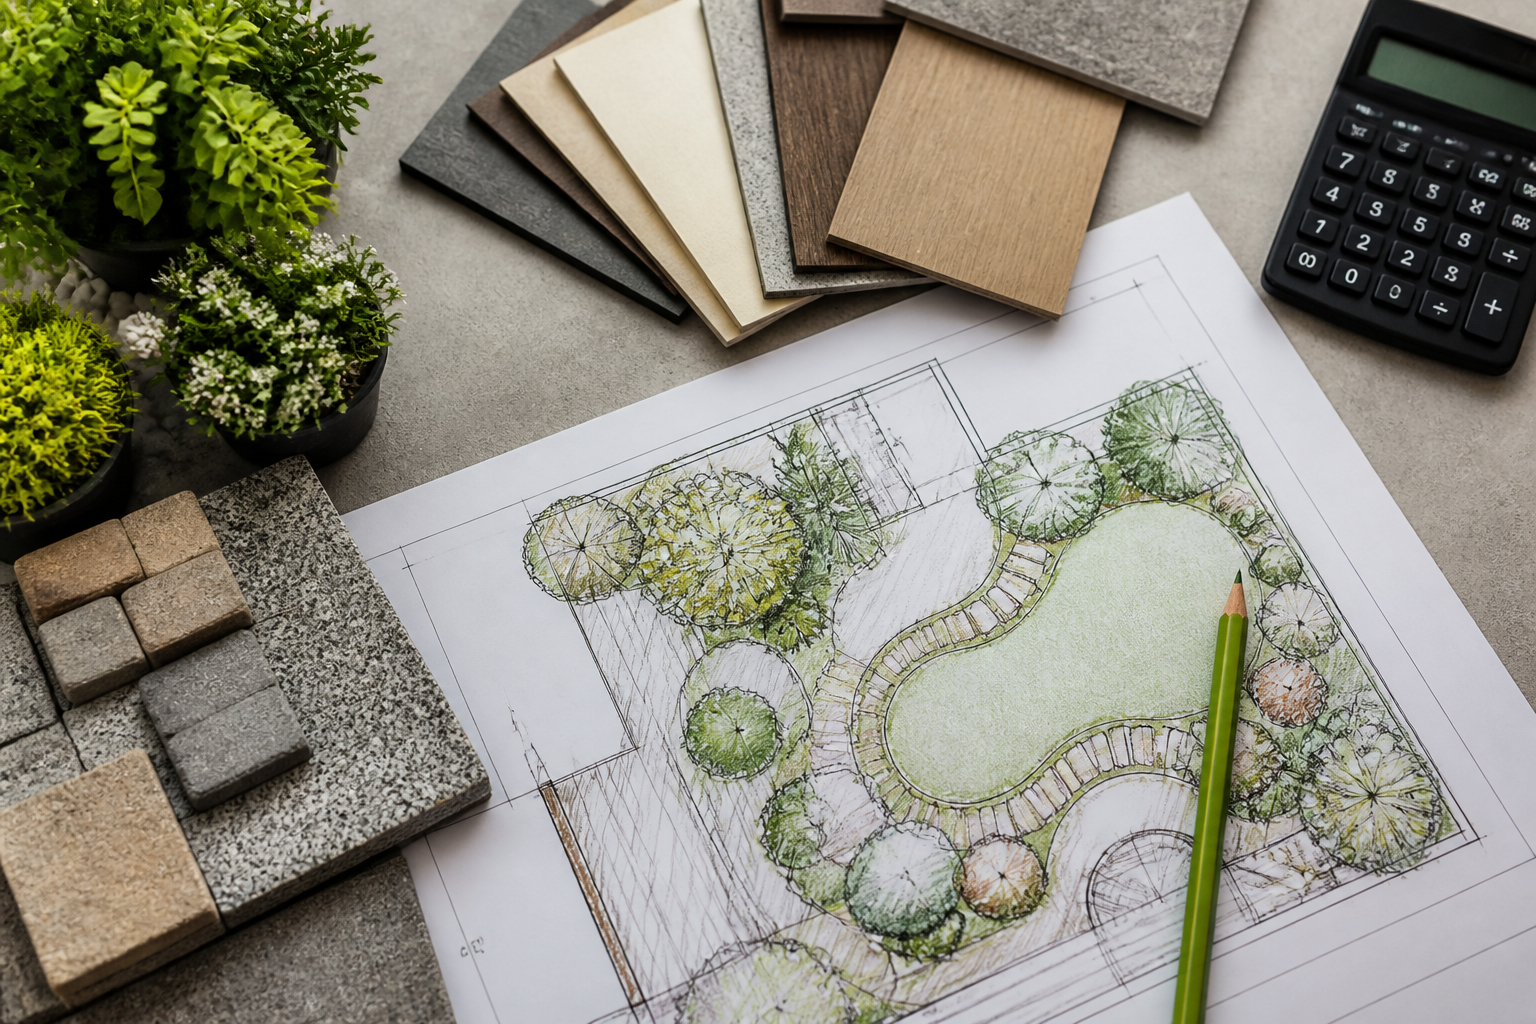
Planning & Best Practices (Mississauga/GTA)
Plan interlocking projects by confirming drainage, soil conditions, and load paths first. Size the base to traffic and soils, design a 2% slope away from structures, and define clean borders. Accurate measurements and staging reduce rework and keep installations on schedule.
Good plans lower risk and protect day‑two maintenance. We emphasize base sizing, haul logistics, and clean edge control in every design‑build scope. Here’s a planning checklist we use across Mississauga and the GTA.
- Map water: Establish downspout paths and a 2% surface slope; add drains where needed.
- Mark utilities: Locate lines before excavation; preserve minimum cover.
- Choose thickness: 60 mm for foot‑traffic areas; 80 mm for vehicles.
- Right‑size base: Softer soils → thicker base and possible geotextile separator.
- Edge plan: Include hidden restraints plus visible soldier/sailor courses.
- Access & staging: Identify machine paths, material drops, and waste removal.
- Pattern alignment: Square off reference lines to keep joints consistent.
- Lighting & power: Pre‑plan conduits for step lights or outlets before base compaction.
- Planting tie‑ins: Blend bed edges and mulch to control weeds and finish the look.
- Seasonal window: Aim for compaction in frost‑free conditions; protect exposed base from rain.
Want a buildable plan you can trust?
HR Greenroots Landscaping provides on‑site, design‑build consultations across Mississauga and the GTA. We size bases correctly, align drainage, and select patterns that match how you live outside.
Step‑by‑Step Installation (Field‑Tested)
Successful paver installs follow a proven sequence: layout, excavation, base compaction, screeding, laying, cutting, edging, compacting, joint filling, and final checks. Each step builds accuracy, so don’t skip density checks, slope verifications, or edge restraint fastening.
- Layout & reference lines: Square your first course; snap chalk lines to control joints.
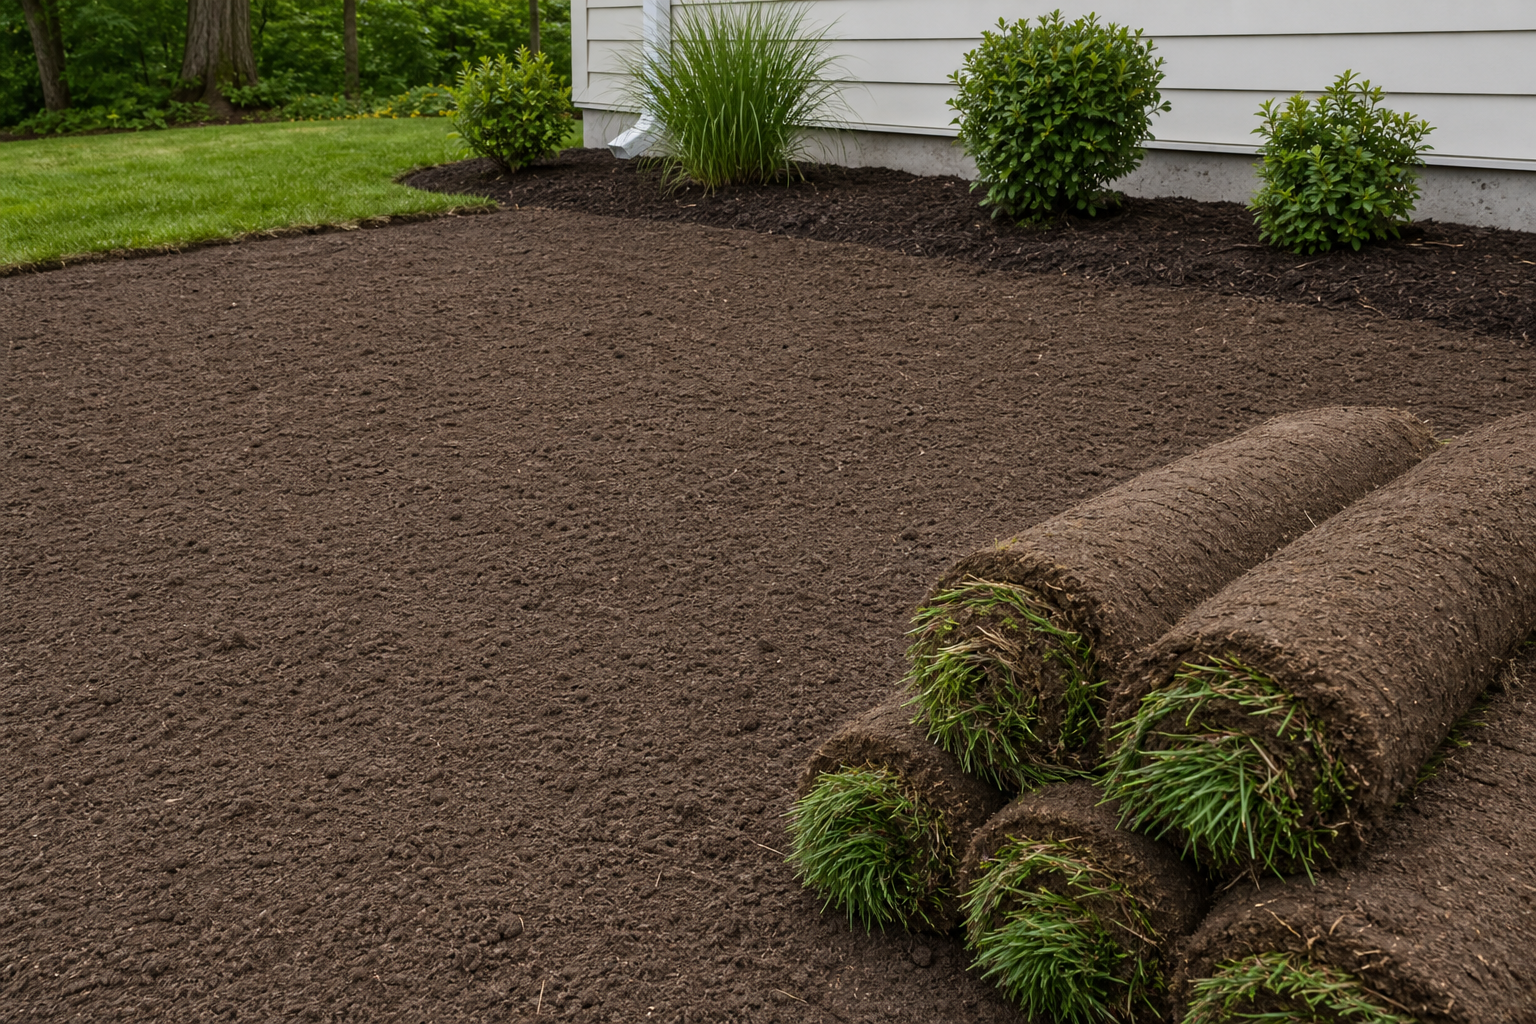
- Excavation: Remove sod/soil to base thickness plus bedding and unit depth; keep a uniform subgrade.
- Subgrade compaction: Dampen and compact to a firm, even surface to limit future settlement.
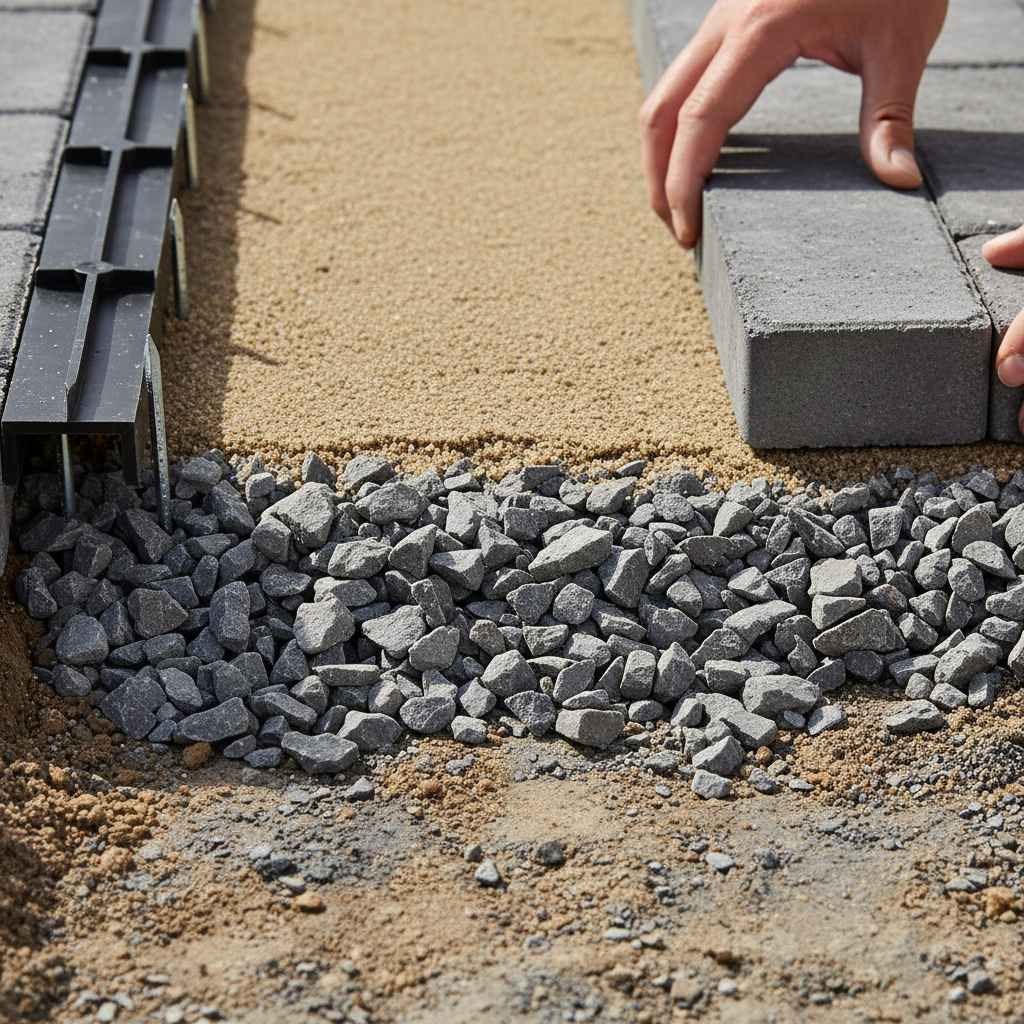
- Base installation: Place graded aggregate in lifts (typically 2–3 in. per lift); compact each lift thoroughly.
- Slope verification: Maintain ~2% fall away from structures; check with a level and string line.
- Edge restraints: Install spike‑anchored restraints on compacted base at perimeters and borders.
- Bedding sand: Screed ~1 in. concrete sand; do not walk on screeded surface.
- Set pavers: Place units tight to strings; maintain consistent joints; blend from multiple pallets.
- Cut & finish: Wet‑saw or score‑and‑split to fit; install border courses cleanly.
- Compact & joint sand: Compact surface; sweep in polymeric sand; activate per manufacturer guidance.
Two quality checks matter at the end: a final compaction pass to seat units and a careful polymeric‑sand activation in dry weather (often 24 hours without rain). These details dramatically improve joint lock and keep seedlings out of seams.
Tools & Resources You’ll Actually Use
Most successful builds rely on compactors, grade controls, saws, and accurate measuring tools. Pair those with polymeric sand, edge restraints, and stable aggregates. Organize materials and tools before excavation to avoid delays and rework.
- Compaction: Plate compactor, hand tamper for tight spots
- Cutting: Wet saw with masonry blade; eye and ear protection
- Layout & measure: String lines, stakes, tape, square, level
- Screeding: 1‑in. pipes/rails, straightedge, lute rake
- Drainage checks: 2‑ft level, laser or water level, and string line
- Materials: Graded aggregate, concrete sand, polymeric sand, restraints, spikes
- Protection: Geotextile (as needed), landscape fabric along beds
For added context on driveway performance and Ontario‑specific considerations, see this practical interlock driveway guide and a complementary overview of interlocking in Ontario. For a process refresher, this step‑by‑step patio article breaks down the sequence clearly.
Maintenance & Seasonal Care (Done Right)
Keep pavers looking new with simple routines: sweep grit, top up joints, and manage water. In snowy months, use plastic blades and de‑icers compatible with concrete. Reapply polymeric sand and consider sealing only when appearance or staining control warrants it.
Weaves of sand in joints are your first defense against weeds and movement. Expect some joint loss after a GTA winter. A spring top‑up with polymeric sand and a light compaction pass restores interlock. Focus on four areas:
- Clean regularly: Sweep debris and rinse to prevent grit grinding.
- Protect edges: Watch for edge roll‑out; reset units and re‑spike restraints as needed.
- Manage snow: Prefer rubber/plastic shovels; use de‑icers labeled safe for concrete pavers.
- Spot seal: Seal high‑traffic or stain‑prone zones; test small sections first.
If dips appear, lift the affected area, add and compact more bedding sand, and reset the units. Because systems are modular, this targeted fix often takes hours—not days—and preserves the surrounding surface.
Case Studies & Mississauga/GTA Examples
Real projects show how planning details pay off. These Mississauga and GTA scenarios highlight base sizing, drainage control, and pattern choices that keep surfaces attractive and functional through Ontario’s seasons.
Driveway with turning loads (Mississauga)
A homeowner needed a wider driveway and smoother snow removal. We specified ~80 mm pavers in a 45° herringbone, upsized the base toward the street apron, and installed straight soldier‑course borders. The result reduced tire rutting and made spring joint top‑ups fast.
Patio plus walkway loop (GTA)
To connect a deck and side gate, we built a ~60 mm patio in modular ashlar, then ran a running‑bond walkway to the gate. A 2% slope pulled water away from the house, and hidden restraints kept the arc of a curved border crisp against new mulch beds.
Pool surround refresh (GTA)
The client wanted cooler feet and better traction. We selected a light, textured unit, aligned drains outside the splash zone, and set a clean sailor course to frame plant beds. The surface now stays comfortable in July sun and rinses clean after parties.
Front entry upgrade (Mississauga)
We replaced cracked concrete with 60 mm textured pavers, added step lighting conduits before base compaction, and used an accent border to frame new shrubs. Winter shoveling is smoother, and the entry reads organized from the street.

Frequently Asked Questions
Homeowners ask about thickness, sealing, winter care, and repairs. Choose 80 mm for driveways, maintain a 2% slope, and top up polymeric sand each spring. Seal only when appearance or stain control warrants it. Most dips can be fixed by lifting and resetting a small area.
What thickness of pavers should I use for a driveway?
Use pavers around 80 mm thick for vehicle traffic. Pair them with a well‑compacted aggregate base sized to soil and loads, and favor a herringbone pattern for stronger interlock where cars turn or brake.
Do I need to seal my interlocking pavers?
Sealing is optional. It can enhance color and resist stains in high‑use areas. If you seal, test a small area first and reapply only as needed. Many homeowners simply maintain joints and keep surfaces clean without sealing.
How do I prevent weeds between pavers?
Start with compacted base and tight joints. Fill joints with polymeric sand and activate it per directions. Sweep regularly to remove wind‑blown seeds, and top up joints each spring to keep gaps locked and less hospitable to growth.
Can interlocking pavers handle Ontario winters?
Yes—when built correctly. The flexible system tolerates freeze–thaw, and joints vent moisture. Maintain about 2% slope for drainage, use de‑icer‑compatible products, and plan a quick spring joint top‑up after snow season.
Conclusion & Key Takeaways
Interlocking pavers deliver flexible strength, clean aesthetics, and easy repairs—ideal for Mississauga and GTA properties. Plan drainage first, size the base to loads, and secure edges. Maintain joints each spring, and you’ll enjoy a crisp, durable surface for years.
- Design to drain: Keep ~2% slope and clear water paths.
- Build the base: Compact in lifts; size thickness to soils and traffic.
- Lock the edges: Hidden restraints and border courses prevent creep.
- Pick smart patterns: Herringbone for driveways; ashlar/running bond for patios and walks.
- Maintain joints: Spring polymeric top‑ups keep weeds and movement in check.
Ready to plan your patio, driveway, or walkway in Mississauga or the GTA? We integrate design, base prep, and planting tie‑ins so your space looks intentional on day one and stays practical through the seasons.
Related Articles
Explore complementary topics across landscaping GTA projects: interlocking base prep fundamentals, pool surround paver safety, garden bed edging tips, retaining wall drainage, and sod installation timing for new hardscapes.