Mississauga stone work planning is the end-to-end process of assessing site drainage, defining elevations, and sequencing base preparation so patios, walkways, steps, and retaining features stay level through Ontario’s freeze–thaw cycles. Done right, planning prevents heave, ponding, and shifting, helping your new hardscape perform for 5–10 winters before any major tune-ups.
By HR Greenroots Landscaping • Last updated: 2026-06-27
Quick Summary
Plan Mississauga stone work by mapping water routes, excavating to stable subgrade, compacting 2–3 inch lifts of well-graded base (often 6–12 inches total), and selecting materials matched to use zones. Lock edges, stabilize joints, and document slopes around 2% away from structures to keep surfaces safe and stable.
- What you’ll get: a practical, build-ready plan you can stake and measure.
- Why it matters: fewer callbacks, smoother winters, and better curb appeal.
- Who this helps: homeowners, small businesses, and property managers in Mississauga.
- How we work: integrated design-build that aligns grading, base, and finishes.
- What is stone work planning?
- Why planning matters in Mississauga
- How projects run (step-by-step)
- Types of stone work
- Best practices & checklists
- Tools, specs & resources
- Case studies & examples
- Mistakes to avoid
- Maintenance & longevity
- Planning with HR Greenroots
- FAQ
- Conclusion & next steps
What is stone work planning?
Stone work planning is the structured translation of design intent into buildable details—elevations, slopes, base depths, edge restraints, and joint stabilization. It aligns layout, soil conditions, and material choices so patios, walkways, steps, and retaining features resist movement, shed water, and remain safe under foot and vehicle traffic.
In our experience across Mississauga and the GTA, great outcomes start on paper. We tie drawings to field-ready specs: 2% target slopes, 2–3 inch base lifts compacted to a dense state, and clear edge control. That’s how a mood board becomes a hardscape that survives winter number one—and winter number ten.
- Scope: interlocking pavers, natural flagstone, large-format slabs, armour stone, steps, and walls.
- Inputs: native soil type, frost depth, surface drainage, traffic loads, and sunlight exposure.
- Outputs: excavation lines, base specifications, joint strategy, and a finishing sequence you can follow.
Planning also pairs nicely with broader outdoor upgrades. When stone layouts coordinate with a planting plan and edge definition, maintenance drops while curb appeal rises. For a full framework, see our landscape design and build overview.
Why planning matters in Mississauga
Mississauga’s clay-leaning soils and frequent freeze–thaw cycles demand drainage-first design and disciplined base preparation. Without them, many surfaces shift within 1–2 winters. A detailed plan sets slopes, separates base from fines, and compacts layers uniformly so water exits and the structure stays put.
Here’s the reality: water always seeks the low point. If that low point sits beneath your patio, frost will expand trapped moisture and lift stones. When spring arrives, those pockets collapse. We prevent that with clear 1.5–2.0% surface slopes, daylighted outlets, and well-graded aggregates that compact tightly.
- Surface grading: aim ~2% away from foundations for patios and walks; adjust near thresholds.
- Subgrade separation: a non-woven geotextile between native soil and base reduces pumping.
- Uniform compaction: compact in 2–3 inch lifts; avoid the temptation to dump 6 inches at once.
Most callbacks we hear about trace back to skipped steps: no geotextile, shallow excavation, or missing edge restraint. Planning fixes that on day one. If your yard struggles with slope or soggy corners, start with our slope correction guide.
How stone work projects run (step-by-step)
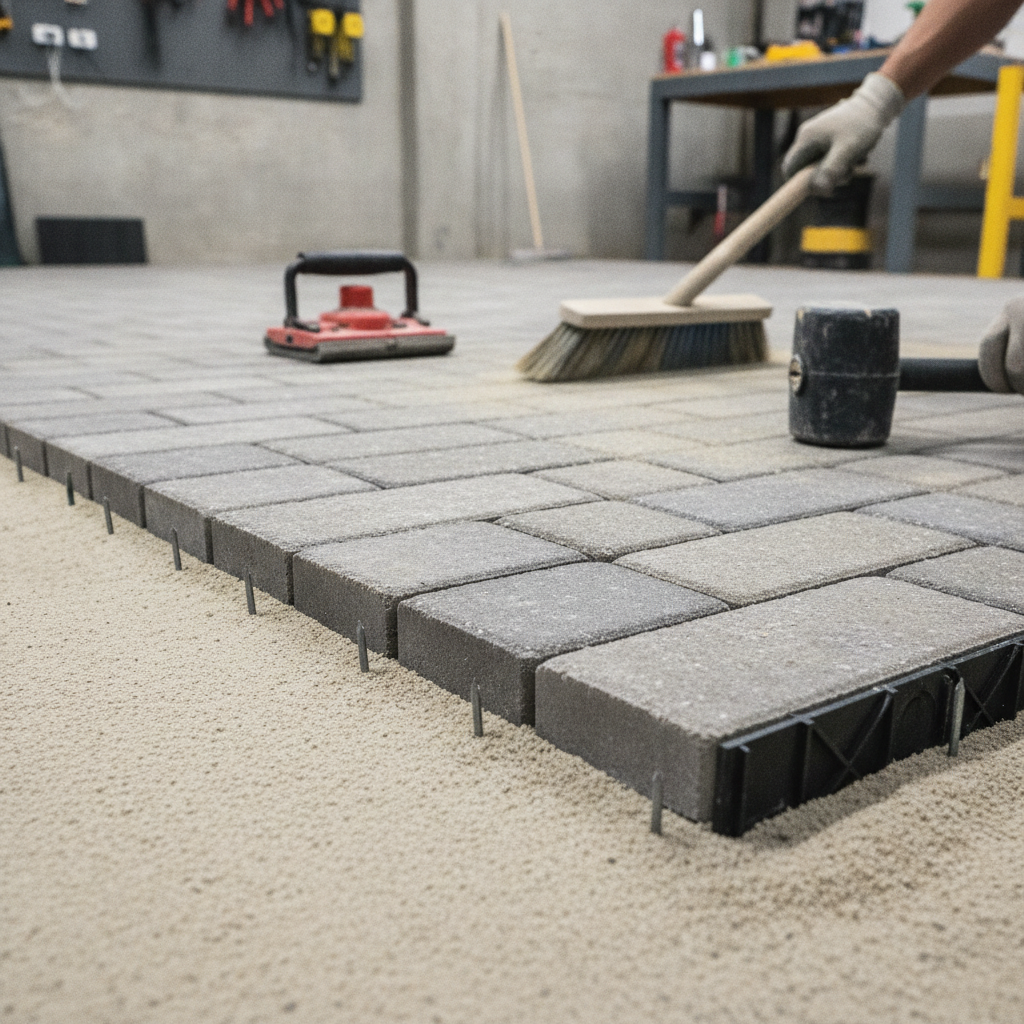
A reliable Mississauga stone work planning sequence is consistent: confirm drainage and utilities, excavate to stable subgrade, install geotextile, place 2–3 inch lifts of well-graded base, screed bedding sand, set stones, secure edges, stabilize joints, and verify final slopes. This order prevents movement and ponding.
- Site walk and measurements: Define use zones (dining, grill, pathway, parking). Record existing grades to 0.25 inch where it counts—door sills, garage slabs, and window wells.
- Utility locates and access: Mark gas, hydro, and communications. Plan material staging, wheelbarrow routes, and waste haul-out so production stays efficient.
- Excavate to subgrade: Remove turf, topsoil, and organics. Depth varies: patios often 6–10 inches of base; driveways 8–12 inches, plus 1 inch bedding.
- Proof-roll the subgrade: Identify soft spots and undercut if needed. Stable subgrade supports everything above it.
- Install geotextile: A non-woven separator curbs fines migration and keeps your aggregate base clean.
- Place base in thin lifts: 2–3 inches at a time. Compact each pass; verify with a straightedge and target density (many crews aim near 95% of Standard Proctor).
- Screed bedding layer: Typically 1 inch of concrete sand or HPB. Keep the layer uniform; don’t walk on freshly screeded areas.
- Set stones: Blend multiple pallets to avoid color banding. Maintain joint widths (often 1/8–3/16 inch for pavers; variable for natural stone).
- Edge restraints: Spike-in or concrete haunch to lock the field and prevent creep.
- Stabilize joints: Sweep polymeric sand, compact, then lightly mist to activate binding agents without flooding.
- Final checks: Confirm 2% fall, test water flow, clean surfaces, and review lighting and transitions.
For a deeper dive into base science, we’ve outlined field-tested methods in our interlocking paver base preparation guide.
Types of stone work and where each fits
Match material to load, slip risk, and style. Use interlocking pavers for driveways and high-traffic patios, natural flagstone for organic feel, large-format slabs for modern looks, and armour stone for steps and retaining. Around pools, prioritize non-slip textures and cooler-touch surfaces.
Choosing the right stone isn’t only about looks. Driveway pavers need interlock strength and joint stability under turning loads. Pool surrounds demand traction under wet feet, typically targeting textures with a high wet coefficient of friction and light colors that run cooler in July sun.
- Interlocking pavers: Strong, modular, and repairable. Typical vehicular base: 8–12 inches.
- Natural stone (flagstone/limestone): Classic grain and color variation; ideal for patios and garden paths.
- Large-format slabs: 24×24 or 24×36 inch pieces deliver clean modern geometry; require flat, well-compacted support.
- Armour stone and wall systems: Stabilize slopes, form steps, and define edges with mass and presence.
- Step kits and treads: Pre-sized risers improve safety; common riser height 6–7.5 inches.
To see how a single stone feature can anchor a whole yard, scan our practical notes in stone feature installation planning.
Best practices and planning checklists
Start with drainage, then build up from a well-compacted, well-graded base. Keep lifts thin, joints clean, and edges restrained. Document elevations at thresholds and drains so crews build exactly what was designed, minimizing field guesses and rework.
Drainage and grading
- Set primary slopes at ~2% away from foundations; use 1–1.5% only for protected runs.
- Daylight water to swales, drains, or lower lawn—never trap it under the patio.
- Confirm downspout routing; add extensions or buried lines where needed.
Base composition and compaction
- Specify well-graded aggregate (e.g., 0–3/4 inch) over a non-woven geotextile.
- Compact 2–3 inch lifts; target dense, uniform support across the field.
- Thicken base 2–4 inches at edges, transitions, and under steps.
Layout and pattern control
- Use string lines and a laser level to hold patterns square and slopes consistent.
- Blend 3–4 pallets to avoid color banding; rotate stones for natural variation.
- Keep paver joints ~1/8–3/16 inch; use spacers for large slabs.
Finish and protection
- Stabilize joints with polymeric sand; mist gently to avoid washout.
- Seal where staining is likely (grills, driveways). Follow product cure windows.
- Protect edges during backfilling and planting to prevent early creep.
Planning for seasons is part of the job in Ontario. For a broader calendar, bookmark our seasonal maintenance planning checklist.
Tools, specs, and local resources
Use a plate or reversible compactor sized to your base depth, a straightedge or screed rails for bedding, reliable edge restraints, and polymeric sand for joints. Cross-check your approach with trusted hardscaping references and local guidance before you break ground.
- Compaction: Choose a plate compactor with suitable centrifugal force for 2–3 inch lifts; verify pass counts on a test strip.
- Control: Laser level for slope checks; 8–10 foot straightedge for flatness.
- Restraint: Use spike-in edge or concrete haunch; increase reinforcement at curves.
- Safety: Utility locates first; then plan delivery routes and staging to reduce handling.
For additional perspectives on sequencing and homeowner prep, see these practical overviews of hardscaping considerations before starting and a concise patio or walkway planning checklist. For design context, scan a broader landscape design overview. These references align with the planning-first approach we use on Mississauga projects.
Case studies and local examples
On Mississauga projects, our design-build team pairs clear slopes with disciplined base prep and clean edge control. Real outcomes include patios that shed water, steps that feel solid, and retaining walls that tame grades—each documented with target slopes, base depths, and joint plans.
Backyard dining patio near Saigon Park
- Problem: A 35×16 foot lawn area back-pitched ~0.8% toward the house; spring thaws caused puddling within 24 hours.
- Plan: Regrade to 2% away from the foundation; add a swale that daylighted at the side yard.
- Build: 7 inches of well-graded base in 3 lifts; 1 inch bedding; 24×24 inch slabs with joint spacers.
- Result: Water clears the surface in under 10 minutes during a steady rain; joints remain tight.
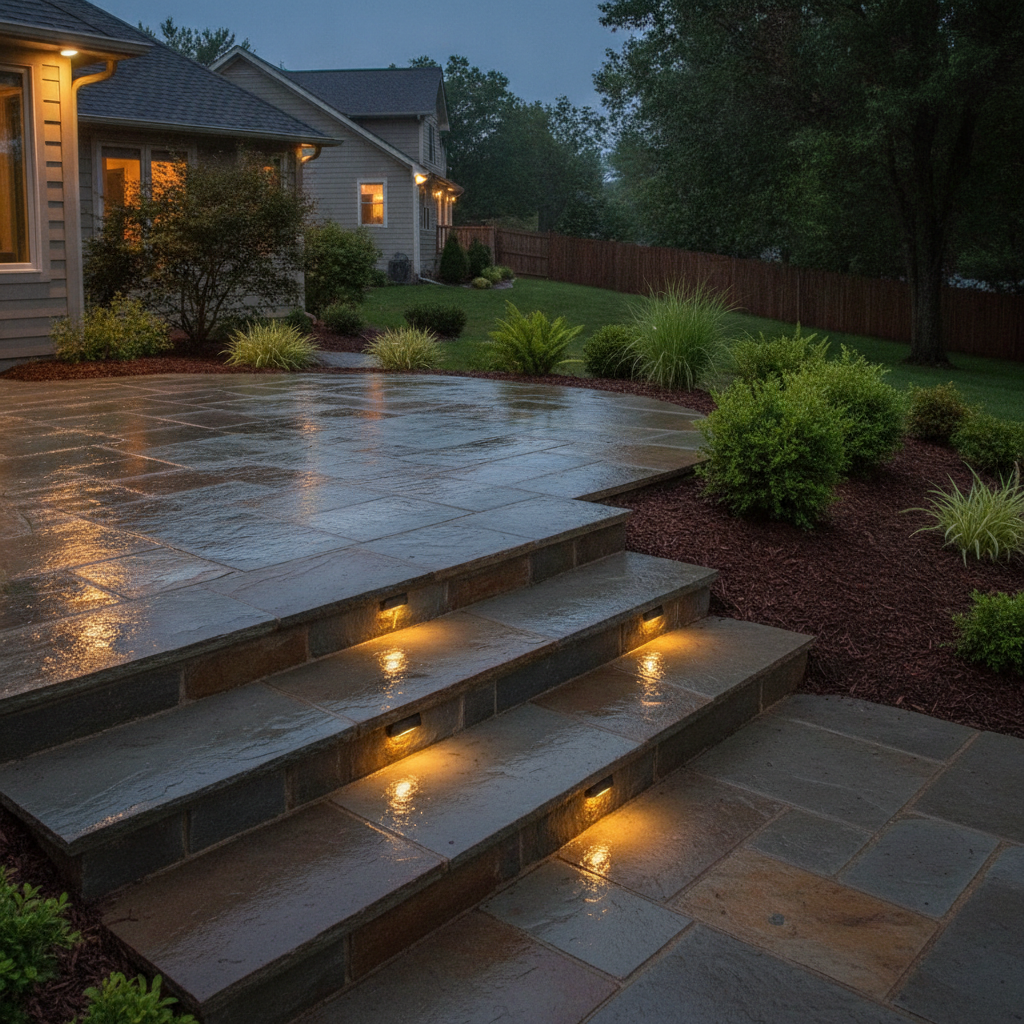
Front entry steps close to Lambton College
- Problem: Slippery timber steps with inconsistent 9–10 inch risers led to trip risks.
- Plan: Replace with armour stone treads; target 6.5–7 inch risers and 12 inch minimum run.
- Build: Engineered bearing zone; compacted base extended 12–16 inches behind each tread.
- Result: Predictable footing and integrated low-voltage lighting improved nighttime safety.
Circulation and parking upgrades benefit from the same discipline. For driveway widening best practices, see our practical notes on extending a driveway in Mississauga.
Common mistakes to avoid
Most failures trace to rushed prep: under-excavation, missing geotextile, thick un-compacted lifts, uneven bedding, or no edge restraint. Avoid these, and your patio or path typically stays flat and drains cleanly through multiple Ontario winters.
- Skipping utility locates: Risky and avoidable. Call before you dig; mark and protect lines.
- Leaving organics under base: Organic layers decay and settle. Strip to stable soil.
- Deep, single-pass base layers: The center stays loose. Use 2–3 inch lifts and verify.
- Uneven bedding: Overworked sand creates soft spots; keep a consistent 1 inch.
- Missing edge restraint: Perimeters migrate; lock them with spikes or haunching.
- Trapped water: No daylight? Expect heave. Always show a route out.
If permits or property lines complicate your layout, integrate planning early with our broader design-build process.
Maintenance and longevity
Well-planned stone work needs light, predictable care. Inspect edges each spring, touch up polymeric sand when joints sink 1/8 inch or more, and keep surface water routes clear. Around grills and driveways, consider sealing; reapply on the manufacturer’s cycle to maintain protection.
- Spring: Check for rocking stones; top up joints; confirm 2% slopes still move water.
- Summer: Rinse surfaces; remove weeds at edges; verify lighting runs.
- Fall: Clear leaves; protect drains; route downspouts before freeze-up.
Maintenance is faster when planting beds are organized. For a seasonal route that keeps everything tidy, review our maintenance planning checklist.
Planning with HR Greenroots Landscaping
We plan and build Mississauga stone work as one coordinated service—grading, base, edges, joints, and finishing plants handled by a single team. That integrated approach reduces handoffs, tightens timelines, and keeps accountability clear from concept to completion.
- Integrated services: interlocking & pavers, natural stone, retaining walls, steps, and lighting.
- Ontario-specific planting: layered beds, clean edges, and mulch that reduces upkeep.
- Maintenance-minded details: access routes, hose bib clearances, snow paths, and storage.
Want to see how planning informs the base, joints, and sealer choices? Start with our paver base preparation playbook and pair it with stone feature planning for accents and steps.
Local considerations for Mississauga
- Schedule work near Saigon Park with weekend traffic in mind; event days can affect deliveries and staging.
- Sequence excavation and base during drier stretches; saturated clay reduces compaction quality and adds 1–2 extra passes.
- When projects sit close to Lambton College, avoid peak class-change windows for material drop-offs.
Need a buildable plan? We map slopes, base depths, and edge details so your hardscape looks intentional on day one—and stays sharp through the seasons.
Book a site consultation to align design and construction.
Frequently Asked Questions
These concise answers move you from idea to a build-ready Mississauga stone work plan. Each one covers what to do and why it works in our local soils and climate.
How deep should the base be for a Mississauga driveway?
Many interlocking driveways perform well with 8–12 inches of compacted, well-graded base plus 1 inch bedding, adjusted for soil strength and load. Thicken 2–4 inches at edges and transitions. Compact in 2–3 inch lifts and verify drainage away from structures.
Do I need geotextile under my patio base?
In many Mississauga yards with clay or silt, a non-woven geotextile separates base aggregate from native soils, reducing pumping and preserving structure. It’s a low-cost step that supports long-term stability and consistent drainage performance.
What slope should I design for around the house?
A common planning target is about 2% away from foundations for patios and walks, with final routes daylighting to a swale, drain, or lower lawn. Always adapt to site constraints, thresholds, and neighboring grades.
Should I seal interlocking pavers?
Sealing is optional. It can enrich color and resist staining, especially near driveways or grills. If you choose to seal, clean thoroughly, respect cure windows, and reapply on the manufacturer’s schedule for best results.
Conclusion and next steps
Strong Mississauga stone work planning aligns vision with buildable details: drainage routes first, compacted base in thin lifts, precise bedding, locked edges, and stabilized joints. Commit to that sequence and your patio, path, or wall stays level, drains cleanly, and looks intentional for years.
- Key takeaways: 2% slopes, 2–3 inch base lifts, geotextile separation, and solid edge control.
- Action steps: stake elevations, draft base specs, and plan access and staging before demo.
- Next move: schedule an on-site walkthrough so we can finalize a build-ready plan.
Ready to map your site and lock the plan? Book a discovery session in Mississauga and we’ll coordinate design and build so your hardscape performs through winter and beyond.