Stone feature installation planning is the end-to-end process of assessing site conditions, selecting durable stone and base materials, and sequencing work so walls, steps, and accents last. From our Mississauga hub at 100 Matheson Blvd E unit 202, we coordinate design, utility checks, and build prep so each decision suits Ontario’s climate and codes.
By HR Greenroots Landscaping • Last updated: 2026-05-24
Above-Fold Overview and ToC
Plan stone features by defining goals, mapping drainage, confirming structure types, and locking base depths and materials before digging. Accurate measurements, utility locates, and frost-aware design prevent failures. This guide outlines practical steps HR Greenroots Landscaping uses across Mississauga and the GTA to deliver durable, low-maintenance stone elements.
Get oriented quickly. Then dive deeper where you need detail.
- What stone feature installation planning includes and excludes
- Why timing, grading, and drainage drive success
- Step-by-step workflow from first visit to final sweep
- Specifications, tools, and quality checks we rely on
- Real Mississauga examples and common pitfalls to avoid
- FAQ, key takeaways, and an easy way to start
Summary
Successful stone features start on paper: site grading, base thickness, edge restraints, and water paths are set before any excavation. With a plan, you control risk, sequence crews, and protect warranties. Without one, drainage and frost can undermine even premium stone within a couple of seasons.
Here’s the short version of how we plan, build, and verify durable stone work for Ontario properties.
- Set goals and constraints: Desired look, use, code limits, access routes.
- Survey and soil check: Slopes (aim 1.5–2% shed), compaction targets (~95% Proctor), and utilities.
- Design: Elevations, layer depths, weep paths, and material schedule.
- Build sequence: Excavation → base → edge → set stone → jointing → clean.
- Quality control: String lines, laser levels, and plate compaction passes (documented).
What Is Stone Feature Installation Planning?
Stone feature installation planning defines goals, site elevations, drainage paths, materials, and construction sequencing for walls, steps, edging, and patios. It converts inspiration into build-ready drawings with tolerances, base depths, and safety clearances the crew can execute and warranty.
In practice, a good plan bridges aesthetics and engineering. It details how water leaves the site, how frost heave is managed, and how each layer supports the next.
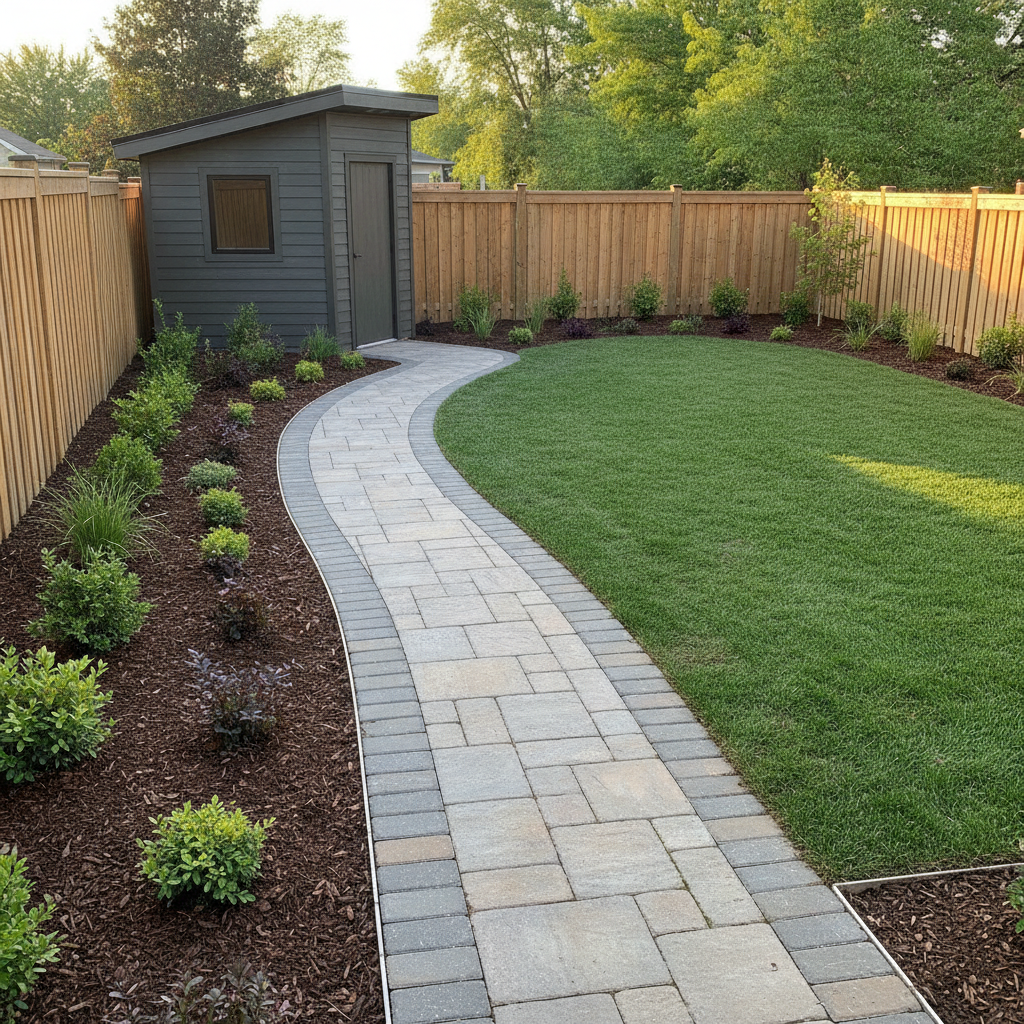
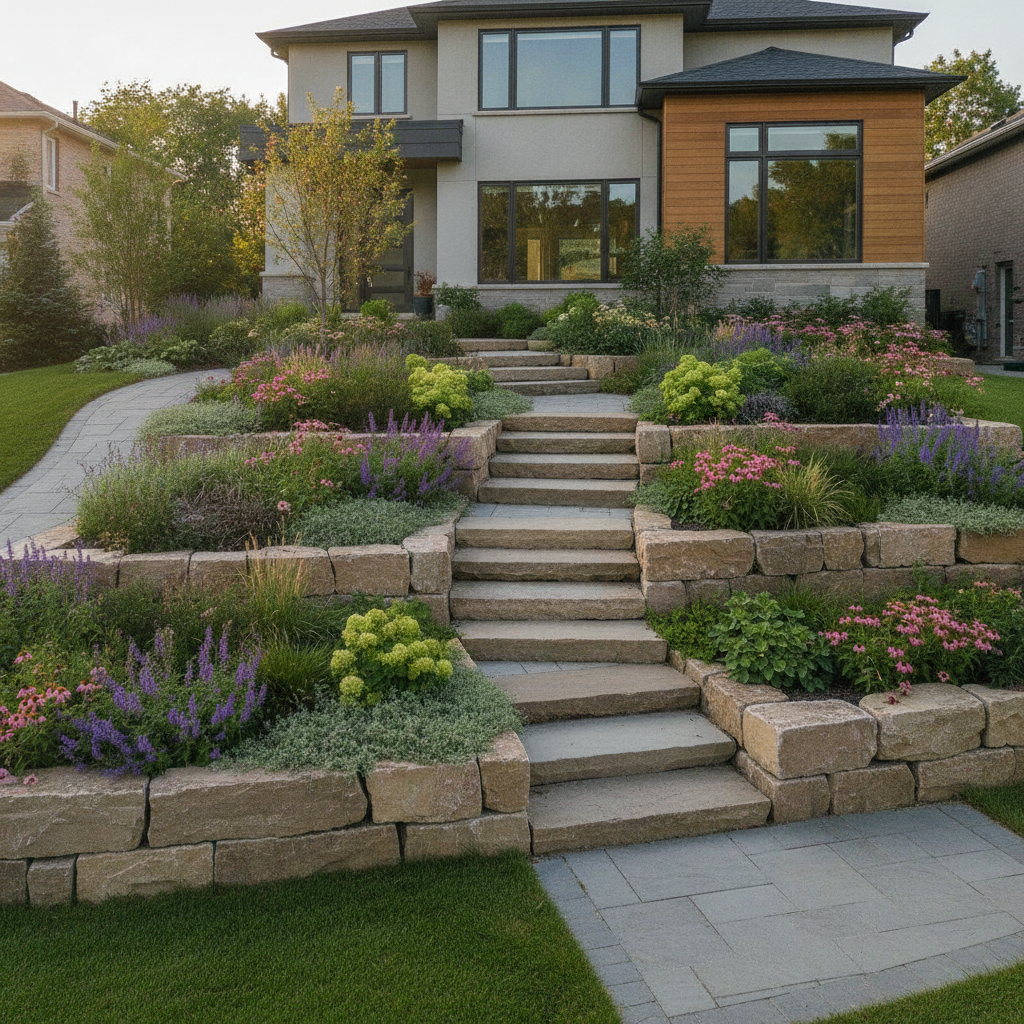
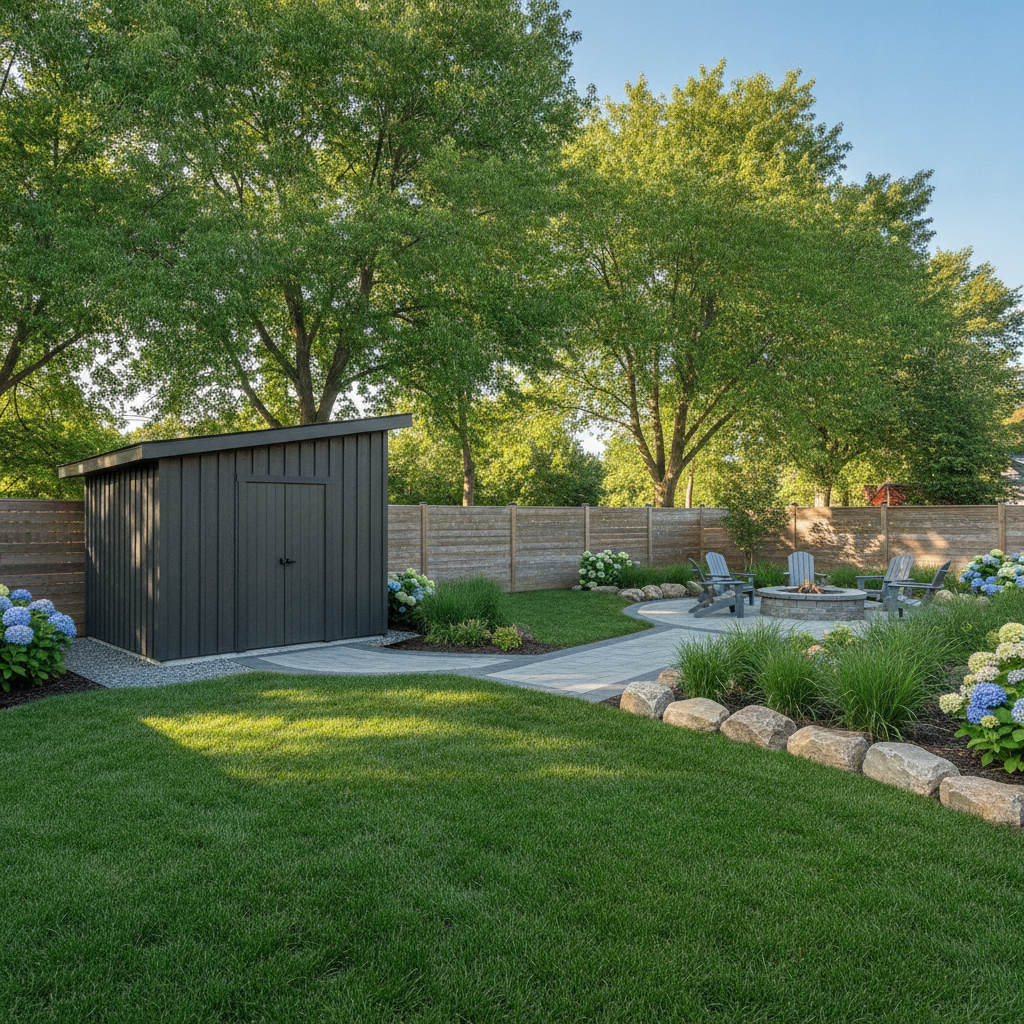
- Scope: Retaining walls, garden walls, steps, landings, patios, walkways, borders, armor stone accents, and pool surrounds.
- Decisions: Stone type, base depth, geotextile class, drainage stone size, edge restraints, jointing material.
- Documents: Layout plan, section details, materials list, and inspection checkpoints.
- Tolerances: Flatwork slope typically 1.5–2% away from structures; step risers 6–7 inches with 12–14 inch treads; wall backfill with 3/4 inch clear stone and a 4 inch perforated drain where needed.
Our team aligns drawings with how we actually build, so the plan matches field reality—access, staging, and compaction equipment included.
Why Stone Features Matter in Mississauga and Peel
In Mississauga and the Regional Municipality of Peel, freeze-thaw cycles, clay soils, and storm events challenge stone work. Thoughtful grading, sub-base compaction near 95% Proctor, and 2% surface slope move water off features and away from foundations, protecting your home and landscape investment long-term.
Local climate puts pressure on poorly planned installations. Clay can trap water; winter pushes on anything that holds it. We design for movement and drainage first, beauty second—both are essential.
- Freeze–thaw reality: Frost can reach 36–48 inches in Southern Ontario. We avoid water traps and set proper base depths.
- Storm intensity: Even brief downpours can overwhelm flatwork without 1.5–2% fall. Swales and French drains add resilience.
- Soil bearing: Clay and fill vary widely. Proof rolling and plate compaction help us hit density before stone goes down.
- Access planning: Protect lawns and trees with mats; stage 3/4 inch clear stone and 5/8 inch crushed gravel to minimize trips.
Local considerations for Mississauga
- Schedule utility locates and staging early—traffic near EPIC College of Technology can affect deliveries during weekday rush.
- Plan around spring thaw and fall rains; we prioritize sub-base work in stable weather, then set stone when moisture drops.
- Where sites border Saigon Park, we protect tree roots and topsoil, using geotextile and aggregate pads for equipment.
How Stone Feature Projects Work: Step-by-Step
A reliable process moves from goals to drawings, then to excavation, base, setting, jointing, and cleanup. Each stage has pass–fail checks: utility clearance, compaction density, slope verification, and edge restraint integrity. Documented checkpoints reduce callbacks and protect warranties.
Below is the repeatable workflow we use on Mississauga projects. Following it reduces drift, delays, and rework.
- Discovery and goals: Use-cases, styles, and maintenance preferences captured in writing.
- Site audit: Measure slopes with a laser; note soil, drainage, shade, and access. Photograph utilities and downspouts.
- Concept design: Layout options, elevations, and section details for base and drainage.
- Materials schedule: Stone SKUs, geotextile, aggregates, edge restraints, jointing sand or mortar.
- Pre-build checks: Utility locates, permits as required, neighbor notifications if access is shared.
- Excavation: Remove organics; over-excavate to design depth (+ allowance for compaction).
- Sub-base and base: Geotextile separation where needed; compacted lifts of 5/8 inch crushed gravel; 3/4 inch clear stone for drainage zones.
- Edge restraint: Secure metal or concrete edge at 10–12 inch spike spacing or as specified.
- Set stone: String lines, spacers, and dead-blow hammers to align joints and heights.
- Jointing: Polymeric sand, washed joint sand, or mortar—selected for use-case and slope.
- Punch and clean: Rinse stone (as appropriate), confirm slopes, and document maintenance plan.

Types of Stone Features and Methods
Choose methods that match function: gravity or segmental retaining walls for holding soil, mortared stone for structural steps, dry-laid patios for flexible, frost-tolerant surfaces. The right system pairs base, drainage, and edge restraint with the stone’s thickness and intended use.
We build with both natural stone and high-quality manufactured units, aligning details to use-cases.
Walls and garden edging
- Armor stone accents: Dramatic, heavy units for seating or grade transitions; set on leveled gravel pads.
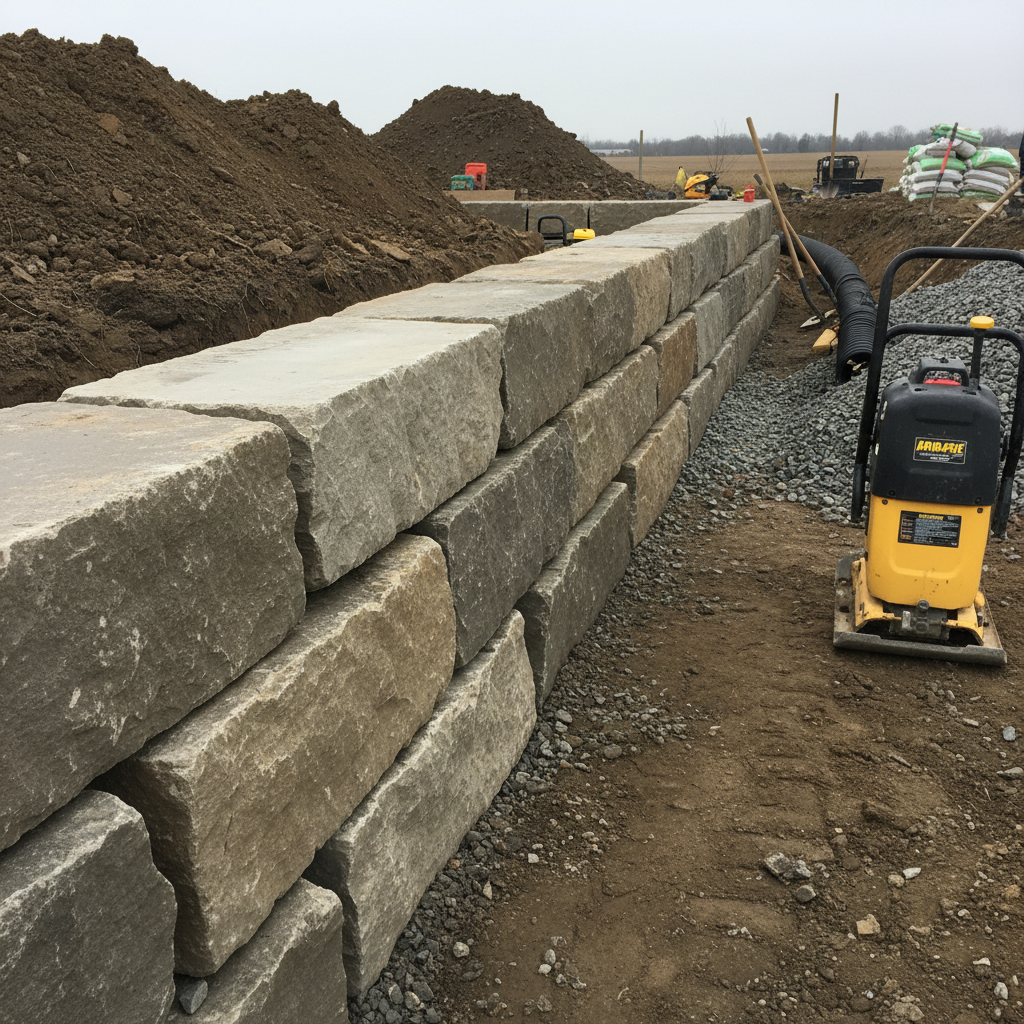
- Segmental retaining walls (SRWs): Interlocking blocks with geogrid when engineered; typical batter 1 in per course for gravity walls.
- Garden edging: Natural stone curbs or soldier-course pavers with concealed stakes or concrete toe.
Steps, landings, and entries
- Dry-laid steps: Thick slabs on compacted base; risers 6–7 inches, consistent to avoid trip hazards.
- Mortared steps: Concrete base with natural stone veneer or solid stone treads for permanence.
- Landings: 1.5–2% slope away from doors; edges restrained to prevent creep.
Patios, walkways, and pool surrounds
- Dry-laid patios: Flexible systems with bedding sand; joints sanded or polymeric for stability.
- Walkways: Minimum clear width 36–48 inches for comfortable movement; smooth transitions at thresholds.
- Pool surrounds: Heat-reflective, slip-aware textures; expansion joints where rigid bases meet coping.
Our planning connects these elements so circulation feels natural and edges stay clean—no wandering borders, no water trapped at transitions.
Best Practices for Stone Feature Planning
Design water away, build a base you can trust, and lock edges. Target ~95% Proctor density in sub-base, maintain 1.5–2% surface fall, and separate fines with geotextile where soils are mixed. Document slopes and compaction passes so the installation performs through freeze–thaw cycles.
In our experience across Mississauga and the GTA, these habits prevent the majority of callbacks.
- Drainage first: Map downspouts, sump outlets, and low areas. Add French drains or swales if needed.
- Lift management: Compact in lifts no thicker than the plate can densify—often 2–4 inches per pass.
- Edge control: Secure metal or concrete toe; spikes 10–12 inches apart. Unrestrained edges wander.
- Jointing matched to use: Polymeric sands in traffic zones; washed sand for permeable builds; mortar where rigidity is required.
- Freeze strategy: Keep water moving. Backfill SRWs with 3/4 inch clear stone; set drains to daylight or a basin.
- Consistent stairs: Hold riser/tread dimensions within 1/4 inch across a flight.
- Protection: Use ground protection mats and plywood “roads” to save lawns and garden beds during staging.
We also plan maintenance from day one—access for resealing (if chosen), bed edges you can string-trim, and joints you can sweep-clean.
Tools, Materials, and Resources
A dependable stone build uses the right tools and materials: plate compactors sized to the job, screened aggregates, geotextile separation, and reliable edge restraints. Laser levels, string lines, and dead-blow hammers deliver finish quality; French drain components keep water out of trouble zones.
Here’s a concise checklist the crew and homeowner can align on before mobilization.
Core equipment
- Laser level or builder’s level; 100 ft tape; marking paint and flags.
- Plate compactor matched to lift thickness; hand tamp for edges and tight areas.
- Cutting tools (wet saw or table) and PPE; dead-blow mallets; pry bars.
Base and drainage materials
- Geotextile separator for mixed soils; robust grab tensile strength recommended.
- 5/8 inch crushed gravel for base lifts; 3/4 inch clear stone for drainage zones.
- 4 inch perforated drainpipe with sock to a safe daylight or basin.
Setting and finishing
- Metal or concrete edge restraints; 10–12 inch spikes; masonry adhesive as specified.
- Bedding layer (screeded sand or chip depending on system); joint sand or polymeric.
- Sealant (optional) chosen for stone type and slip resistance requirements.
For a broader planning context, see our own design–build guide for Mississauga, which shows how stone work ties into planting, lighting, and maintenance.
Case Studies and Mississauga Examples
Local case studies show how planning choices play out: base preparation, drainage routes, and edge control determine longevity. In Mississauga backyards, matching methods to soil and access constraints prevents settlement, washouts, and wandering borders—even after heavy spring rains.
Here are condensed, anonymized scenarios drawn from recent HR Greenroots Landscaping projects.
- Armor stone entry steps: A clay-heavy lot near central Mississauga received a three-slab stair on leveled gravel pads with 1 inch setback per rise. We added a 4 inch drain to daylight and kept treads at 13 inches. After two winters, risers remain level and joints tight.
- SRW with backyard slope: A segmental retaining wall stabilized a 30 inch grade change. We backfilled with 3/4 inch clear stone and installed a perforated pipe to a catch basin. The lawn above drains via a shallow swale, keeping hydrostatic pressure off the wall.
- Patio plus walkway, dry-laid: A 380 sq ft patio and 50 ft walkway used compacted 5/8 inch gravel lifts and restrained edges at 10 inch spike spacing. Joints received polymeric sand. Surface slope averaged 1.7%, verified with a laser.
- Pool surround refresh: We replaced uneven coping with non-slip stone and reset the sub-base. Expansion joints isolate rigid sections; surface fall directs splash-out to planting beds, keeping water away from the house.
Across these projects we documented slopes, compaction passes, and materials—useful records if a warranty claim is ever needed.
Common Mistakes and How to Avoid Them
Most failures trace to water and movement: inadequate base depth, poor compaction, missing edge restraints, and no drain path. Fix them at the plan stage—specify layer depths, compaction targets, and weep routes—and confirm them on-site with photos and measurements.
- Skipping utility locates: Always book locates before digging. Striking lines is dangerous and costly.
- Thin base, thick bedding: Reverse it. Strong base, thin, even bedding gets you endurance and even joints.
- No edge restraint: Unrestrained edges creep within a season, especially on curves and driveways.
- Flat to the house: Always aim 1.5–2% fall away from structures; check at multiple points.
- Mixed soils without separation: Use geotextile where clay and fill meet aggregate to prevent fines migration.
If you’re unsure about any of these, we’ll walk the site and mark a simple plan you can follow without guesswork.
Project Timing and Seasonality
In Southern Ontario, schedule excavation and base work in stable weather, then set stone as moisture drops. Spring and fall windows work well; mid-winter installs are limited. Allow lead time for utility locates, material delivery, and any municipal permits tied to walls or trees.
We stage aggregate deliveries to match compaction rhythm so lifts don’t sit wet. When rain threatens, we protect open excavations with temporary drainage and coverings.
- Lead times: Utility locates typically require a few business days; complex walls may need engineering review time.
- Weather buffers: We build 1–2 day weather cushions into schedules during shoulder seasons.
- Material readiness: Keep stone, spikes, and drains on-site before excavation to avoid pauses between stages.
How Stone Features Fit into Your Whole Landscape
Stone features work best inside a coordinated plan—matching circulation, beds, lighting, and maintenance access. Tie elevations to lawn and garden edges, keep mower-friendly lines, and ensure water exits into planting or drainage, not onto neighbors or walkways.
Stone isn’t the whole story. Our design team connects hardscape decisions with sod installation, garden beds, and privacy edges so the yard is easy to live with and care for.
- Movement: Walkways 36–48 inches wide, landings sized to pause and turn comfortably.
- Planting synergy: Beds catch runoff, add seasonal color, and soften stone mass.
- Edges for upkeep: Clean soldier courses or curbs you can string-trim without fraying lawns.
For a deeper primer on the design side, our internal Mississauga design–build article covers circulation, grading, and planting structure.
Need a Planning Session?
A focused, on-site planning session clarifies elevations, drainage, and build sequencing in under an hour. You leave with a sketch, layer depths, and a short punch list—exactly what crews need to build once and build right. It’s the fastest path from idea to durable stone work.
Prefer a consultative walk-through? We’ll mark slopes, note access paths, and outline edge and drainage details the same day.
- On-site review of slopes, soils, and utilities
- Sketch with key depths, slopes, and materials
- Staging and protection plan to keep lawns tidy
Frequently Asked Questions
Homeowners ask about base depth, drainage, permits, and winter performance. The short answers: build thicker base, manage water, check local rules, and document compaction. Below are direct, no-fluff responses to the questions we hear most often in Mississauga.
How deep should the base be for a stone patio?
Base depth depends on soil and use. For most patios in our area, compacted aggregate often ranges 4–8 inches, with 1–2 inches of bedding above. On driveways or poor soils, the base is thicker. We verify with a laser and compaction passes to ensure stability.
Do I need drainage behind a retaining wall?
Yes. We backfill with 3/4 inch clear stone and include a 4 inch perforated pipe to daylight or a basin when required. Proper drainage reduces hydrostatic pressure and freeze–thaw damage, which is a key reason walls fail prematurely.
What’s the right slope away from the house?
Aim for 1.5–2% fall away from structures on patios and landings. We confirm at multiple points with a level or laser. Consistent slope moves water safely, protecting foundations and keeping surfaces drier after storms.
Can stone be installed in winter?
It’s limited. Frozen soils and moisture swings make compaction unreliable. We prefer shoulder seasons for excavation and base work. If winter work is necessary, we adapt with protection, but final setting typically waits for stable weather.
How do stone features tie into lawn and beds?
We align patio and walkway elevations with sod and bed edges. Clean borders allow easy mowing and trimming, while planting beds absorb runoff and soften the look. The result is a cohesive yard that’s beautiful and low-maintenance.
Conclusion and Next Steps
Put drainage, base, and edge control on paper before you dig. Then build to spec with documented compaction and slope checks. This sequence delivers stone features that look intentional on day one and keep performing through Ontario winters—without surprise repairs.
Here’s what to remember—and what to do next to move from idea to installation.
- Key takeaways: Design water paths, hit compaction targets, and lock edges. Verify with measurements, not guesses.
- Action steps: Book an on-site review, align on a materials list, and set your build sequence on a calendar.
- Local help: Our Mississauga team coordinates design, excavation, and finishing with maintenance in mind.
Ready to plan your project? Book a discovery session in Mississauga and we’ll map a buildable plan tailored to your yard.
For additional homeowner context on preparation, you can scan a concise hardscaping checklist, a brief note on planning patios or walkways, and a step outline of landscape construction. While approaches vary by region, the planning themes are consistent: drainage, base, and sequencing.