Garden shed planning and installation tips are the step-by-step methods to design, site, permit, and build a durable, weather-tight backyard storage structure. In Mississauga near 100 Matheson Blvd E unit 202, HR Greenroots Landscaping integrates shed foundations, drainage, access, and landscaping so your shed is strong on day one and easy to maintain.
By HR Greenroots Landscaping • Last updated: 2026-05-23
Quick Summary
A successful garden shed starts with accurate planning: confirm bylaws and utility locates, choose a flat, well-drained site, build a compacted gravel base, and integrate access paths and gutters. HR Greenroots designs and installs sheds that stay level, dry, and organized—then ties the structure into the overall landscape for long-term usability.
Here’s what you’ll learn in this complete, practical guide:
- How to choose the right location, foundation, and drainage plan
- When permits, setbacks, and inspections apply in Mississauga
- Step-by-step base prep and installation sequencing (with pro tips)
- Foundation options compared: gravel pads, slabs, pavers, helical piles
- Ways to connect walkways, fencing, sod, and garden beds for a polished finish
- Maintenance habits that keep your shed level and dry through Ontario seasons
What Is Garden Shed Planning?
Garden shed planning is the upfront process of siting, permitting, and designing the structure, base, and drainage before installation. It ensures your shed meets local rules, avoids underground utilities, sheds water, and integrates with paths, fencing, and planting—so it lasts longer and works better day to day.
When we say “planning,” we mean defining placement, access, clearances, foundation type, water management, and interior layout before any digging. Good planning prevents avoidable problems like door binding, pooling water, frost heave, and awkward circulation.
- Siting: Choose a flat, reachable spot with sun/wind considered; allow future maintenance access on all sides.
- Compliance: Verify setbacks, height limits, and accessory building definitions; secure permits if required.
- Foundation: Decide between compacted gravel pad, concrete slab, patio slabs on base, or helical piles.
- Drainage: Aim for 1–2% slope away from structure; add gutters and splash blocks or extensions.
- Integration: Plan paths, edging, sod, and beds so the shed feels built-in, not dropped-in.
- Interior layout: Map shelving, hooks, and mower clearances to avoid cramped circulation.
In our experience across Mississauga and the GTA, clear decisions in these six areas reduce callbacks and keep the space reliable through freeze–thaw cycles.
Why Shed Planning and Installation Matter
Proper shed planning and installation prevent rot, frost heave, door misalignment, and water damage. By getting the base, drainage, and siting right, you protect tools and materials, reduce maintenance, and extend the structure’s life—especially through Ontario’s freeze–thaw and heavy rain events.
Here’s why this matters for homeowners and property managers:
- Longevity: A compacted, well-drained base resists frost heave and keeps walls plumb.
- Dry storage: Gutters and swales move roof runoff away, preventing splashback and mold.
- Daily use: Correct door swing clearances, a level threshold, and non-slip paths make access effortless.
- Compliance: Proper setbacks and heights avoid fines and rework.
- Resale and curb appeal: Integrated paths, edging, and planting look intentional and elevate value.
We’ve found that small misses—like skipping landscape fabric under a gravel pad or placing the shed in a low spot—create chronic moisture and settlement issues. Plan first; the rest builds on that foundation.
How a Shed Project Works (From Consultation to Walkthrough)
A successful shed project follows a clear sequence: site assessment, locating utilities, confirming bylaws, selecting a foundation, prepping the base, assembling the structure, adding drainage and paths, then final cleanup. This order minimizes rework and protects your lawn and hardscapes.
- On-site assessment: We verify access widths, grades, soil conditions, and staging areas.
- Utility locates: Request locates before digging. In Ontario, contact the province’s locate service well in advance.
- Bylaw check: Confirm setbacks, coverage, height, and any permit triggers for accessory buildings.
- Foundation selection: Choose compacted gravel, concrete slab, pavers on base, or helical piles based on soil and load.
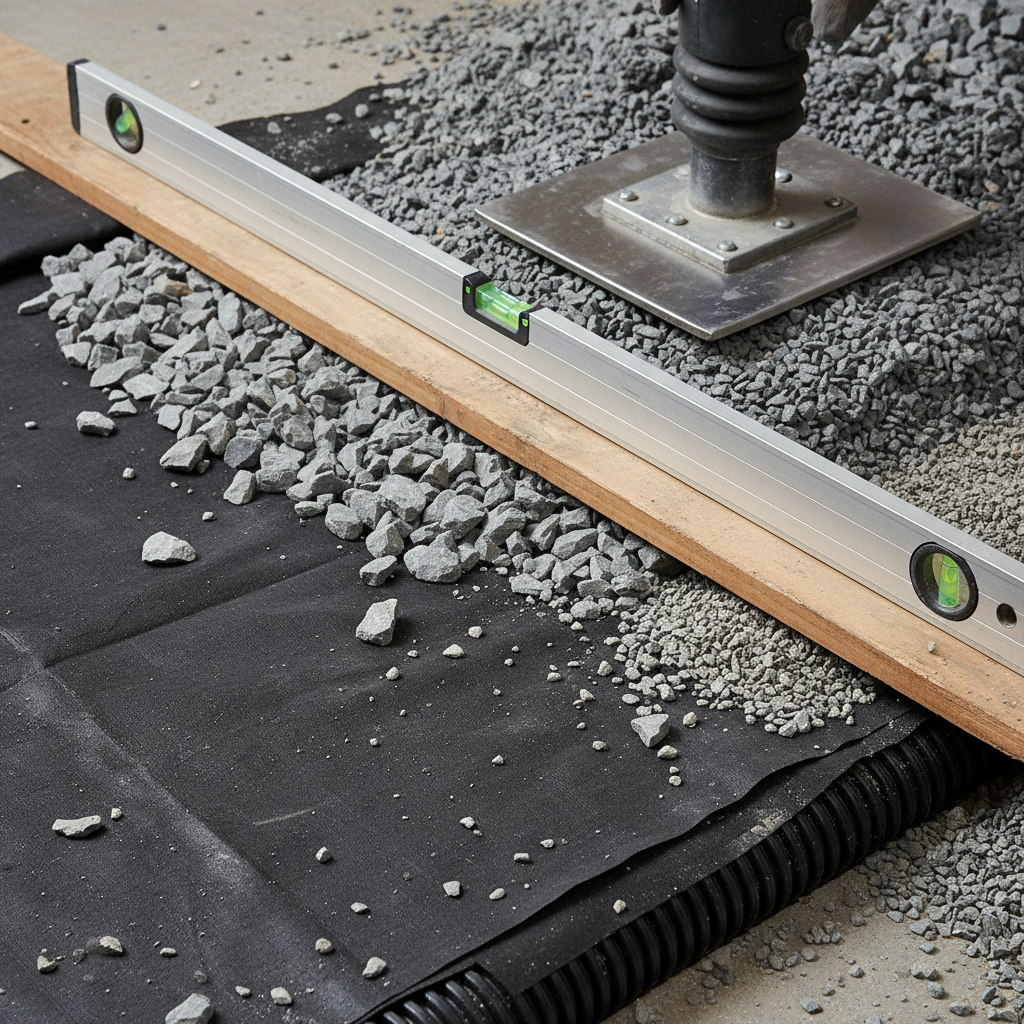
- Base preparation: Excavate to depth, install geotextile, place 3/4" clear stone, and compact in 2–3 lifts.
- Assembly: Build or install shed per manufacturer specs; keep frame square and sheathing tight.
- Drainage controls: Add gutters, downspouts to splash blocks or extensions, and grade soil away at 1–2%.
- Integration: Install access paths, edging, and sod or mulch; tie into fence gates and storage zones.
- Quality checks: Confirm door operation, slope, fastener integrity, and paint/stain touch-ups.
- Walkthrough: Review care tips, seasonal checks, and any optional upgrades (shelving, hangers, lighting).
Sequencing this way avoids tracking mud through finished lawns and ensures the base is perfectly set before walls go up.
Types of Shed Foundations (Compared)
Choose a foundation based on soil, load, and drainage. In most yards, a compacted gravel pad with 3/4" clear stone and geotextile offers excellent drainage and frost resistance. Slabs suit heavy loads; pavers work for lighter sheds; helical piles excel on poor soils or slopes.
Foundation Best for Depth/Specs Pros Watch-outs Compacted gravel pad Most residential sheds 4–8 in compacted 3/4" clear stone over geotextile; 1–2% slope Great drainage; frost-friendly; fast install; easy to adjust Needs proper edging; must compact in lifts; control weeds Concrete slab Heavy machinery or workshop loads 4 in slab with wire mesh/rebar; isolation joint; vapor barrier Rigid, flat floor; rodent-resistant; easy to roll loads More prep; needs precise drainage plan; harder to modify Pavers on base Small sheds; DIY-friendly 4–6 in base, 1 in bedding layer; polymeric joint sand Attractive; easy repairs; matches walkways Must maintain joints; edge restraint critical Helical piles Poor soils; slopes; flood-prone areas Engineered depth; galvanized brackets; beams on centers Minimal excavation; stable in wet soils Requires specialized installer; upfront planningWe often recommend gravel pads for Ontario yards because they balance performance, speed, and cost of ownership. When clients need workshop-grade floors or expect heavy rolling loads, a slab becomes the right call.
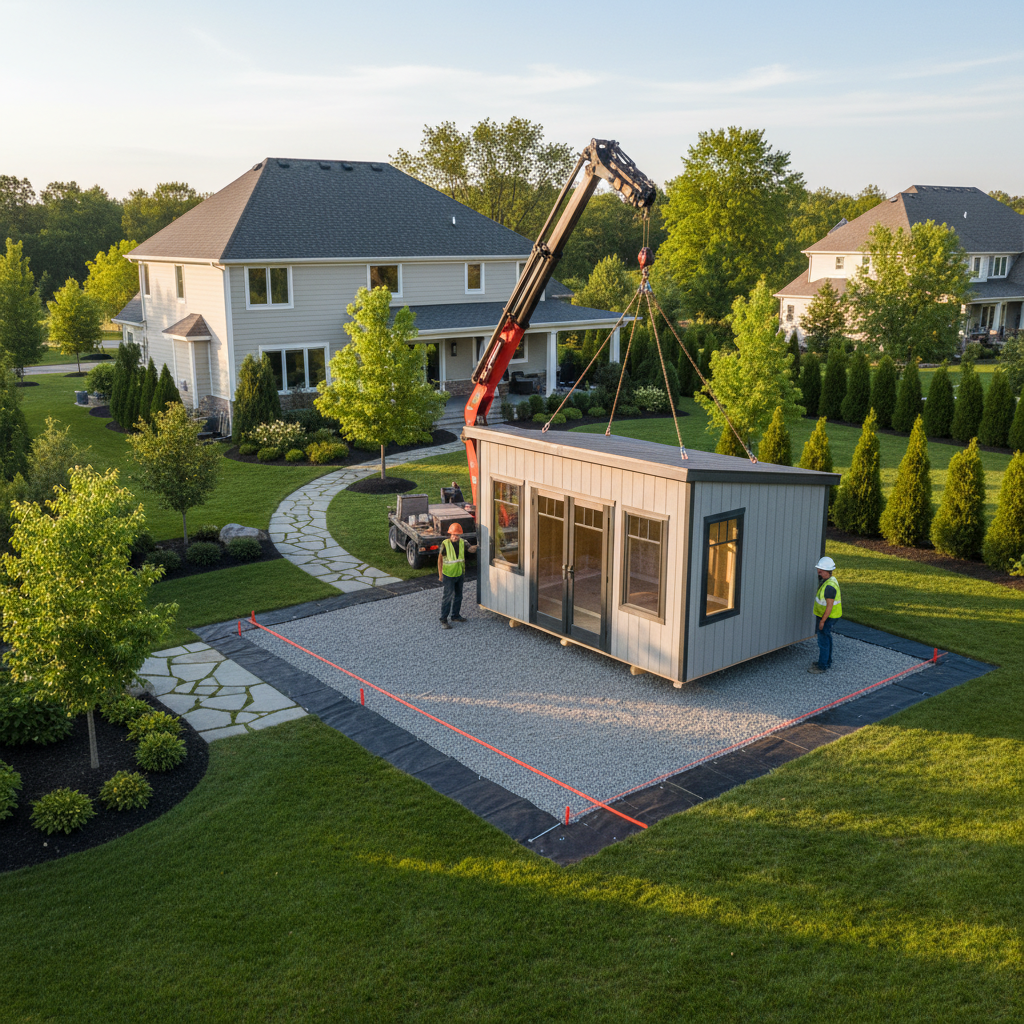
Step-by-Step Shed Installation (Pro Sequence)
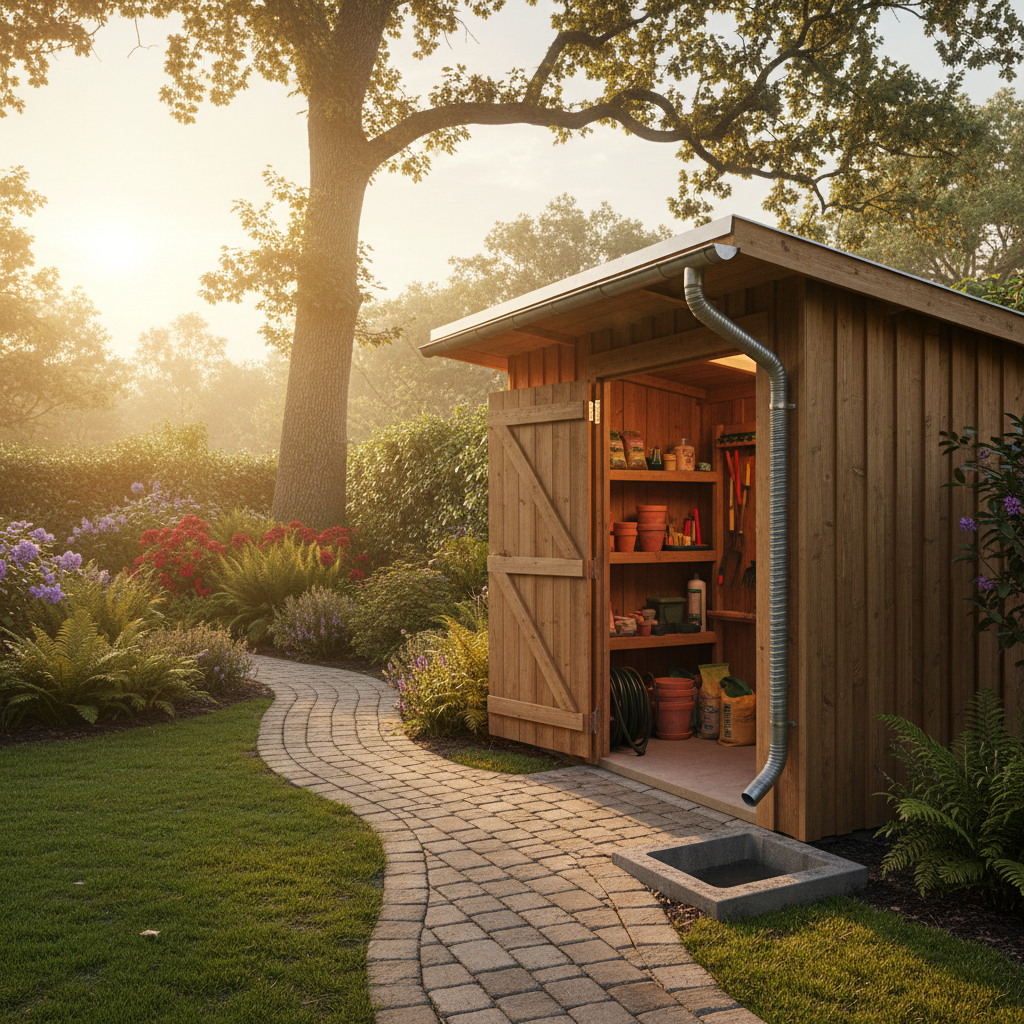
Build your shed on a stable, drained platform. Excavate, install geotextile, compact 3/4" clear stone in lifts, screed level with 1–2% fall, set the shed square, then add gutters and a path. Finish with edging, sod or mulch, and a clean, safe threshold.
Base preparation
- Mark footprint with stakes and string; measure diagonals to confirm square.
- Excavate organic/topsoil to firm subgrade; typically 6–10 inches depending on soil.
- Lay geotextile fabric to separate soil from aggregate and resist pumping.
- Place 3/4" clear stone; compact in 2–3 lifts to achieve dense, level support.
- Screed top 1–2 inches to a consistent plane with slight fall away from shed walls.
- Install edge restraint (treated timber, aluminum, or stone) to contain the base.
Structure assembly
- Follow manufacturer’s order: floor frame, walls, roof trusses, sheathing, shingles/metal.
- Anchor to base per spec (sleeve anchors for slab; ground anchors or plates for gravel pads).
- Flash transitions and seal penetrations; install drip edge along eaves.
- Hang doors true; confirm 1/8–3/16 inch reveals and smooth latch action.
Drainage and access
- Add gutters and downspouts; direct to splash blocks or extensions away from the pad.
- Grade surrounding soils to 1–2% away; add a shallow swale if needed.
- Build a non-slip path (pavers on base) to the door; keep threshold flush or add a small ramp.
Keep fasteners corrosion-resistant, especially at ground contact. Stainless or hot-dip galvanized hardware outlasts standard coatings in wet zones.
Local Rules, Permits, and Utility Locates
Before building, verify Mississauga’s accessory building rules and request utility locates. Setbacks, height, and coverage determine where your shed can go, while locates prevent dangerous underground strikes. Confirm timelines early so the project stays on schedule.
Compliance in Mississauga and across the Regional Municipality of Peel hinges on two checks: local zoning/permit requirements and utility locates. Both should be handled before excavation or base prep.
- Utility locates: Request locates well ahead of excavation to mark gas, electric, telecom, and water. It’s a safety step that protects crews and property.
- Setbacks and coverage: Typical rear/side yard setbacks for accessory buildings vary; verify minimum distances and lot coverage limits.
- Height limits: Many municipalities cap shed height; check ridge height and number of stories.
- Permit triggers: Some sheds need permits based on size, services (power, plumbing), or closeness to other structures.
For local permitting guidance, see the City’s building permit resources. For safe digging, the 811 family of services and provincial one-call centers provide standardized locate processes.
Local considerations for Mississauga
- Plan deliveries and staging to avoid peak traffic near 100 Matheson Blvd E; narrow access points are common around business parks and nearby campuses like EPIC College of Technology.
- Schedule base prep when frost is out of the ground and soils are workable; spring thaw and fall rains demand extra drainage attention.
- Wind exposure off open areas (e.g., around Saigon Park) can drive rain under doors; add weatherstripping and a modest overhang.
Best Practices That Prevent Problems
The best practices are simple: build on compacted stone over geotextile, keep a 1–2% slope, add gutters, and integrate a solid path. Flash and seal joints, set doors true, and finish with clean edging. These steps stop water, heave, and wear before they start.
Base and drainage
- Use non-fines aggregate (3/4" clear stone) to drain; avoid limestone screenings under sheds prone to frost.
- Compact in 2–3 lifts to achieve density; a vibrating plate tamper improves interlock.
- Maintain a 1–2% fall away from walls; verify with a 4-foot level and shimmed straightedge.
- Install gutters with downspouts to splash blocks or extensions 2–4 feet from the base.
Structure details
- Prime/seal end grain on trim; maintain 6–8 inches of clearance from grade to siding.
- Choose roofing with underlayment and drip edge; vent the roof to reduce condensation.
- Specify stainless or hot-dip galvanized fasteners at exposed locations.
Usability and integration
- Create a non-slip paver path at least 36 inches wide; widen to 48 inches for mower clearance.
- Add interior shelving at 16 inches depth and wall hooks set 16 inches on center for studs.
- Edge with stone, steel, or aluminum to keep mulch/sod lines crisp and low-maintenance.
Small details—like a flush threshold or a 1-inch polymeric sand-set paver apron—make daily access smoother and reduce tripping hazards.
Tools and Materials Checklist
For most sheds, you’ll need marking tools, excavation gear, geotextile, 3/4" clear stone, a plate tamper, straightedge/level, anchors, gutters, and edging. Prestage materials and verify access widths so deliveries don’t damage existing lawns or walkways.
- Layout: Stakes, mason’s string, tape measure, builder’s level or laser.
- Excavation: Spade, trenching shovel, wheelbarrow, tarps for soil, or a compact loader where access allows.
- Base: Geotextile, 3/4" clear stone, plate compactor, aluminum edge restraint, spikes.
- Framing/assembly: Impact driver, circular saw, square, clamps, corrosion-resistant fasteners.
- Water control: Gutters, downspouts, splash blocks, drain extensions.
- Finishing: Pavers, polymeric sand, aluminum/steel edging, sod or mulch, seed for disturbed areas.
- Safety: Work gloves, eye/ear protection, dust mask, and lifting aids for panels.
Staging matters. Keep aggregates on plywood or a clean driveway to avoid rutting turf, and tarp soil to speed cleanup.
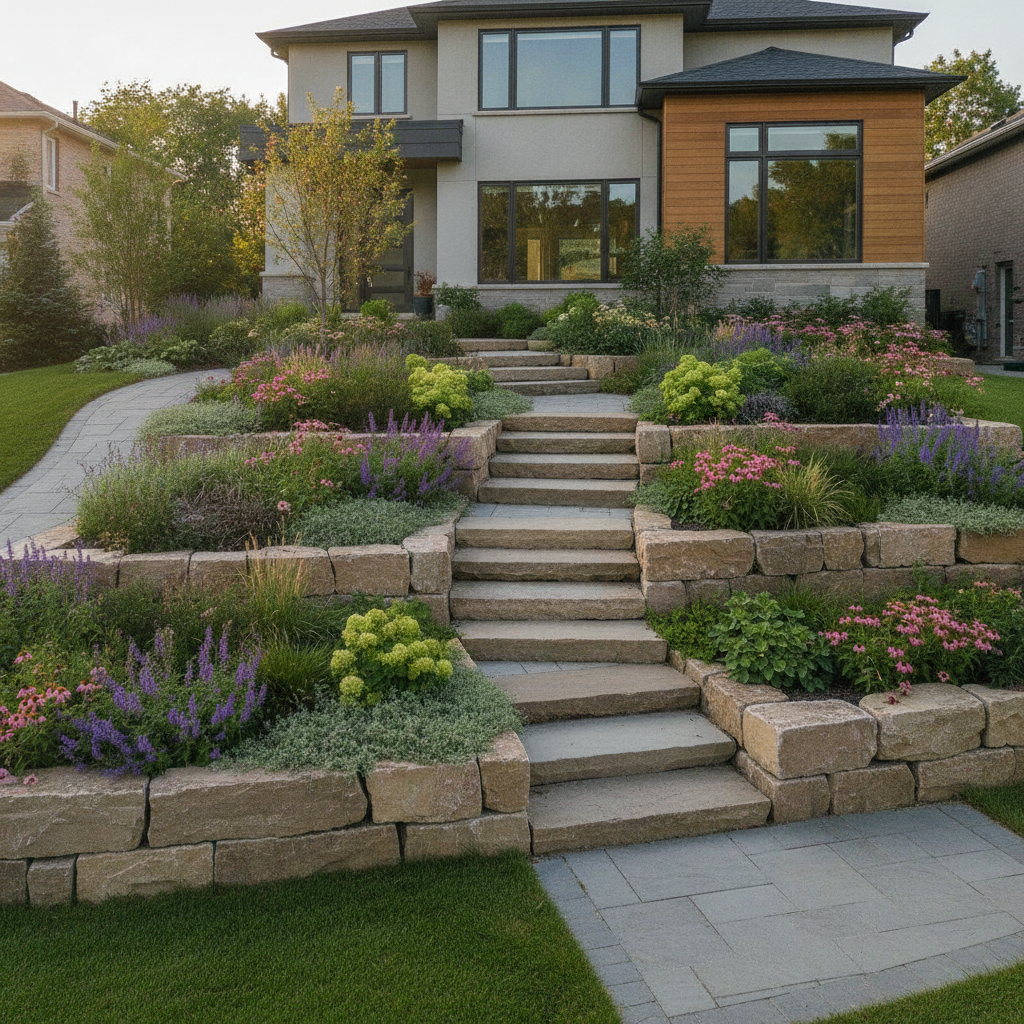
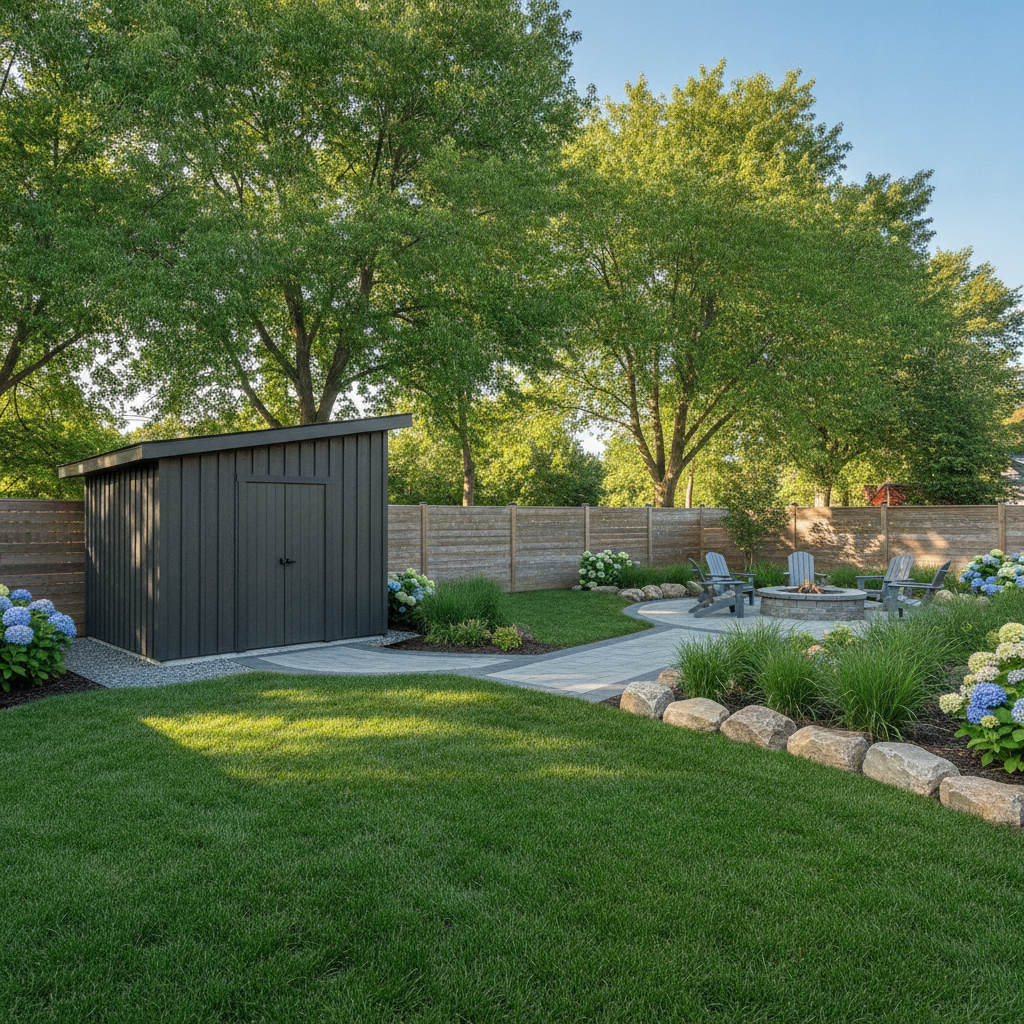
Integrating the Shed with Your Landscape
Tie the shed into your yard with a defined path, edging, and planting. Blend materials with your driveway, walkways, or patio, and align sightlines and fence gates. Integration makes the shed look intentional, improves circulation, and simplifies mowing and maintenance.
HR Greenroots is a full design–build team, so we coordinate the shed layout with related upgrades. That might include sod replacement, a new interlocking walkway, or a privacy fence segment to screen bins and equipment.
- Paths: Match pavers to existing patios or walkways; keep joints tight and edges restrained.
- Fencing: Align sheds with gate swings; maintain proper clearances for snow shoveling and mower turns.
- Sod and beds: Re-establish lawn edges, add breathable mulch, and choose hardy, low-maintenance plantings.
- Retaining walls: Where grades drop, use small wall segments or armour stone to terrace and hold soils.
- Drainage features: Add a swale or river rock trench to move water away from the base.
When projects combine sheds with hardscape refreshes, the whole space works better—movement is clearer, maintenance is lower, and storage stays dry and accessible.
Mini Case Studies: Mississauga + GTA
Real projects show the difference planning makes. Across Mississauga and the GTA, we’ve installed sheds on compacted stone pads, added matching paver paths, and tied drainage to downspouts—eliminating puddling and door sticking while improving day-to-day usability.
Corner shed with mower path (Mississauga)
- Challenge: Low corner collected water; doors stuck each spring.
- Plan: Relocated footprint 4 feet to higher ground; added 6 inches of 3/4" clear stone over geotextile.
- Result: Doors swing freely; paver path (42 inches) now handles mower and bin traffic.
Storage shed on narrow side yard (Etobicoke)
- Challenge: Tight access for panels and aggregates.
- Plan: Staged stone on plywood runners; wheelbarrowed in lifts; compacted each 2 inches.
- Result: No turf damage; a crisp aluminum-edged base with downspout extension keeps the side yard dry.
Workshop-ready slab (Brampton)
- Challenge: Heavy benchtop tools and rolling tool chests required a flat, rigid floor.
- Plan: 4-inch reinforced slab with isolation joint and vapor barrier; exterior swale diverted runoff.
- Result: Stable work surface in all seasons; clean roll-in access from driveway pavers.
These are common scenarios across the Regional Municipality of Peel. The constants are well-compacted bases, clean edge control, and water directed away from thresholds.
Maintenance and Longevity
Annual checks keep sheds dry and true: clean gutters, confirm slope and door alignment, top up stone at edges, and re-seal exposed wood. A few seasonal habits protect the base from ruts and keep storage safe through freeze–thaw cycles.
- Spring: Clear debris from gutters; inspect for frost heave or settlement and re-level pavers if needed.
- Summer: Re-seal end grain; check paint or stain; adjust door hardware if sun movement changed reveals.
- Fall: Extend downspouts before heavy rains; top up river rock/splash blocks as needed.
- Winter: Keep snow piles off shed walls; maintain a safe path with traction grit (avoid salt near metal).
Plan for a quick refresh every 2–3 years: top up polymeric sand on paver aprons, adjust edging spikes, and re-tension gate hinges near shed corners.
Common Mistakes to Avoid
Avoid low spots, thin bases, and missing gutters. Skipping geotextile, compacting poorly, or ignoring setbacks leads to rutting, puddles, and compliance headaches. Good planning removes these risks and keeps your shed dry, square, and accessible year-round.
- Placing the shed in a natural sump; always raise or relocate to higher ground.
- Using fines-rich base material that traps water and freezes solid.
- Skipping edge restraint so bases spread and thresholds sink.
- Forgetting a path, forcing muddy shortcuts that damage lawns.
- Neglecting downspouts, which splash and saturate the base.
- Overlooking setbacks and height limits until a neighbor complains.
The fix is straightforward: confirm rules, choose drainage-first foundations, and integrate the shed with the yard’s movement patterns.
DIY vs. Hiring a Pro
DIY works for small sheds on easy sites if you can excavate, compact, and assemble precisely. Hire a pro when access is tight, grades are complex, soils stay wet, or you need integrated paths, fencing, or retaining walls coordinated with the shed install.
- DIY-suitable: Small footprints, dry soils, simple access, and time to compact in lifts and set true.
- Pro-recommended: Steep or wet lots, large sheds, heavy loads, or projects combining interlock, sod, and fencing.
- Hybrid: We prep the base and paths; you handle kit assembly and interior organization.
Our team often pairs shed work with sod replacement, paver walkways, or fence adjustments so the storage zone functions like a small outdoor room.
How HR Greenroots Can Help (Services & Next Steps)
We plan, build, and integrate sheds end to end—site checks, base prep, assembly, drainage, and finishing. As a full landscape design–build team, we also add walkways, fencing, sod, and stone work so the shed looks built-in and stays easy to maintain.
If you’re considering a shed as part of a broader landscape upgrade, start here:
- Explore our Garden Shed service for planning and installation.
- Read our landscape design and build overview to align the shed with your whole yard.
Soft CTA: Want a site-specific plan? Book a quick on-site assessment in Mississauga so we can confirm access, locates, and base options before you buy materials or a kit.
FAQ: Garden Shed Planning and Installation
Shed FAQs cover size limits, base depth, drainage, and paths. Most sheds perform best on compacted 3/4" clear stone over geotextile with gutters and a paver path. Verify setbacks, request utility locates, and plan access widths before ordering a kit.
Do I need a permit for a shed in Mississauga?
Permits depend on size, height, and whether you add services like electricity. Always check Mississauga’s accessory building rules, confirm setbacks, and request utility locates before digging. When in doubt, ask the City to avoid rework.
What is the best base material for a shed in Ontario?
For most yards, a compacted base of 3/4" clear stone over geotextile works best. It drains well and tolerates freeze–thaw cycles. Concrete slabs suit heavy workshop loads. Choose based on soil, load, and drainage needs.
How far should a shed be from fences and property lines?
Setbacks vary by municipality and lot type. Many rear and side yards require a minimum distance; confirm your exact numbers with the City. Leave space to maintain siding and gutters on all sides.
Should I add gutters to a small shed?
Yes. Even small roof areas shed surprising water in storms. Gutters with downspouts to splash blocks or extensions prevent splashback, protect the base, and reduce rot and mold risks.
How wide should the path to my shed be?
Aim for at least 36 inches for wheelbarrows and bins. If you store a mower or snowblower, 42–48 inches improves clearance. Build the path on a compacted base and restrain edges to prevent spreading.
Key Takeaways
Plan first, dig second. Confirm rules and locates, choose a drainage-first base, and integrate paths and gutters. HR Greenroots plans and installs sheds across Mississauga and the GTA, delivering level, dry, and easy-to-use storage that stands up to Ontario weather.
- Confirm bylaws, setbacks, and utility locates before excavation.
- Use geotextile and compacted 3/4" clear stone with 1–2% fall.
- Add gutters, splash blocks, and a non-slip path for daily use.
- Integrate edging, sod, and beds for durability and curb appeal.