Driveway widening ideas for narrow lots include paver extensions, ribbon strips, permeable shoulders, and compact turning pads that respect setbacks and drainage. From our Mississauga base at 100 Matheson Blvd E unit 202, HR Greenroots Landscaping designs and builds code-aware driveway extensions that add parking, protect grading, and keep curb appeal strong.
By HR Greenroots Landscaping • Last updated: June 5, 2026
Overview: narrow-lot driveway upgrades
Narrow-lot driveway upgrades focus on reclaiming hard-to-use side yards and setbacks with engineered extensions. The best solutions mix interlocking pavers, proper base prep, and edge restraints to add width without harming drainage or roots. The result is safer parking, fewer lawn ruts, and better day-to-day circulation.
You’re here because parking feels tight. In this complete guide, we’ll show you practical options that fit narrow properties—what works, where it fits code, and how to build it to last in Ontario’s freeze-thaw climate.
- What driveway widening is and how it works
- Why it matters for safety, drainage, and usability
- 12 proven methods for tight sites
- Step-by-step build sequence we use on projects
- Best practices for base prep, grading, and edging
- Local tips for Mississauga and the Regional Municipality of Peel
- Real examples from HR Greenroots Landscaping installs
What is driveway widening?
Driveway widening is the controlled addition of legal, durable hardscape area beside an existing drive to improve access and parking. It often uses interlocking pavers over a compacted base, set at proper slope, and finished with edge restraints to protect lawns, trees, and drainage routes.
In simple terms, you’re adding usable shoulder space. On narrow lots, we rely on modular pavers, reinforced gravel, and crisp edging to expand width where cars track and doors open—without undermining the main driveway.
- Common working widths: 18–24 inches for door swing comfort; 36–60 inches for true side-by-side parking.
- Typical slopes: 1–2% away from structures for runoff control; transitions are feathered to avoid trip lips.
- Base depth targets: 6–12 inches of compacted aggregate (more on clay or for heavier vehicles).
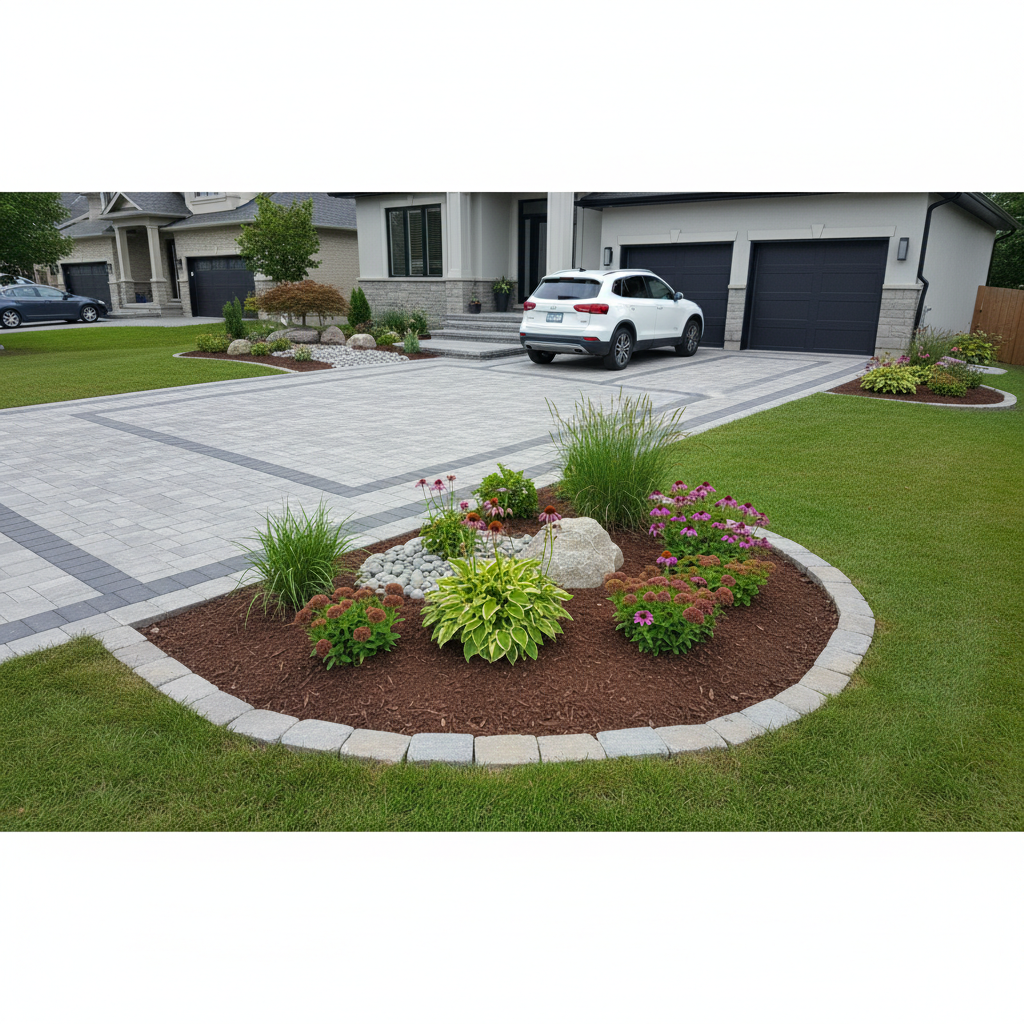
Our landscape design team pairs the hardscape with turf repair, mulch, and planting adjustments so the finished edge looks intentional—not like an afterthought.
Why driveway widening matters
Widening a driveway on a narrow lot improves safety, reduces lawn damage, and shortens daily parking choreography. Built right, it protects drainage patterns and foundations, prevents rutting, and keeps curb appeal intact across seasons.
Here’s the thing: tight parking routines add stress. A 9–10 foot single-lane is common, but many SUVs need 14–16 feet to open doors comfortably next to landscaping or a fence. Smart widening relieves daily friction while preserving trees, utilities, and sightlines.
- Safety: Wider shoulders reduce door dings and slip hazards at icy edges.
- Lawn health: Eliminating tire ruts stops soil compaction and patchy grass.
- Winter function: Clear edge definition speeds snow shoveling and reduces heave at the boundary.
- Property value: Neat, durable hardscape framing boosts first impressions.
Because we manage design, build, and seasonal maintenance, HR Greenroots ensures the widened area stays functional after the first winter—not just on day one.
How driveway widening works (the process)
The widening process maps utilities and setbacks, sets a drainage-friendly grade, builds a compacted aggregate base, and installs pavers with edge restraints. The final step blends lawns, beds, and borders so the new shoulder reads as one cohesive system.
We follow a field-tested sequence to protect your home and shorten disruption.
- Site evaluation: Locate utilities, note door swings, slope, and tree roots. Photograph pre-conditions.
- Design and layout: Define target width, tie-ins, and elevation points; plan 1–2% slope away from structures.
- Excavation: Remove sod/soil to base depth. On clay, we often deepen the base for stability.
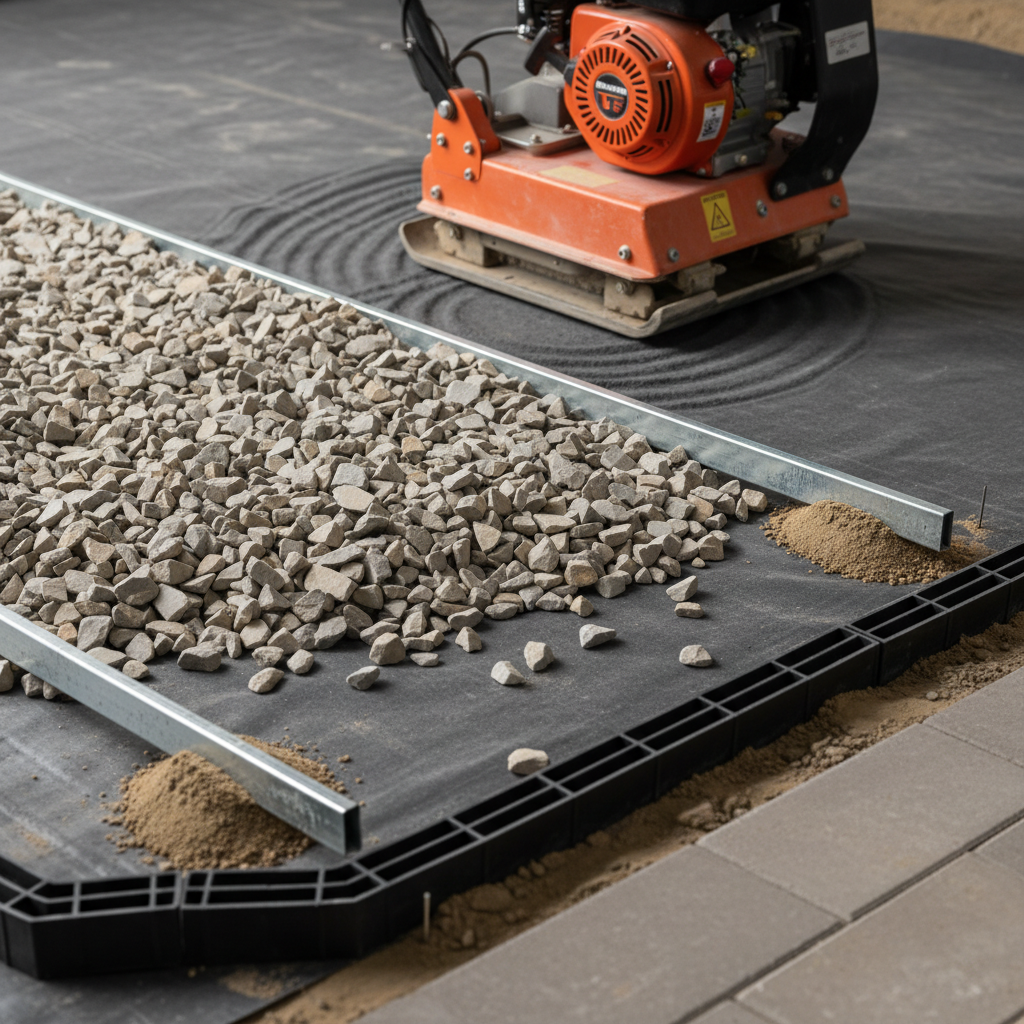
- Geotextile and base: Place fabric, add layered crushed stone (3/4-inch minus), compact to refusal in 2–3 inch lifts.
- Screed and pavers: Set screed rails, place bedding sand (about 1 inch), install pavers in a locking pattern.
- Edge restraints: Pin aluminum or concrete edge to stop creep; install soldier or sailor rows where appropriate.
- Compaction and jointing: Plate-compact with a pad; sweep in polymeric sand; activate per product instructions.
- Blending and cleanup: Reseed or sod edges, refresh mulch, and adjust irrigation heads if present.
Done right, the widened shoulder sheds water predictably and resists freeze-thaw cycles. Our crews document compaction passes and capture final grades so maintenance is easier next season.
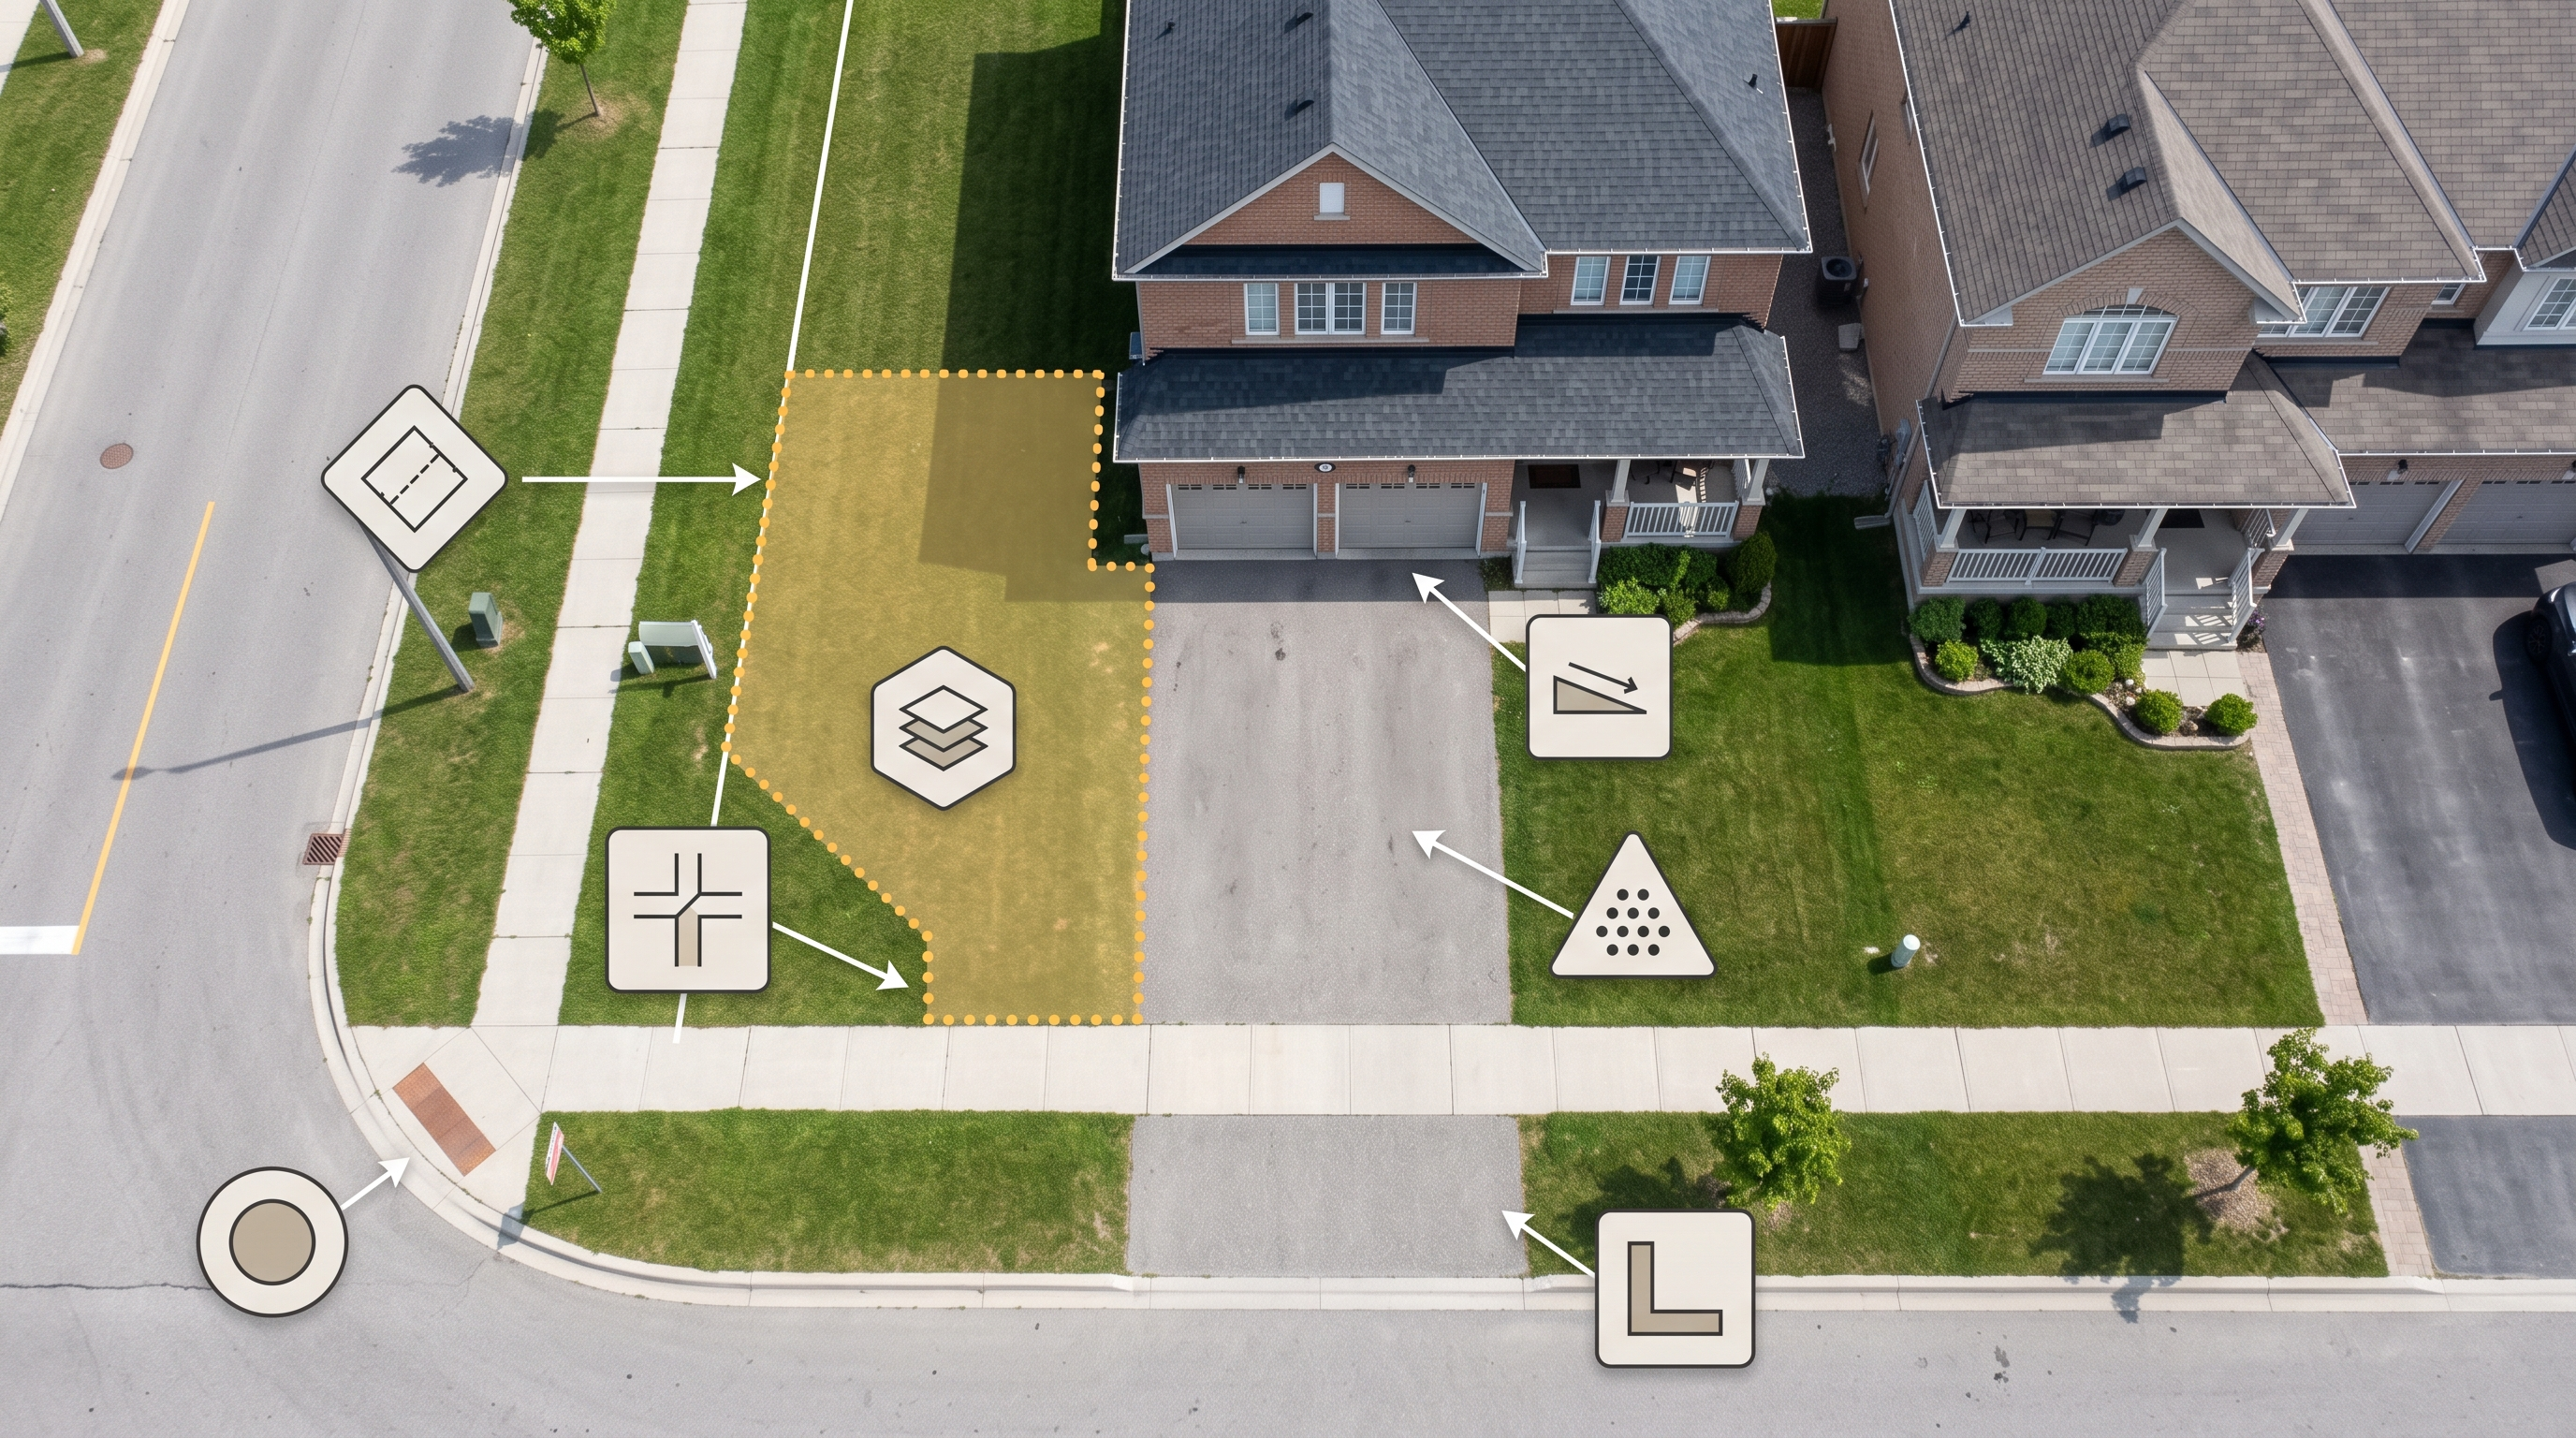
Driveway widening ideas for narrow lots: 12 strategies that work
On narrow lots, the best widening ideas combine slim footprints with strong bases and tidy edging. Options include paver shoulders, ribbon strips, permeable grids, reinforced gravel, retaining edges, and compact turn pads that solve door swing and rutting without fighting setbacks.
Hardscape-first options
- Interlocking paver shoulder: A 24–48 inch band using modular pavers to match or complement the main drive. Ideal for everyday door swing clearance.
- Ribbon wheel strips: Two 18–24 inch paver or concrete bands with turf between. Reduces impervious area and preserves green look.
- Permeable pavers: Open-joint units over clean stone for infiltration. Useful near trees or where runoff needs relief.
- Concrete edge band: A monolithic curb or band that protects asphalt edges. Simple, but less flexible for root zones.
- Stone curb with pavers: Armour-stone or precast curbs paired with pavers to create a durable, elevated boundary.
Gravel and grid systems
- Reinforced gravel (stabilizer grid): Honeycomb or rigid grid under angular gravel. Limits rutting; great where aesthetic is informal.
- Grass paver grid: Turf reinforcement units that carry vehicle loads while remaining green. Works for occasional parking pads.
- Granular shoulder rebuild: For minor width needs, rebuild the first 12–18 inches with compacted aggregate and a tight edging.
Layout tweaks
- Flare at the street: Add a short funnel-shaped flare (2–3 feet each side) to make turning in easier without widening the whole drive.
- Compact turn pad: A 6–8 foot square of pavers near the house for quick three-point turns or a bike bay.
- Setback-smart jogs: Step the shoulder in 12–18 inch segments to respect utilities, trees, or side-yard rules.
- Integrated walkway: Combine the shoulder with a walkway to the door so one build solves two paths.
Many of these are perfect candidates for our driveway extension service, which pairs base prep excellence with clean edge control for longevity.
Which method fits your lot? (Quick comparison)
Choose paver shoulders for daily use and clean aesthetics, grids for informal look with drainage, and permeable pavers where runoff relief or tree health matters. Flared entries and compact pads improve maneuvering without full-width changes.
Approach Setback fit Drainage impact Build time Maintenance Paver shoulder (24–48") Good on most narrow sides Controlled with 1–2% slope Short Low (sweep, re-sand) Permeable pavers Great near trees High infiltration Medium Medium (vacuuming) Reinforced gravel grid Flexible around roots Moderate infiltration Short Medium (rake, top-up) Ribbon strips Excellent in tight codes Lower impervious area Short Low Flared entry At apron only Neutral Short LowIf you’re unsure, we can evaluate setbacks, trees, and utilities during an on-site consultation and recommend the right build-up for your soil and traffic.
Best practices for long-lasting results
Durable widening projects rely on soil-aware base depths, lift-by-lift compaction, and crisp edge restraints. Maintain 1–2% slope away from structures, protect root zones, and finish with polymeric sand and a winter-ready joint profile.
- Base depth by soil: 6–8 inches on well-draining soils; 10–12 inches on clay or for frequent truck loads.
- Compaction targets: Compact in 2–3 inch lifts until refusal; don’t exceed lift thickness.
- Edge integrity: Use pinned aluminum or concrete curbs; soldier/sailor rows for visual finish.
- Water management: Keep surface grades falling away from foundations and channel meltwater to safe outlets.
- Winter detailing: Aim for flush transitions to avoid plow catches and heaving at seams.
- Turf recovery: Replace or repair sod along the new edge; mulch beds to prevent splash and weeds.
We apply the same rigor across interlocking driveways, walkways, and patios. For a deeper design perspective, see our landscape design and build guide.
Tools and resources we trust
A professional widening build uses utility locates, compactors, geotextiles, graded aggregate, edge restraints, and polymeric jointing. The right tools speed production and make compaction, alignment, and drainage consistent from end to end.
- Site prep: Utility locate tickets, chalk/paint, string lines, laser level.
- Excavation: Shovels, mini-skid or excavator, wheelbarrows, spoil management.
- Base building: Non-woven geotextile, 3/4-inch minus aggregate, plate compactor with pad, hand tamper.
- Install: Screed rails, aluminum edge restraints, spikes, polymeric sand, broom, leaf blower, hose.
- Finishing: Sod knives, topsoil, sod/seed, mulch, pruning tools to refine bed lines.
For a broad overview of interlocking driveway pros and cons in Ontario conditions, this interlocking driveway overview offers useful context.
Local considerations for Mississauga
- Plan staging and access around class times near Lambton College to limit driveway downtime and maintain neighborhood flow.
- Freeze-thaw cycles peak mid-winter. Schedule base work spring through fall so compaction and curing happen in stable weather.
- Our design-build team at 100 Matheson Blvd E coordinates grading with fencing and sod so the finished edge stays neat after the first melt.
Step-by-step field checklist (what we do on site)
Field success comes from repeatable checks: confirm utilities, set benchmarks, validate slopes, compact in lifts, pin edges, and blend landscaping. A disciplined checklist cuts rework and keeps the widened shoulder tight for years.
- Mark utilities and root zones; mark door swing arcs with tape to validate width.
- Set slope markers at 1–2% away from structures; verify with a level and laser.
- Excavate to design depth; proof-roll subgrade and undercut any pumping spots.
- Install geotextile; place and compact aggregate in 2–3 inch lifts to plan depth.
- Set screed rails; screed bedding layer; lay pavers in a locking pattern.
- Pin edge restraints every 8–12 inches; add a soldier course where desired.
- Compact with a pad; sweep in polymeric sand; activate as specified.
- Blend lawn edges with sod; refresh mulch; micro-adjust bed shapes for symmetry.
We document each stage with photos and measurements so you know exactly how the base was built—helpful for future maintenance planning.
Integrate widening with the rest of your landscape
Treat the new shoulder as part of a system: align bed lines, adjust irrigation, reinforce slopes, and add privacy where cars track. Integration turns a functional upgrade into a curb-appeal win.
- Bed reshaping: Echo paver geometry in mulch bed arcs for visual cohesion.
- Privacy and safety: Use low hedging or fencing to guide foot traffic and protect plantings.
- Slope control: Add mini retaining features or armour stone where grades drop more than 6 inches.
- Lawn refresh: New sod along the edge removes rut scars fast.
Explore our driveway extension ideas and how they pair with seasonal maintenance planning for neat edges year-round.
Case studies: Mississauga narrow-lot examples
Three quick scenarios show how different sites benefit: a paver shoulder for daily parking comfort, a permeable grid near a tree line, and a compact turn pad at a tight garage entry. All use disciplined base prep and clean edging.
1) Door-swing relief on a 32-foot frontage
A homeowner near Saigon Park had a 10-foot asphalt lane and constant door conflicts. We added a 36 inch interlocking paver shoulder with aluminum edge restraint, compacted 10 inches of aggregate, and blended new sod. Parking maneuver time dropped noticeably, and winter shoveling got simpler.
2) Tree-sensitive widening by a side fence
Along a mature maple, we used a permeable paver grid over clean stone to protect roots. The 24 inch shoulder handles occasional tire loads while letting water infiltrate. A light soldier course keeps gravel migration in check.
3) Compact turn pad at the garage
At a tight garage throat, we installed a 7-by-7 foot paver pad. The square lets a mid-size SUV realign without backing into the street. We coordinated a small retaining edge to hold grade, then tuned bed lines for a crisp approach.
These approaches align with our landscaping services in Mississauga and our focus on strong base preparation and grading.

Codes, permits, and constraints (read this first)
Before building, confirm setbacks, driveway coverage limits, curb cut rules, and tree protection. Many narrow-lot solutions succeed without a full-width change by using shoulders, flares, or permeable systems that respect impervious-area thresholds.
Each city sets coverage and approach rules. While we don’t quote bylaws here, our Mississauga team designs shoulder solutions that navigate typical constraints like distance from property lines, front-yard coverage caps, and public tree protection. Where rules require, we coordinate drawings and any permit submissions.
- Setbacks: Verify side-yard and front-yard distances before layout.
- Impervious cover: Consider permeable options to ease coverage calculations.
- Trees and utilities: Use root-friendly bases and avoid utility conflicts.
- Apron and curb: Flared entries may need approval; we design within allowed widths.
For a general, step-by-step sense of paver installation, this interlocking patio guide outlines a process similar to driveway shoulder builds.
Maintenance and winter care
Post-build, keep joints topped, edges pinned, and transitions flush. In winter, shovel early, avoid aggressive steel blades on fresh installs, and watch melt paths to protect plantings.
- Quarterly scan: Inspect edges and joints; sweep in polymeric sand if needed.
- Drainage check: After heavy rain, confirm water moves away from structures and doesn’t pond.
- Snow strategy: Mark edges before storms; use rubber-blade shovels or lift plow shoes.
- Spring tune-up: Light re-leveling of any settled units and a quick mulch refresh keeps the edge looking new.
Our crews can bundle shoulder tune-ups with seasonal maintenance so the widened area stays tight year after year.
When to choose each idea (decision guide)
Match the idea to your constraints: pick paver shoulders for daily use, permeable grids near trees or tight coverage limits, ribbon strips for minimal look, and flares/pads for maneuvering gains without full-width changes.
- Daily parking comfort: Paver shoulder 24–48 inches wide.
- Root and runoff sensitivity: Permeable pavers or reinforced gravel grid.
- Visual lightness: Ribbon strips with turf center.
- Driveway approach issues: Flared entry and/or compact turn pad.
Need a second opinion? Our driveway extensions team can assess soil, slope, and codes to finalize the best-fit approach.
Thinking about a shoulder add-on?
A 30-minute on-site assessment clarifies width targets, base depths, and edging choices. We align widening with your landscape so everything looks intentional and drains right.
Get a cohesive plan that covers grading, interlocking, sod repair, and edging. Book a design-build consultation with HR Greenroots Landscaping to turn tight parking into smooth daily use.
Frequently asked questions
Homeowners ask about width, drainage, and winter performance. Here are direct answers you can act on now, tailored for narrow-lot driveways.
How wide should a driveway extension be on a narrow lot?
For door swing comfort, 18–24 inches helps. For side-by-side parking or car seats, plan 36–60 inches. Confirm setbacks and utilities first, then design 1–2% slope away from structures with solid edge restraints.
What’s the best material for widening—pavers, concrete, or gravel?
Interlocking pavers deliver the best blend of durability, repairability, and curb appeal. Permeable pavers help near trees or where coverage is tight. Reinforced gravel works for informal looks. Concrete bands are simple but less flexible around roots.
Will widening affect drainage or my foundation?
Not if it’s graded correctly. Maintain 1–2% fall away from structures, use compacted base, and integrate downspout routes. Permeable pavers can add infiltration. We verify slopes and transitions during installation.
Can I widen without replacing my entire driveway?
Yes. Shoulder additions with pavers, grids, or ribbon strips add functional width without touching the main lane. Proper base prep, edge restraint, and a flush transition are the keys to long-term performance.
Key takeaways
On narrow lots, small, well-built changes deliver big daily wins. Focus on base depth, compaction, slope, and crisp edges; choose a method that fits your constraints and integrates with your landscape.
- Interlocking shoulders are the go-to for daily parking comfort.
- Permeable options help near trees and with coverage limits.
- Flares and pads improve maneuvering without full-width changes.
- Finish with sod and mulch so everything looks intentional.
Ready to plan your project? Start with our practical slope correction guide and explore our design-build approach to connect parking upgrades with the rest of your yard.