
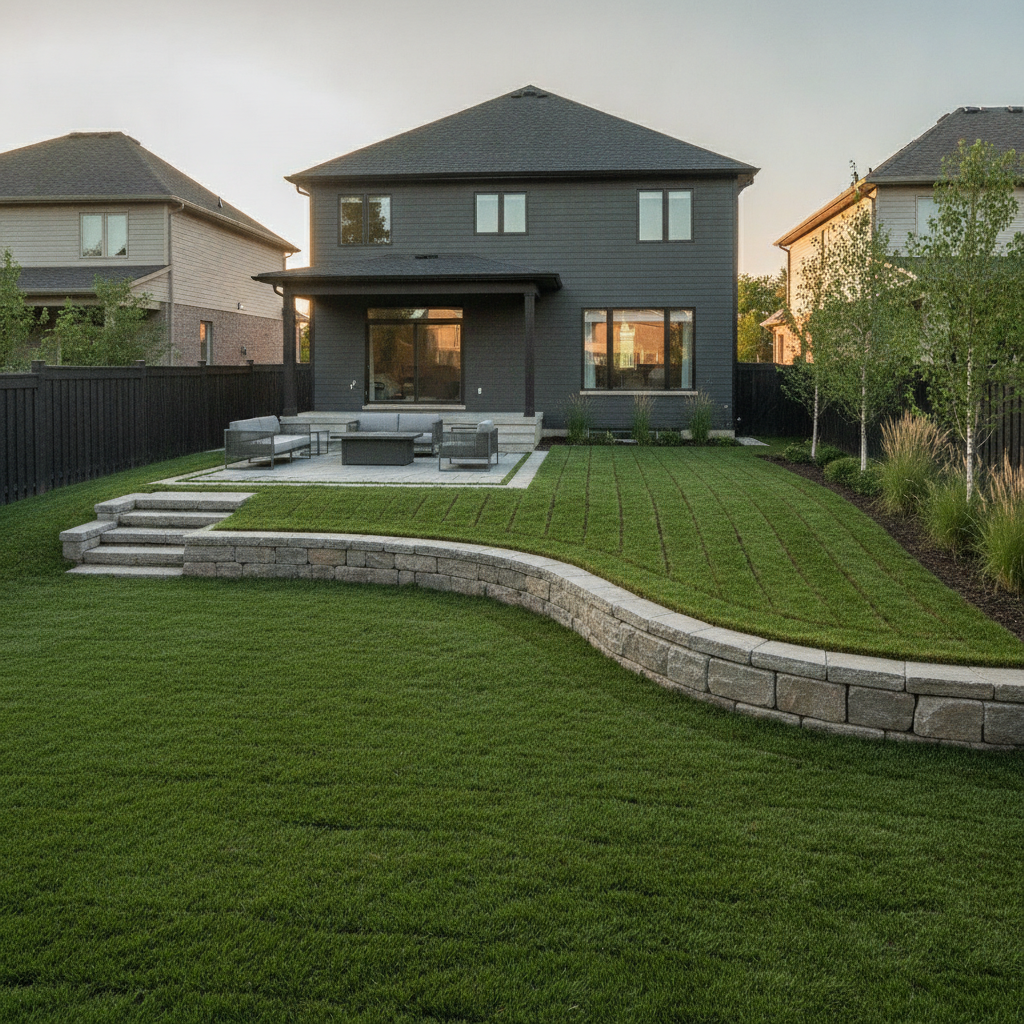
Slope correction for backyard spaces is the focused reshaping of grade, drainage, and support so water leaves the house and your yard becomes safe and usable. In Mississauga’s clay soils and freeze–thaw cycles, we match the fix to severity: regrade light slopes, step moderate runs with interlocking, and retain steep drops with engineered walls.
Quick answer: Backyard slope correction blends regrading, sub-surface drainage, and (when needed) retaining walls to push water away from your foundation and create level terraces or paths. In Mississauga, regrade gentle areas, combine steps and drains on moderate grades, and use a properly reinforced wall for large elevation changes.By HR Greenroots Landscaping • Last updated: 2026-07-13
Every spring we’re called to the same scene across central Mississauga: a basement window well sitting in a puddle, squishy grass two weeks after rain, and pavers that creep downhill. That’s not “just a wet season.” It’s grade, soil, and drainage working against you. Here’s exactly how we fix it—no guesswork, no patch jobs.
- At a glance
- What slope correction means
- Measure your slope
- Pick the right method
- Prepare the site
- Execute and lock in grade
- Troubleshooting
- Prerequisites
- FAQ
Local pro tip from Mississauga
After a heavy storm, record a 60–90 second video of runoff paths. Around Saigon Park and near EPIC College of Technology, shallow topsoil over compacted fill slows infiltration—runoff races to swales fast. That clip helps us place drains and outlets precisely the first time.
Quick Summary
Slope correction organizes water and stabilizes soil so surfaces stay level. In practice, we regrade gentle areas, step moderate grades with interlocking and drains, and use engineered retaining walls for steep sections. Strong base prep, non‑woven geotextile over clay, and positive discharge separate long‑lasting fixes from short‑term band-aids.
- We take a stance: If your yard drops ~8–12 inches over 20 feet (≈3–5%), regrading may work. Steeper than that? Plan steps or a wall.
- One integrated plan: Grading, drains, pavers, walls, and sod are designed to work together, not fight each other.
- Ontario-ready: Our details are built for freeze–thaw and Mississauga’s clay-heavy subsoils.
Quick Answer: What Slope Correction Actually Means for a Backyard
Slope correction means reshaping grade, adding drainage, and installing structural support where needed so water exits the property and surfaces remain safe. Done right, it creates a consistent fall away from the house and level terraces or paths, with lawns and beds that don’t slump or wash out.
We don’t “chase puddles.” We set a target slope, establish a compacted granular base where hardscapes live, separate clay from stone with non‑woven fabric, and finish with premium sod or mulch to lock the surface. Edges get mechanical restraint, not just soil packed against a border.
Step 1 — Measure Your Slope and Identify the Problem Type
Measure first, choose later. Map where water starts, where it stalls, and where it should exit. A quick level check and a storm‑day video tell us more than a month of guessing. Clay that holds water demands drains and separation; firm loam tolerates simpler regrades.
- How we measure: Use a laser or a 10‑ft straightedge. Note total drop across key routes (house to fence, patio to gate).
- What we look for: Downspouts dumping at corners; soft, dark soils that stay wet; pavers walking downhill; mower scalping high spots.
- What we see locally: Many Mississauga backyards show a steady 8–12 in fall over 20–25 ft. That’s regrade‑plus (steps or a low wall), not regrade‑only.
Local considerations for Mississauga
- Clay subsoil resists infiltration. Plan a positive outlet—street, swale, or a daylight point—not a “soakaway and hope.”
- Freeze–thaw lifts poorly compacted bases. We compact in cross‑hatch passes and keep lifts thin for uniform support.
- Micro‑swales near parks and campuses move neighbor runoff quickly; size your drains so you’re not their overflow.
Step 2 — Match the Slope Severity to the Right Fix (Regrading vs. Retaining Wall vs. Interlocking)
Pick the smallest fix that won’t fail. Gentle grades can be regraded; moderate runs should be stepped with interlocking and drains; steep drops need an engineered retaining wall. If your grade is ≥6% on a walking route, skip regrade‑only—build steps or a wall and do it once.
MethodBest forNon‑negotiablesOur finish RegradingSoft lawns, 1–5% fallCut/fill balance, compacted lifts, topsoil capPremium sod with tight seams, clean bed edges Interlocking + stepsDaily paths, 5–8% fallBase depth, edge restraints, catch basins/channel drainsStepped landings, polymeric joints, safe risers Retaining wallBreaks >8–10% or grade holdsDead‑level footing course, drain tile, geogrid, granular backfillTerraces with stairs, planters, lighting‑ready layout- Regrading pairs well with sod installation. Our crews scarify subgrade, compact in thin lifts, top up screened topsoil, and lay premium sod with cross‑rolled seams so the surface knits fast.
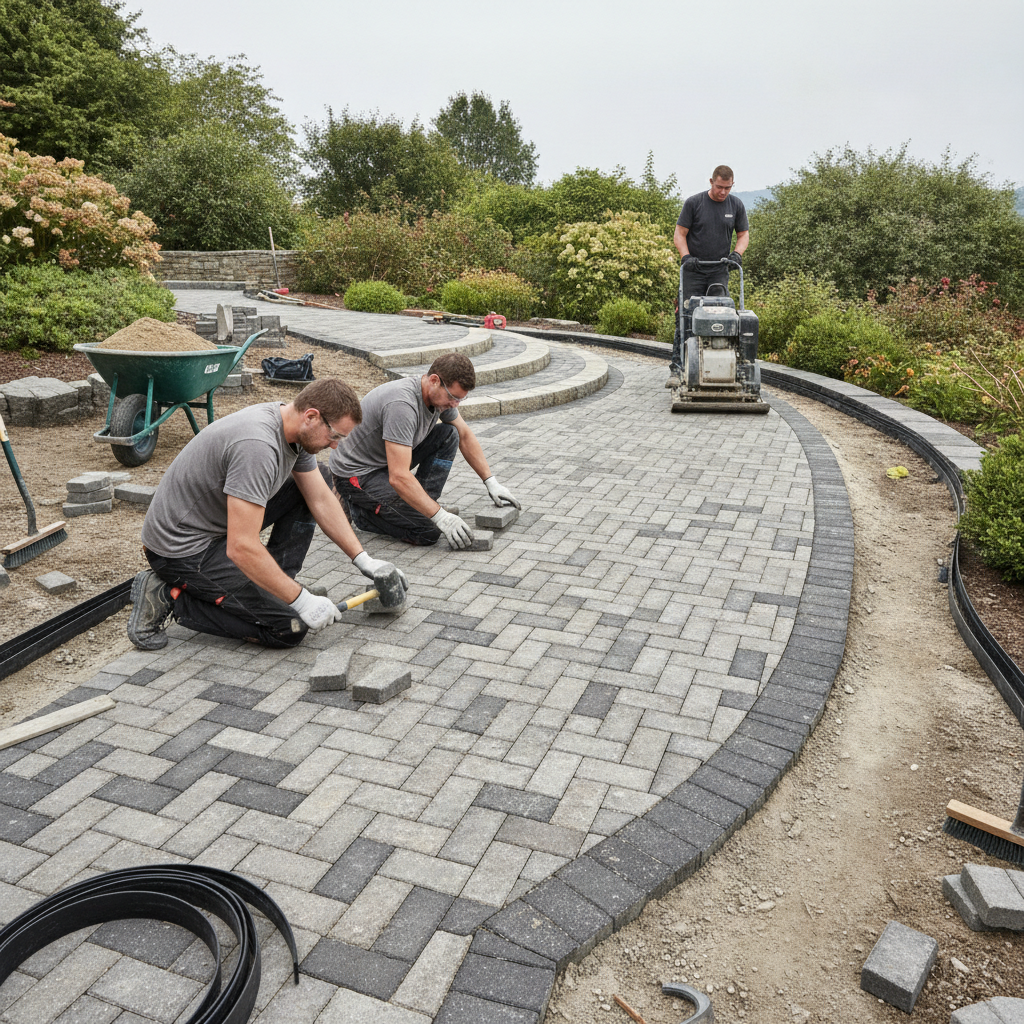
- Interlocking & pavers shine on slopes when we step the run into code‑compliant risers, use rigid edge restraints, and add drains at low points. For sequencing guidance, see our note on retaining wall or grading first.
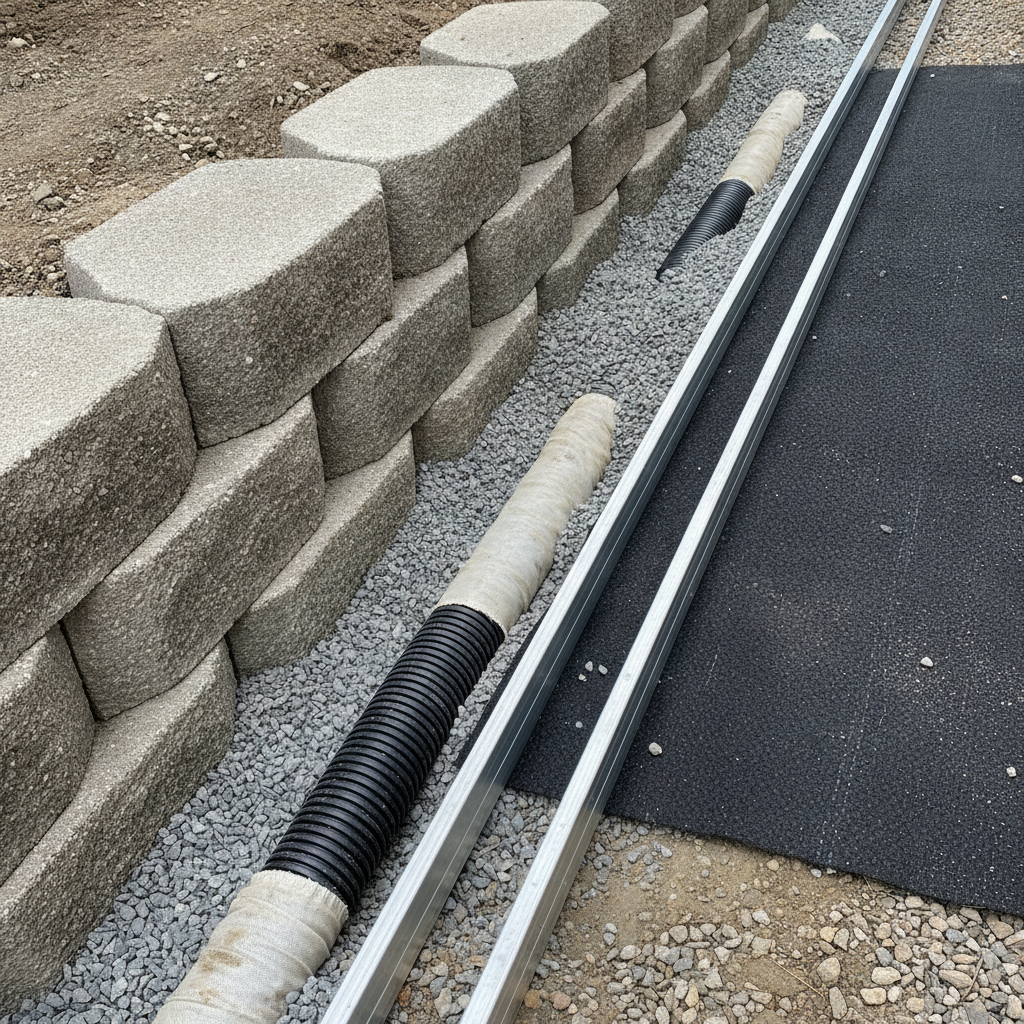
- Retaining walls are structural work. We don’t stack blocks on topsoil. We excavate to undisturbed native, set a level base course, place perforated drain with a sock behind the wall, use geogrid by spec, and backfill with clean stone—then cap with terraces you’ll actually use. Start planning with our retaining wall checklist or explore our retaining wall service.
Step 3 — Prepare the Site Before Any Correction Starts
Prep is where durability lives. Call locates, strip organics, separate clay from stone with non‑woven geotextile, and build a compacted granular base. Set subdrains behind walls and along low edges, and protect outlets from clogging. Good prep keeps grades steady through freeze–thaw.
- Utility locates: Always secure locates before digging. We stage materials to avoid re‑handling.
- Separation + base: Non‑woven fabric over clay; crushed stone compacted in thin, even lifts; screed rails for accurate elevations.
- Drainage: Perforated pipe with a sock in stone, sloped to daylight or a legal discharge; catch basins at pinch points.
- Edge control: Rigid restraints on pavers; clean transitions where sod meets hardscape; mulch to stabilize bare soil.
Step 4 — Execute the Correction and Lock In the Grade
Build from the ground up. For regrades, compact subgrade and topsoil to a steady fall away from structures, then sod. For pavers, step long runs, add drains, and lock edges. For walls, level the base course, add drain tile and geogrid, and backfill in lifts before finishing terraces.
- Regrading: Set a consistent 2–5% fall away from the house; cap with screened topsoil; install premium sod with staggered seams and a thorough first watering schedule.
- Interlocking: Step any run that would exceed safe traction; use polymeric sand after compaction; edge‑restraint everything. For field‑tested hardscape habits, see these practical contractor tips.
- Retaining walls: Level the footing course to the string; drain tile at heel; geogrid length and spacing per unit spec (we don’t guess); granular backfill compacted in lifts.
Troubleshooting: Why Slope Fixes Fail (and How to Avoid It)
Most failures trace to three misses: poor base, no drainage, and ignoring freeze–thaw. If pavers heave, the base is thin or unconfined. If a wall bulges, hydrostatic pressure or missing geogrid is the cause. Give water an exit, reinforce properly, and compact evenly.
- Heaving pavers: Rebuild with proper base depth, cross‑hatch compaction, and rigid edge restraints.
- Bulging walls: Add drain tile wrapped in stone and geogrid to manufacturer spacing. Re‑excavate to correct—there’s no shortcut here.
- Persistent puddles: You likely have negative slope or no outlet. Regrade and add a positive discharge—see this negative‑slope repair example.
- Wet bed edges: Downspouts dumping into gardens. Extend leaders to a basin or pop‑up emitter tied to a safe outlet.
Prerequisites Before You Start Any Slope Project
Confirm a legal discharge, review municipal grading rules, and plan access. Schedule utility locates, identify soil type, and choose materials rated for freeze–thaw. Map staging and protect existing finishes. A solid plan avoids mid‑project redesigns and keeps inspections smooth.
- Drainage plan: Identify where water will go—street, rear swale, or a daylight point. No outlet, no project.
- Municipal expectations: Many cities restrict altering lot drainage; verify your local requirements before moving soil.
- Integration: Tie grading to circulation and planting. For inspiration on terrace flow, browse terrace and path layouts and note how landings break long runs.
- Finish plan: Stabilize quickly: sod for coverage, mulch for bare soil, and crisp bed edging to hold lines.
Frequently Asked Questions
Most homeowners ask three things: Do I need a wall, where does the water go, and how do I maintain it? If your grade is steep, build steps or a wall; plan a legal outlet; and keep drains, downspouts, and edges clear to protect the work.
How do I decide between regrading and a retaining wall?
Measure the drop across the route you use. Gentle grades often succeed with regrading and sod. If you’re at 6% or more on a walking path—or you need to hold soil near structures—step the run or build a properly drained, reinforced wall. Do it once and it lasts.
What drainage belongs behind a backyard wall?
Place perforated drain tile with a fabric sock at the wall base, wrap it in clear stone, and connect to a positive outlet. Separate clay from stone with non‑woven fabric, and install geogrid at the lengths and layers the wall system specifies. That relieves pressure and keeps faces straight.
Can interlocking pavers work on a slope without becoming slippery?
Yes—when you break the run into steps or landings, use a compacted base, install rigid edge restraints, and add drains at low points. Texture and jointing help with traction, but structure does the heavy lifting: steps control speed and water.
How do I maintain new grades after sod, pavers, or a wall?
Keep downspouts tied to a discharge point, clear catch basins, top up mulch at bed edges, and refresh polymeric sand when joints open. Avoid heavy equipment on new terraces and lawns until the base settles. A 15‑minute seasonal check protects the investment.
Key takeaways
- Measure first; if it’s ≥6% on a route you walk, build steps or a wall.
- Prep matters most: separation, compaction, and real drainage.
- Finish fast with sod or mulch to stabilize and reduce erosion.
- One plan beats piecemeal fixes—grade, hardscape, and planting must align.
About HR Greenroots Landscaping: We’re a Mississauga design–build team focused on grading, interlocking, retaining walls, premium sod, clean edge control, and maintenance‑minded planning across the GTA. We build for Ontario’s climate so your yard looks intentional on day one—and stays that way.
- Measure slope with a laser or 10‑ft level; record storm flow on video.
- Plan a legal discharge to street, swale, or daylight; place outlets.
- Select the method: regrade (gentle), interlocking + steps (moderate), retaining wall (steep).
- Call utility locates; strip organics; install non‑woven geotextile over clay.
- Install subdrains and build a compacted granular base in thin lifts.
- Construct pavers/steps or a reinforced retaining wall with drain tile and geogrid.
- Finish with premium sod or mulch; add edge restraints and maintain drains seasonally.


