Outdoor living space planning is the disciplined process of mapping zones, circulation, planting structure, and durable materials so your yard fits daily life and local climate. In Mississauga and the GTA, HR Greenroots Landscaping designs, builds, and maintains patios, decks, fencing, sod, and stone features to deliver year-round function with low-maintenance care.
By HR Greenroots Landscaping • Last updated: 2026-05-08
Overview
This complete guide explains how to plan an outdoor living space that actually gets used. You’ll learn simple sizing rules, drainage and base prep essentials, smart material choices for Ontario weather, and planting layers that look good all year. Use it to turn ideas into a buildable, low-maintenance plan.
Done well, outdoor living planning connects what you do (eat, work, play) with how your property works (grade, sun, wind, access). You’ll see how we size patios and walkways, when to choose decks vs. pavers, and how structured planting and lighting make spaces feel finished from day one.
- Clear definitions and a practical framework you can follow
- Step-by-step process from site audit to build-ready drawings
- Ontario-ready best practices for base prep, grading, and drainage
- Pro tips for interlocking pavers, decks, sod, fencing, and stone work
- Three mini case examples drawn from Mississauga/GTA conditions
What is outdoor living space planning?
Outdoor living space planning is the upfront design of zones, circulation, grade, and materials that make patios, decks, planting, and structures work together. It aligns daily use-cases with site realities—drainage, sun, wind, and soil—so your yard performs comfortably and safely in all seasons.
At HR Greenroots Landscaping, we approach planning like a system: define uses, size zones, engineer bases, and then layer planting, lighting, and privacy. In our experience, yards with clear circulation paths see more consistent use—often jumping from once-a-week to several times per week once obstacles are removed.
Core components that determine success
- Zones with purpose: dining, lounging, cooking, play, storage, service paths.
- Circulation: 42–48 inch walkways let two people pass; 36 inch minimum for single-file comfort.
- Drainage and grading: a 2% surface slope (about 1/4 inch per foot) moves water without feeling tilted.
- Base preparation: compact in 2–3 inch lifts; more lifts reduce settlement and freeze–thaw heaving.
- Planting structure: 60–70% evergreen/shrubs for backbone; 30–40% perennials for seasonal color.
- Lighting and safety: steps at 6–7 inch risers, 10–12 inch treads; warm 2700–3000K lighting at 100–200 lumens for stairs.
The reality is simple: design clarity avoids costly mid-build changes. When we map these elements early, installation goes faster and the finished space is easier to maintain.
Why outdoor living planning matters in Mississauga and the GTA
Good plans multiply use and lifespan. In the GTA’s freeze–thaw climate, correct grading, base depth, and edge control prevent heaving and shifting. Right-sized zones and shade strategies boost comfort, so families use their patios and decks two to three times more each week.
Southern Ontario weather tests weak construction. Thin bases, missing edge restraints, or poor downspout control shorten hardscape life and create trip points. We prioritize compacted granular base, clean edge restraint, and a predictable 2% slope away from structures. Those three details alone reduce call-backs dramatically in our builds across Mississauga.
Local considerations for Mississauga
- Plan drainage paths and swales to handle spring melt; pair pavers with polymeric sand to lock joints after heavy rain.
- Design for shade on west-facing patios; a pergola or a deciduous tree can drop surface temperatures 10–20°F on hot afternoons.
- Follow local rules for decks, sheds, and fences before building; setbacks and height limits affect layout and material choices.
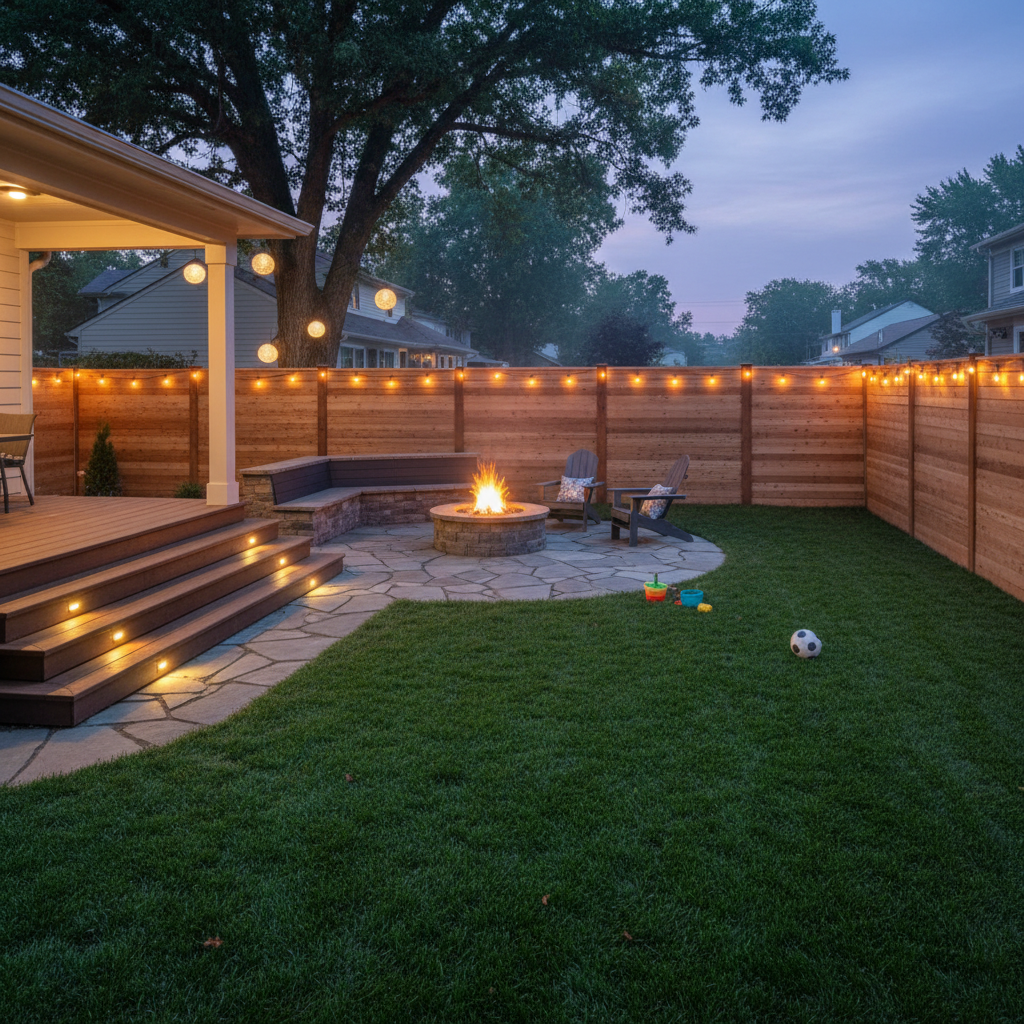
Privacy is another local driver. Six-foot privacy fencing or strategic evergreen screens near seating zones reduce wind and noise, making 15–20 minute sits turn into hour-long hangs. When people feel shielded, they stay longer.
How the planning process works (step-by-step)
Plan in nine moves: define use-cases, map zones, right-size spaces, engineer base, control water, select materials, layer planting, add lighting, and schedule maintenance. This sequence turns rough ideas into a build-ready plan with fewer changes during construction.
- Define use-cases: weekdays vs. weekends; seating for 4, 6, 8, or more. Quick stat: a dining set for six typically needs ~12×16 feet with 36 inches of push-back clearance.
- Map zones and paths: arrival, dining, lounge, cooking, play, storage, and service routes. Keep main paths 42–48 inches wide.
- Right-size key areas: grill zones work best with 36 inches of side clearance; lounge groupings feel natural at 8–10 feet across.
- Engineer the base: many on-grade paver patios use 6–10 inches of compacted base in lifts; more in weak soils or where vehicle loads are expected.
- Control water: set finished surfaces with a 2% slope away from structures; use downspout extensions, drains, or swales to move water to daylight.
- Select materials: interlocking pavers with edge restraint for patios and walks; pressure-treated or composite decking for elevated thresholds; armor stone for steps or seating edges.
- Layer planting: canopy/structure, understory, shrubs, perennials, groundcover; evergreen frames keep bones visible in winter.
- Light for safety and mood: 100–200 lumens on steps; 2700–3000K for warm color. Path lights at 10–14 feet spacing avoid glare.
- Plan maintenance: reset edges in spring, prune mid-summer, cut back in fall; top up polymeric sand as joints weather.
We like to sketch a bubble diagram first, then move to scale at 1 square = 1 foot. That shift uncovers conflicts—like a door swing clipping a chair—before any material is ordered. It saves time and rework during installation.

Approaches and materials that fit Ontario properties
Match the method to the site. Interlocking pavers suit on-grade patios and walkways; decks solve elevation changes; sod and garden beds add softness; retaining walls and armor stone manage slopes; fencing and screens add privacy and wind control.
Interlocking paver systems
- Best for: patios, walkways, and pool surrounds; modular and repairable.
- Build notes: compact base in 2–3 inch lifts, use edge restraint, keep joints 1/8–3/16 inch, and finish with polymeric sand.
- Performance metric: with proper base and drainage, paver surfaces maintain grade through winters with minimal lift or settlement.
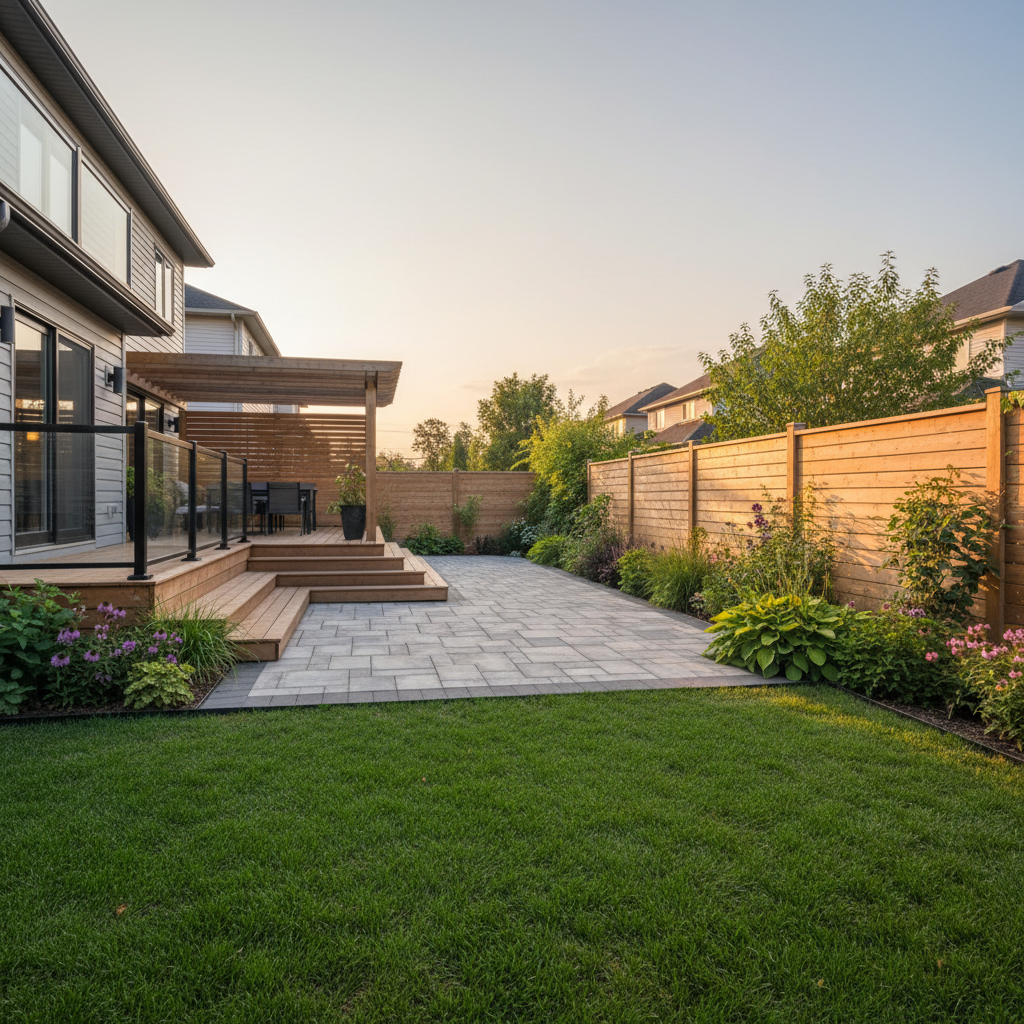
Deck builds
- Best for: elevated thresholds and rapid installs; ideal where the back door sits well above grade.
- Build notes: consistent 6–7 inch risers on stairs; guardrails as required; consider composite boards for low upkeep.
- Comfort tip: add a pergola or privacy screen to block wind and harsh sun at seating zones.
Sod and garden beds
- Best for: play space and visual relief between hard surfaces; clean edges increase curb appeal.
- Build notes: final grade should sit slightly below paver edges for crisp definition; lay sod on prepared, compacted topsoil.
- Upkeep metric: 2–3 inches of mulch annually suppresses weeds and stabilizes soil moisture.
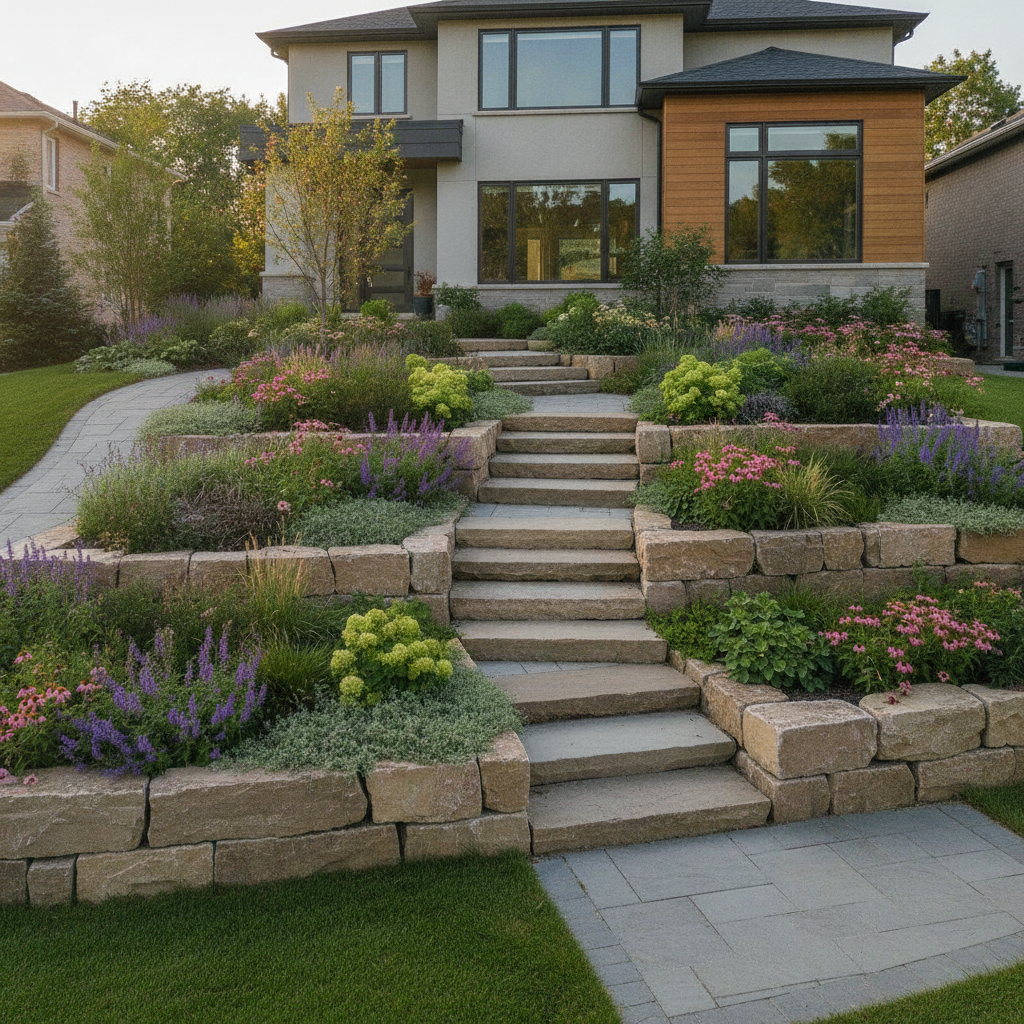
Retaining walls and armor stone
- Best for: holding slopes, creating level terraces, and forming durable seating edges.
- Build notes: proper base and drainage stone behind walls reduce hydrostatic pressure; step down walls naturally where grade falls.
- Design stat: two 15 inch terraces are easier to climb and maintain than a single 30 inch rise.
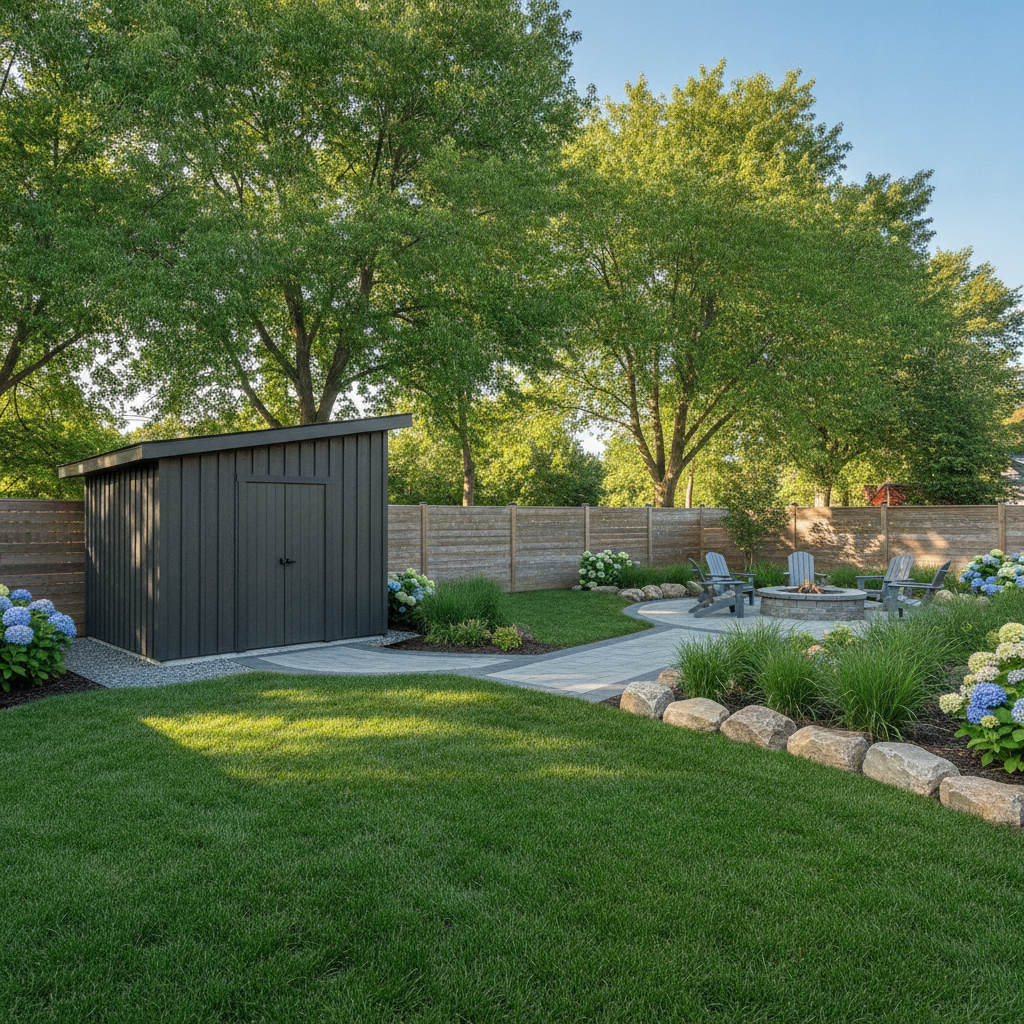
Privacy fencing and screens
- Best for: reducing noise, wind, and sightlines so spaces feel comfortable longer.
- Build notes: secure posts below frost depth; align top rails and panels for a clean, level look.
- Comfort metric: shielding prevailing wind can raise perceived temperature by several degrees in shoulder seasons.
Choosing the right approach is less about trends and more about fit. On-grade doors near kitchens often favor pavers; elevated great rooms frequently call for decks with broad stairs down to a paver lounge.
Best practices that pay off for years
Prioritize base prep, water control, and human-scale sizing. Compact in thin lifts, maintain a 2% slope away from structures, restrain pavers at edges, size walkways at 42–48 inches, and keep stair risers consistent. These details extend lifespan and make spaces feel effortless to use.
- Walkways: 42–48 inches for two-way passing; 36 inch minimum for single-file. Wider paths reduce shoulder bumps by half in tight yards.
- Dining: 36 inches around chairs for comfort; add 24 inches for serving paths at busy corners.
- Steps: 6–7 inch risers, 10–12 inch treads; even a 1/2 inch variation can catch toes.
- Edges: paver restraints limit creep; clean edges on sod and mulch improve mowing efficiency noticeably.
- Drainage: extend downspouts beyond hardscapes; use swales or drains to collect roof runoff and protect bases.
- Lighting: 2700–3000K color temperature is comfortable; use 100–200 lumens at steps and 200–400 lumens for task areas.
- Planting: aim for 60–70% evergreen/shrubs to keep structure visible November–March.
We often see projects fail on the small things: missing edge restraint, undersized patios, and walkways that pinch circulation. Fixing those three during planning eliminates most daily annoyances later.
Tools, templates, and resources
Start with a bubble diagram, then move to a scale plan. Use material calculators for base, pavers, and mulch. Build a seasonal maintenance calendar and a safety checklist for lighting, railings, and clearances. These tools reduce mid-build changes and keep upkeep predictable.
- Zone diagram: sketch circles for dining, lounge, play, and storage; connect them with 42–48 inch paths.
- Scale plan: 1 square = 1 foot helps catch door swings and furniture clearances before ordering materials.
- Material calculators: estimate paver square footage, base depth, and mulch volume so deliveries align with site access windows.
- Maintenance calendar: spring edge reset and hardscape wash; midsummer pruning; fall cutback and top-up mulch 2–3 inches.
- Safety checklist: GFCI-protected exterior outlets; grill 36 inch clearances; guardrails on elevated decks and stairs.
Regional design examples can spark ideas that fit your lot and lifestyle; review practical planning advice for patios and walkways from the Oshawa area to compare approaches and avoid missteps you might overlook at the sketch stage. For instance, see this concise guidance on planning a patio or walkway, broader landscape design ideas across the region, and a focused pool and patio homeowner guide that highlights common layout patterns.
Thinking about your own plan? Our Mississauga-based team handles design, base prep, installation, and maintenance planning under one roof. If you’re mapping zones or unsure about drainage, we can turn sketches into a buildable plan that lasts.
Mini case studies and layout examples
Small changes often unlock big gains. These GTA scenarios show how sizing, drainage, and privacy transform daily use—from rare weekend sits to multiple weeknight dinners—while keeping upkeep simple through spring melt and summer heat.
Small-lot upgrade near an on-grade door
A family wanted weeknight dinners outside. We set a 10×14 paver patio, added an L-bench, and reserved a 36 inch grill aisle. Circulation flowed along a 44 inch path. Result: the patio became a four-nights-per-week habit, with quicker cleanups and fewer chair collisions.
Solving a 30 inch slope with terraces
A yard dropped 30 inches across. Two 15 inch terraces with armor stone steps replaced one steep grade. A deck stair met the upper terrace; a lower paver lounge held a fire feature. Step lighting at 2700K made shoulder-season use comfortable and safe.
Privacy-first layout for longer stays
Street noise cut visits short. We added a six-foot privacy fence, a 12 foot pergola, and an 18 inch seat wall to block wind. Evergreens anchored the view; perennials filled seasonal gaps. Quiet hours stretched from 20 minutes to a full evening hangout—without extra maintenance.
Deck vs. paver patio vs. lawn: quick comparison
Choose by door height, drainage, and daily use. Decks meet elevated thresholds fast; pavers excel at on-grade dining and circulation; lawn and planting soften edges for play and visual relief. Many GTA yards combine all three for balanced function.
Feature Deck (elevated) Paver Patio (on-grade) Lawn + Beds Best use-case Door well above grade; fast access Dining, lounge, grill near on-grade doors Play, visual relief, drainage swales Drainage behavior Airflow under structure; manage downspouts 2% surface slope; permeable options available Absorbs runoff; needs defined edges Typical widths/clearances 4–6 ft stairs; 36 in grill clearance 42–48 in walks; 36 in chair push-back Edge 2–3 in below paver for crisp look Privacy options Screens, pergolas Fences, hedges, seat walls Evergreens, layered shrubs Maintenance rhythm Wash boards, inspect fasteners Top up polymeric sand; wash annually Mulch 2–3 in; seasonal pruningHow HR Greenroots Landscaping turns plans into reality
We integrate design, base preparation, installation, and maintenance planning under one roof. Our coordinated approach aligns grading, interlocking, decks, fencing, sod, and stone work so the finished space looks intentional on day one and stays practical through the seasons.
Our core services in Mississauga and across the GTA include sod installation; interlocking and pavers for patios, walkways, driveways, and pool surrounds; custom deck builds; privacy fencing; retaining walls and armor stone; garden shed planning and installation; driveway extensions; and cohesive landscape design with maintenance planning. One team. One plan. Clean execution.
- Design-build continuity: fewer handoffs reduce change orders and speed up installation.
- Base-first mindset: strong base prep and edge control extend surface life through winters.
- Maintenance planning: we map pruning, mulch top-ups, and joint sand refreshes so care stays simple.
Frequently asked questions
These quick answers cover sizing, materials, drainage, and whether to choose a deck or patio. Each response is based on our Mississauga/GTA projects and the realities of Ontario’s freeze–thaw cycles and busy family routines.
How big should a patio be for six people?
Plan roughly 12×16 feet for a table with six chairs, leaving about 36 inches for push-back and circulation. If you host larger groups often, expand one side by 2–4 feet to create a serving lane.
What’s the right walkway width?
Aim for 42–48 inches so two people can pass comfortably. In tight areas, 36 inches works for single file. Keep edges restrained and joints locked with polymeric sand to reduce shifting over time.
Do I need drainage under pavers?
Yes. Set a 2% slope away from structures and build a compacted granular base. Use downspout extensions or drains to move roof runoff past hardscapes, which limits freeze–thaw heaving and staining.
Deck or paver patio near the back door?
If the door sits well above grade, a deck meets the threshold cleanly and adds quick access. On-grade doors usually favor interlocking pavers for dining and lounge zones, with a path to lawn or garden beds.
Key takeaways
Size for people, build for weather, and plan for care. When zones, drainage, and base prep come first, outdoor spaces feel natural to use and hold their shape through Ontario’s seasons.
- Use 42–48 inch walkways and 36 inch chair clearances to prevent crowding.
- Maintain a 2% slope and strong edge control to reduce heaving and creep.
- Balance evergreens and perennials (about 60/40) for year-round structure.
- Choose decks for elevation, pavers for on-grade comfort, and lawn for relief.
- Document a simple maintenance calendar so the space stays sharp.
Conclusion
Outdoor living space planning ties your daily routines to durable construction. Get the base, drainage, and right-sizing correct, then layer shade, planting, and lighting. The result is a Mississauga-ready yard you’ll use more often and maintain with confidence.
If you want a coordinated plan that covers design, installation, and long-term care, our team at HR Greenroots Landscaping brings interlocking, decks, fencing, sod, retaining walls, stone work, sheds, and planting together—so everything fits, drains, and lasts.